slake instructions

Slake

Theme Instructions

need help setting up your theme? follow our simple steps outlined below to get your blog going!

if you’ve purchased add-on installation, all we need is a questionnaire filled out by you with the information we need to get started. once we’ve received it, your blog will be ready between 3 business days and 2 weeks, depending on complexity. we can let you know your estimated installation time based on your order. please make sure we have the correct email address for you.

Installation

STEP 1. after purchasing your theme, it will automatically download. go to your wordpress dashboard. if you have not yet installed wordpress, you need a hosting plan before setting up your site. in case you need more assistance with this, click here.

STEP 2. once you’re in your dashboard, go to themes under appearance in the menu.
appearance-themes

STEP 3. click add a new theme and then click upload theme.
install-themes

STEP 4. click upload theme. find the .zip file of your theme. our themes are child themes of the standard wordpress theme “twenty twelve”. this theme should be pre-installed, but if it’s not there, you will be prompted to download “twenty twelve” first.

+++ IF YOU DO NOT SEE YOUR THEME FOLDER (slake.zip) : select everything in the folder, right click and click compress items. you’ll then upload that folder.

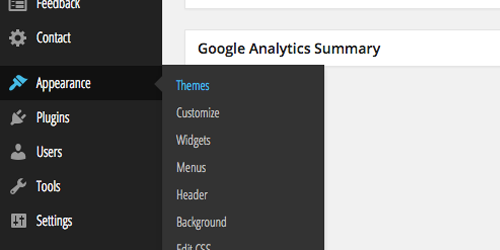
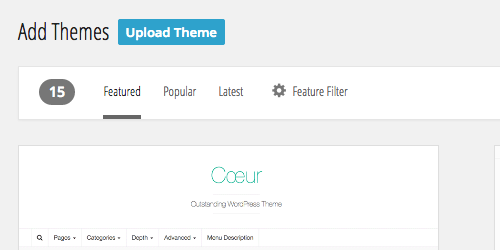
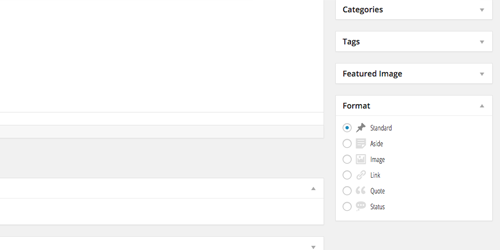
STEP 5. once the theme is installed, click to activate your theme. your theme is now active! you can now customize to your liking in the other appearance sections, arranging your widgets, modifying your menus.

Header Image

if you’d like to upload your own logo or header image, under customize, click site title & tagline and uncheck display header text. then go to header under appearance and simply upload your image. uncheck show header text with image here as well. a .png file with a transparent background is best.

your logo will automatically scale down to fit into the inset space for it.

if you would like your header to look like it does in the demo, simply type the name of your blog into the header section under customize.

to increase or decrease the size of your header, go to appearance and click on editor. click style.css and scroll to the bottom where you’ll see TO EDIT HEADER TEXT SIZE. change the font-size: ___ px; to a larger or smaller number until you’re satisfied with the size.

Social Icons

STEP 1. the social button set that comes with your site will have two versions of each .png file. one is normal state and one is hover state (when your mouse moves over it). to install your buttons, choose the amount of links you’d like to include – we recommend the same amount that is used in the demo, otherwise they will not align correctly.

STEP 2. once you’ve selected the icons you’ll be using, upload them to your blog by going to media, and then add new. press select files and upload the icons. you’ll then see the images uploaded. click edit to retrieve the URL for each icon.

STEP 3. in a text document, use the code below and insert your image urls and links. this is only for one icon. repeat the code as necessary.

<li>
				<a href="your social link url" target="_blank">
				<img onmouseover="this.src='your hover icon url'" onmouseout="this.src='your social icon url'" src="your social icon url">
				</a>
				</li>

++ DO NOT USE MICROSOFT WORD the quotation marks used in the code are not standard quotation marks. please make sure to use the ones we provide.

STEP 4. add <ul> to the top of your code and </ul> to the bottom. be sure that you have only one <ul> and one </ul>. they should only be at the top and bottom and not before and after each <li> and </li>.

STEP 5. create a text widget and add this text into it. they should be functioning normally, if not, check to make sure all your links are correct and be careful to match the quotation marks we’ve shown.

STEP 6. for the navigation bar and footer social media widgets, follow the same steps as above, but add the text widgets to the “social media widget” and the “social media footer widget”

welcome / about widget

under widgets, create a text widget and drag it to the top right of the main sidebar. upload your profile photo to your blog and use the url in this code:

 <img src="insert your photo here">

if you’d like your profile photo to link to your about page use this code:

 <a href="insert the url of your about page here"><img src="insert your photo here"></a> 

Custom Nav Menu

STEP 1. under appearance, click on menus. drag the pages you want to include (or create them) into the nav menu on the right. you can include categories and links as well.
custom-nav-menu

STEP 2 . under appearance, click on customize. click on menus and select your menu from the dropdown.

+ in order to have your links in the menu open in a new tab, select screen options in the top right corner. under show advanced menu properties, check the box next to link target. now your links in the menu will show a box to click titled open link in a new tab/window. click this.

Sharing

to get your sharing feature at the bottom of each post working properly, simply install the ADD TO ANY that came in your themes folder. then activate the plugin, and go to the plugin settings. make sure you click none under universal button. under placement, deselect all of the options. everything else can be left as is. click save changes.

Custom CSS/HTML

please do not modify the design of the theme other than the options we’ve provided for you. it compromises our design. if you want to change functions, colors, fonts, or layout, please visit our shop to purchase add-ons. please be aware that we do not provide technical support for customers who have modified their CSS.

you may not remove our credit link from the bottom of your blog, it is in direct violation of our copyright.

Categories

under widgets, you can include all of your categories on your sidebar easily by dragging the categories widget to your sidebar. if you only want to include certain categories, create a text widget. you can title it however you’d like and then use this code:

<a href="insert category url here">TYPE CATEGORY NAME HERE</a> 

if you’d like more spaces between the categories, simply use <br/> between each code. if you’re unsure how to link to your category, the url should most likely be www.yoururl.com/category/yourcategory

Amount of posts displayed per page

if you’d like to change the number of posts displayed per page, go to settings and then click reading. here you can determine the number you’d like, but keep in mind the less posts displayed per page, the faster the page will load for your readers.

Instagram Widget

STEP 1. if you want to include your instagram feed in a slideshow or gallery on your sidebar, sign up for snapwidget, and you’ll see easy instructions to customize your widget. when you have chosen how you would like to display it, click get widget. make sure you size it properly! (it usually displays best when it’s sized to about 10 pixels less than your sidebar)

STEP 2 . copy and paste the code from snap widget, and go to your dashboard. select widgets. add a text widget to your sidebar, paste the code, and press save.

Formatting + Posting

our themes are designed for standard formatted posts. to ensure the best looking blog, please only create new posts using the standard format. you can post an image, link or quote within this format.
standard-format

other ways to ensure your blog looks the best it can is to always post photos of the same width and when categorizing posts, try to keep the number to 3 categories maximum so you don’t clutter the space.

Plugins + Widgets

many customers have asked about what the best gallery plugins are. unfortunately, the free plugins are not great – so we highly recommend this one from envato for a $15 regular license.
distinctive-postwall

our themes are compatible with all plugins, just make sure never to update your pin-it plugin (if you’ve purchased from us)