brooklyn
Theme Instructions
Installation
After you make your purchase, a zip file will automatically be downloaded to your computer. Unzip this file (titled blogzilla-brooklyn.zip). you will be uploading the brooklyn.zip file inside the folder.
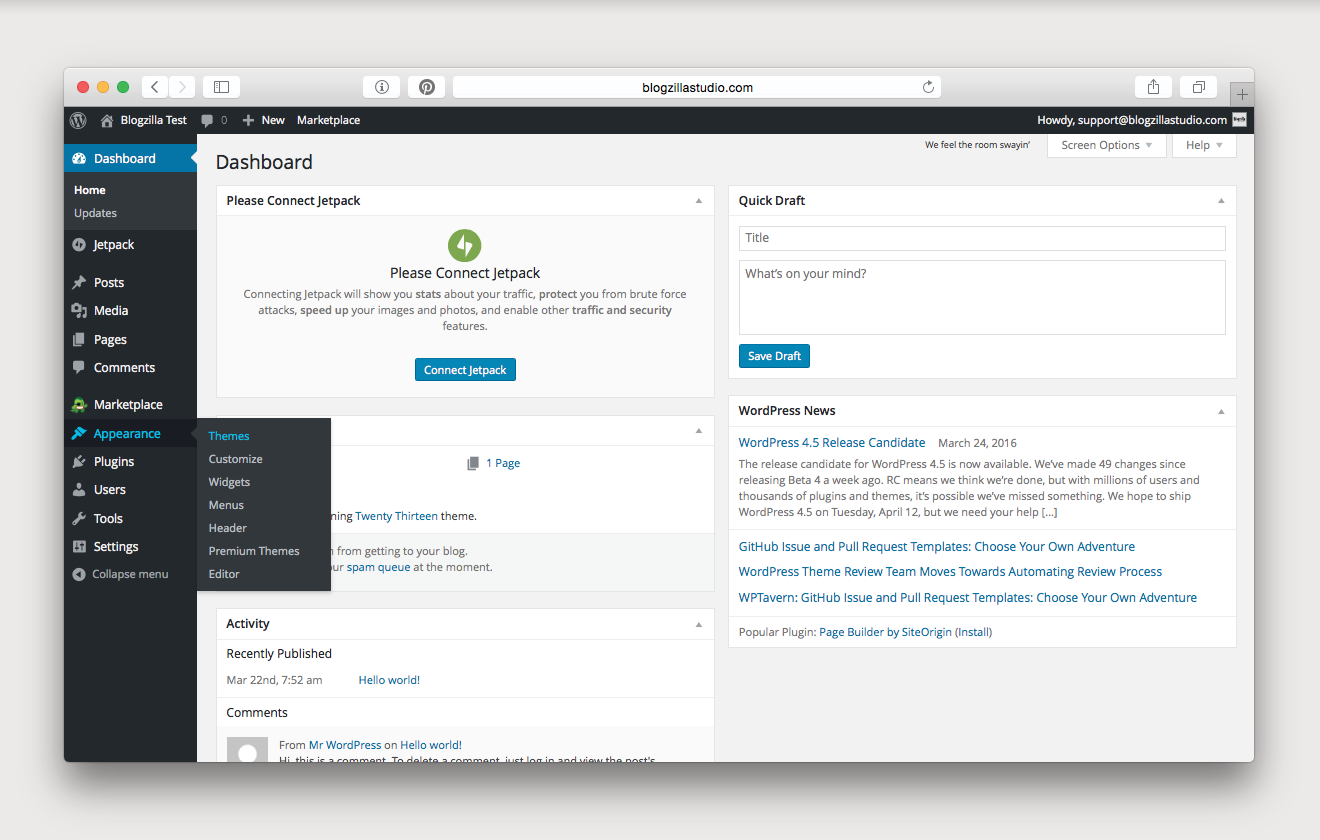
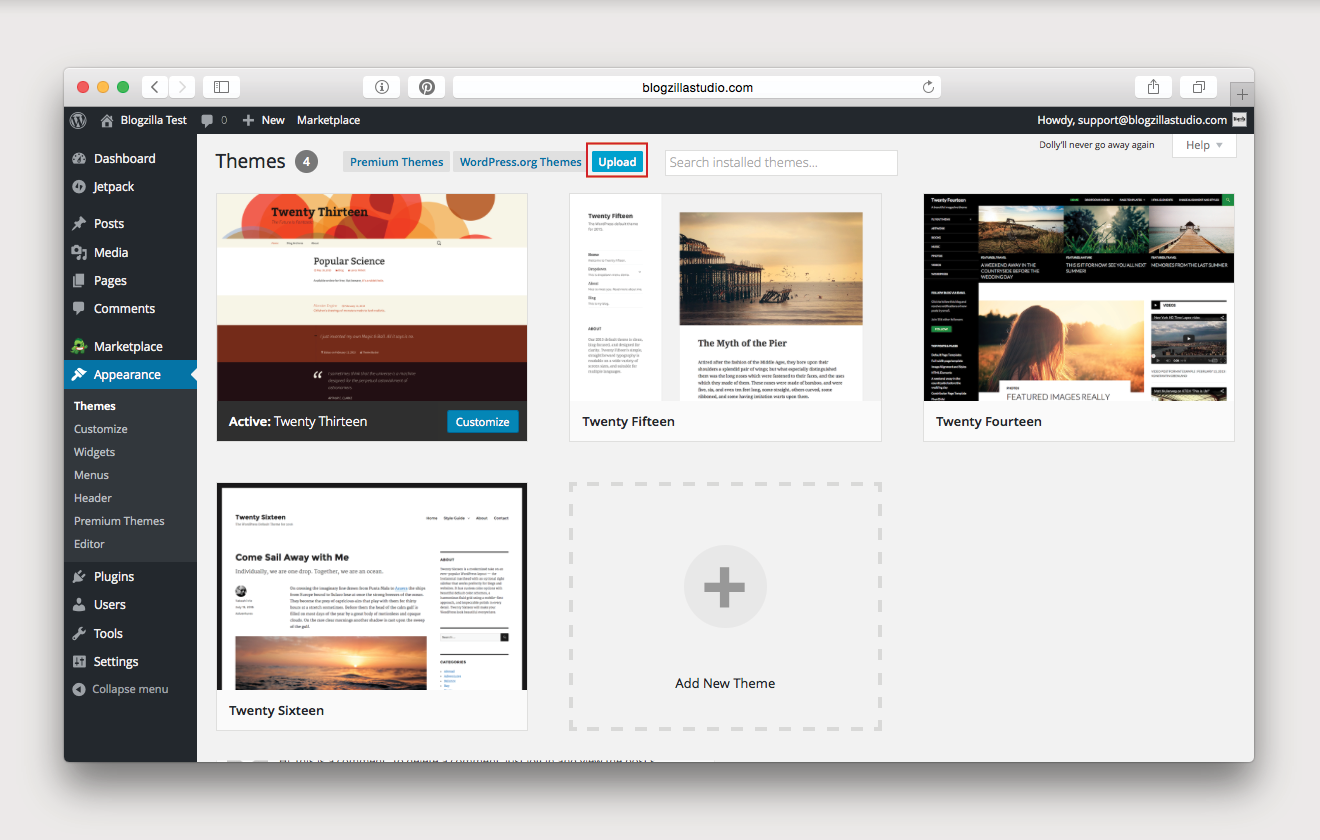
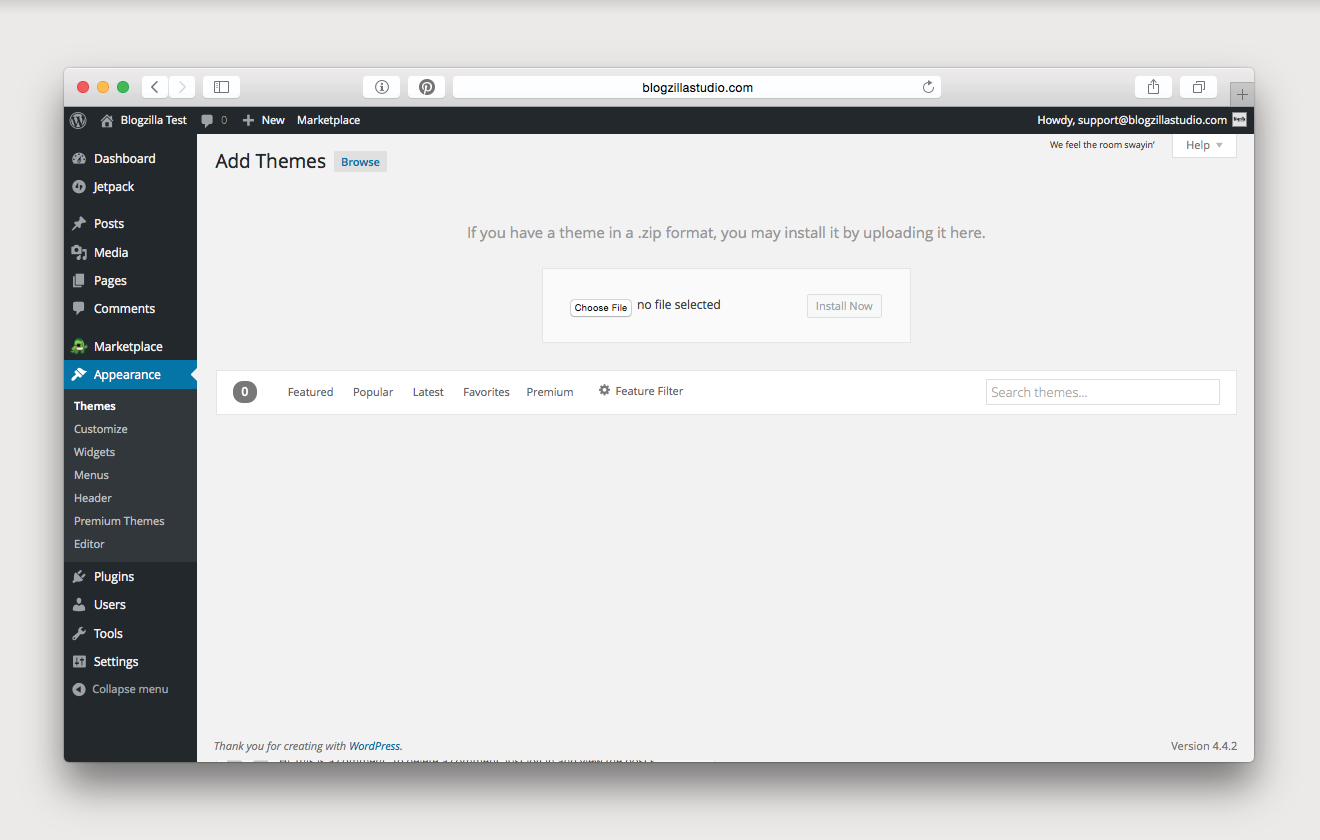
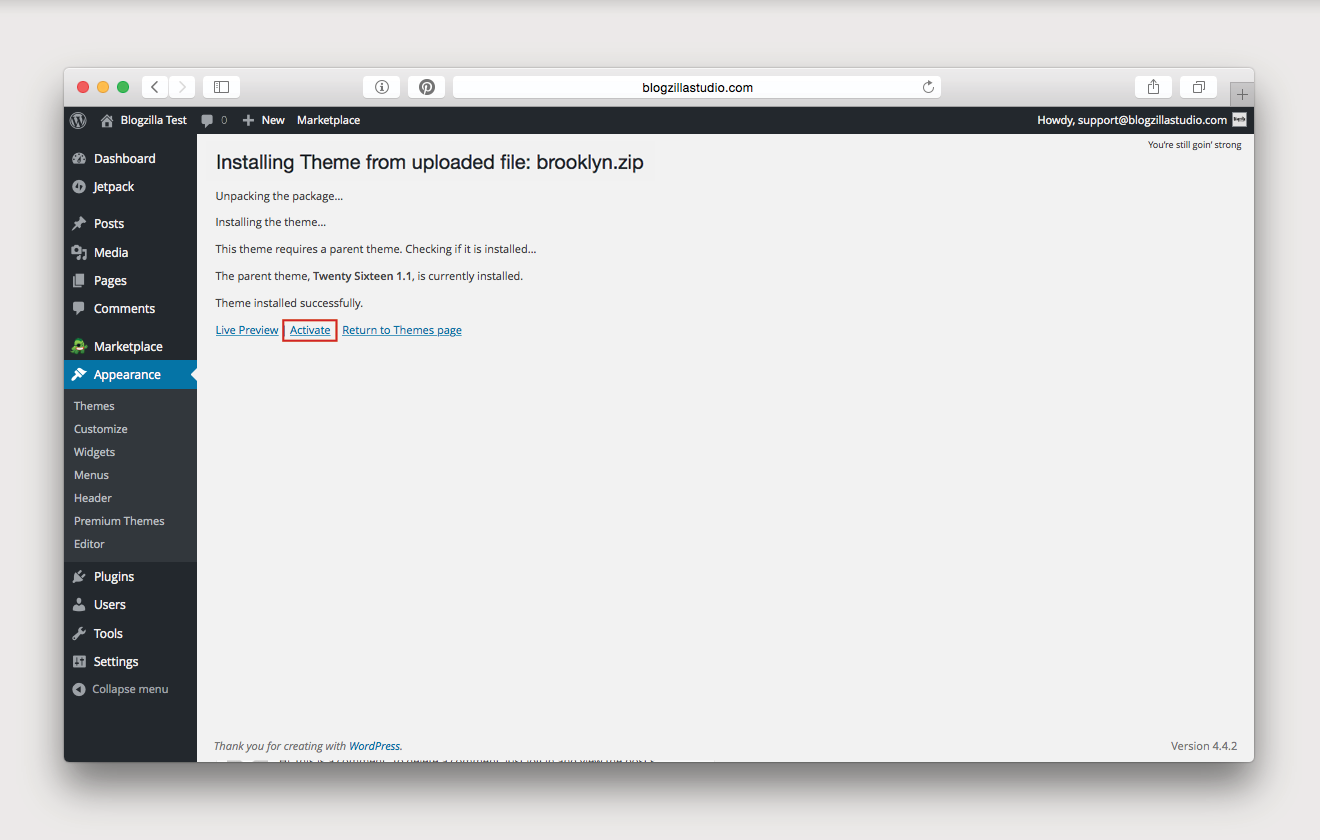
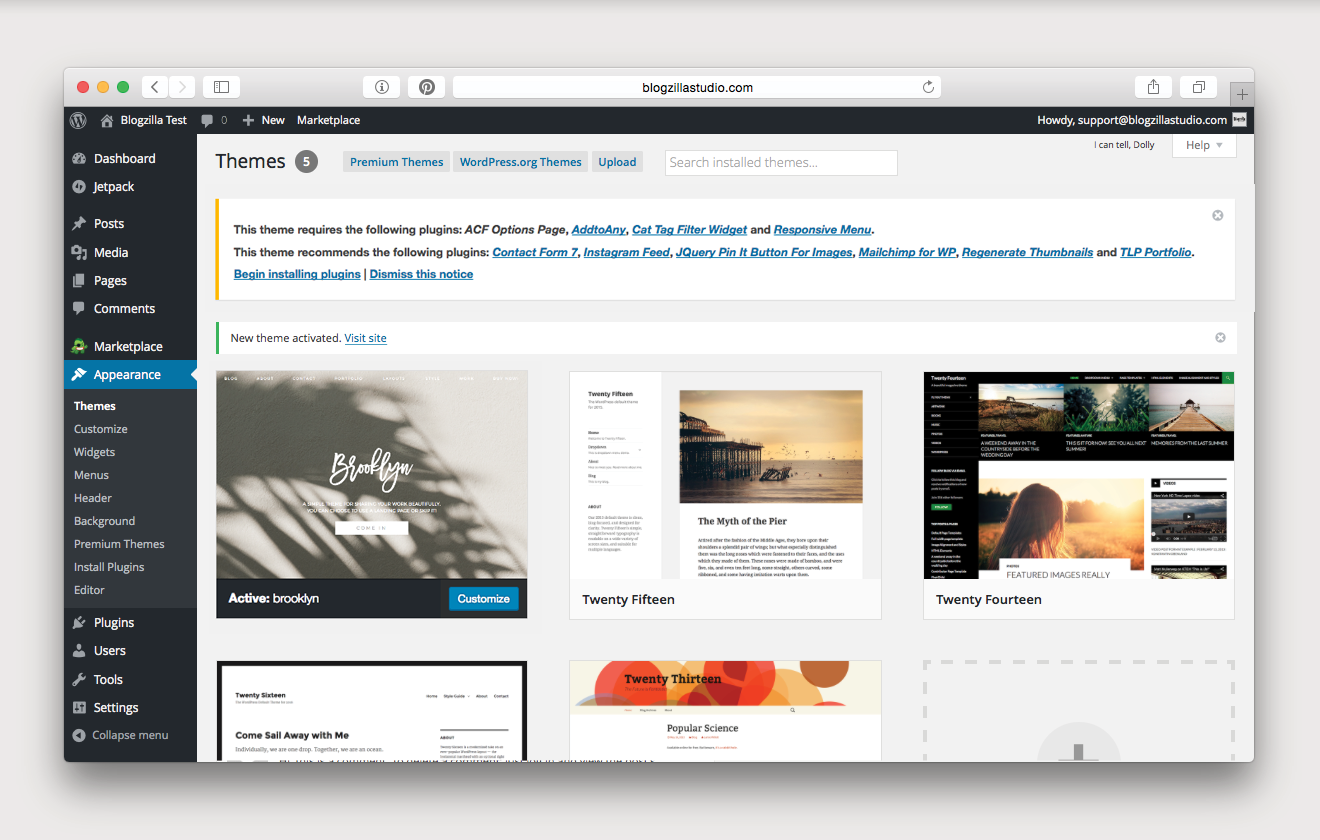
navigate to appearance, and then themes, and click add new, and upload your zip file! once uploaded, you will be asked to activate brooklyn (and possibly install the twentysixteen theme, if it is not already installed).
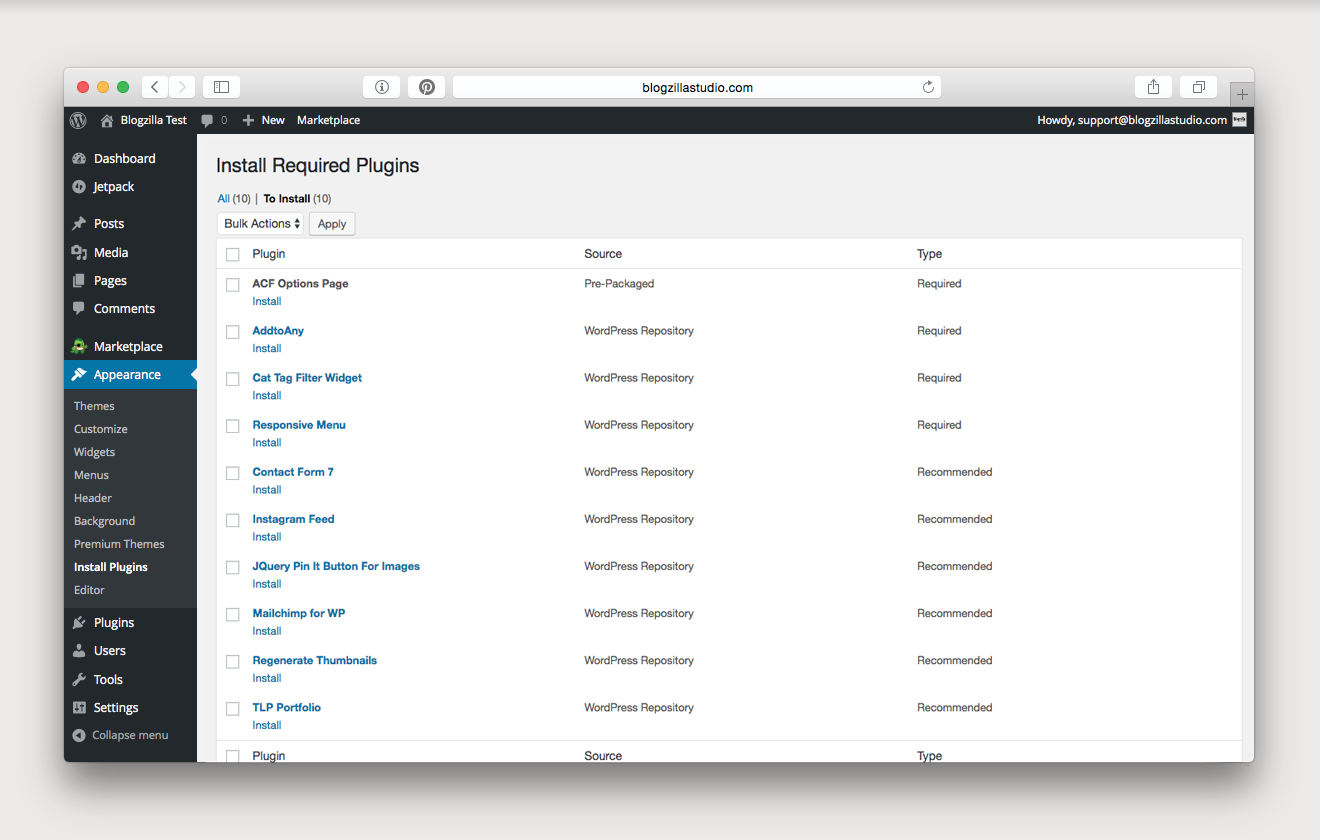
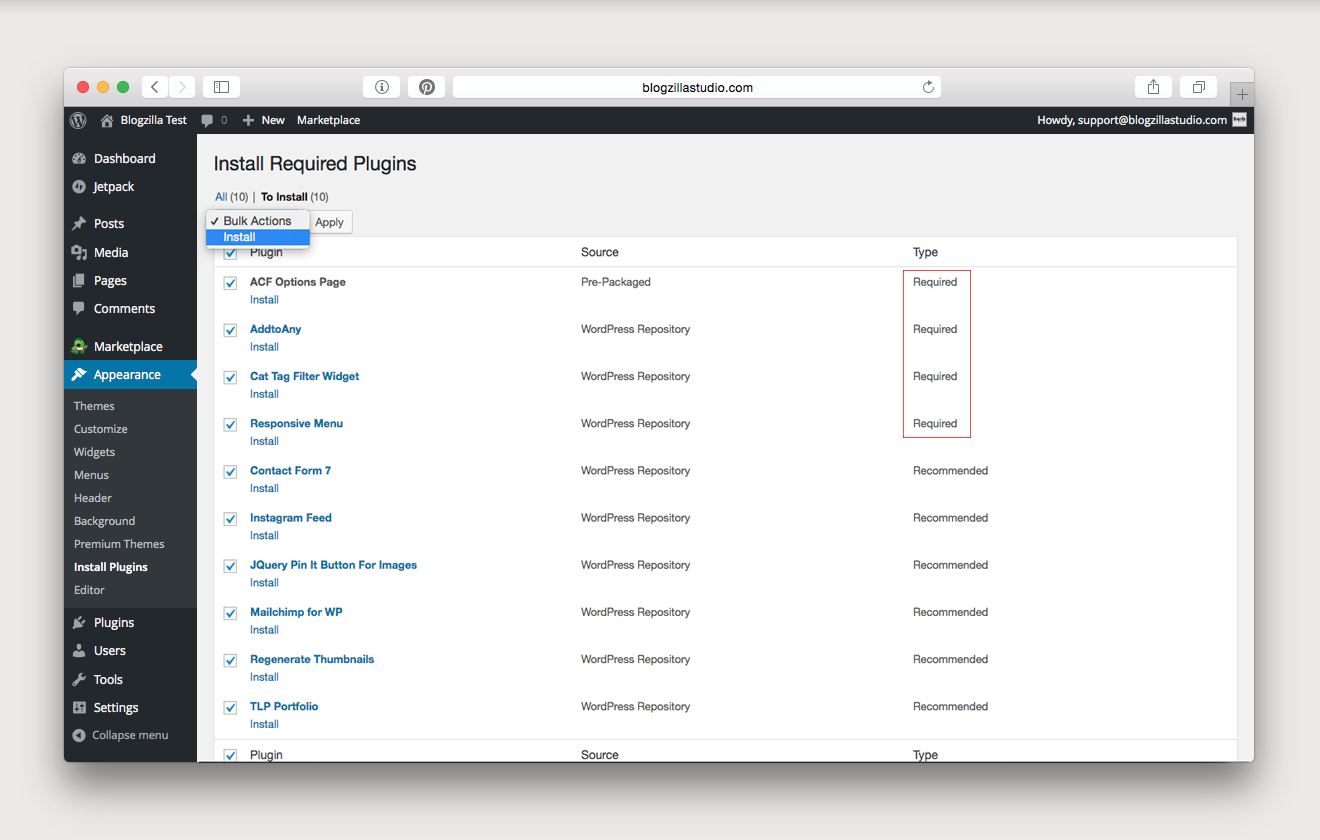
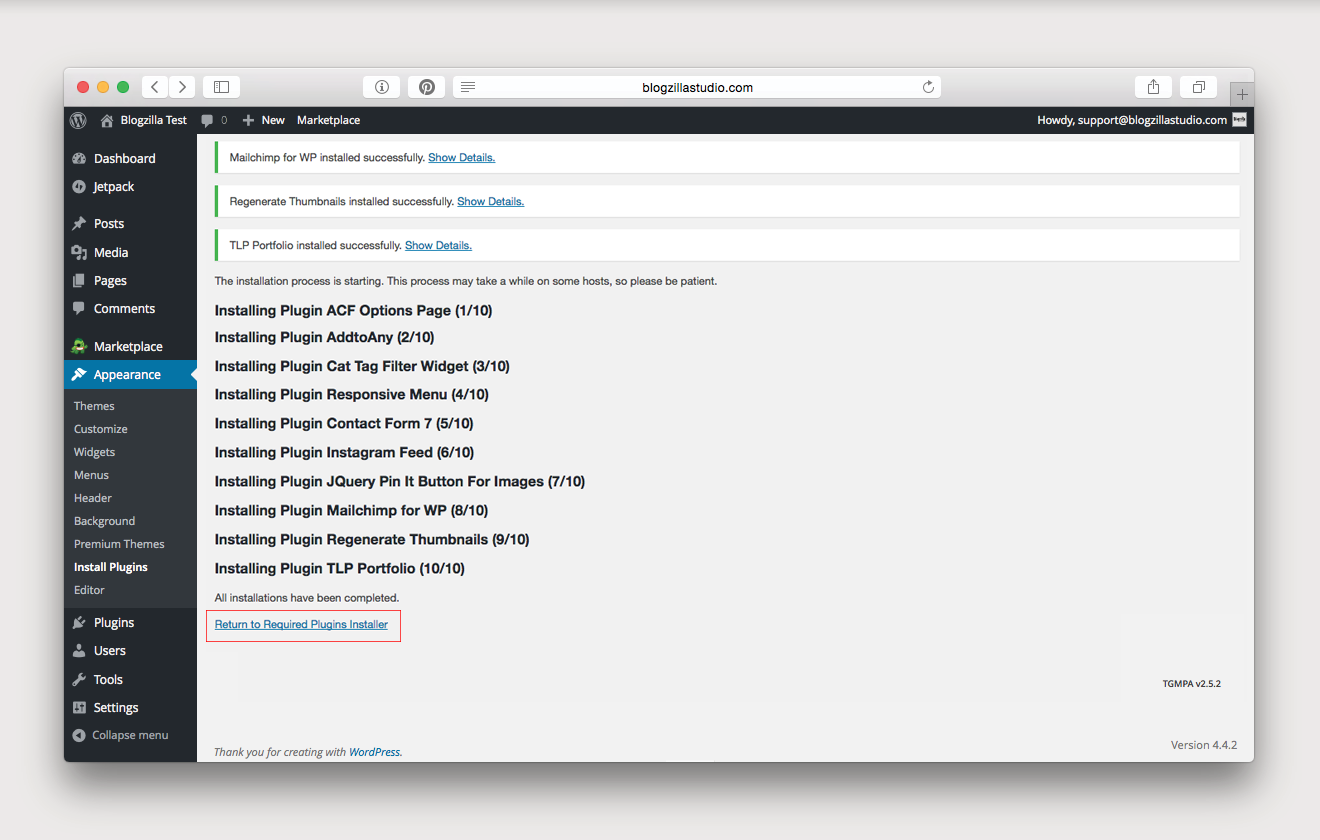
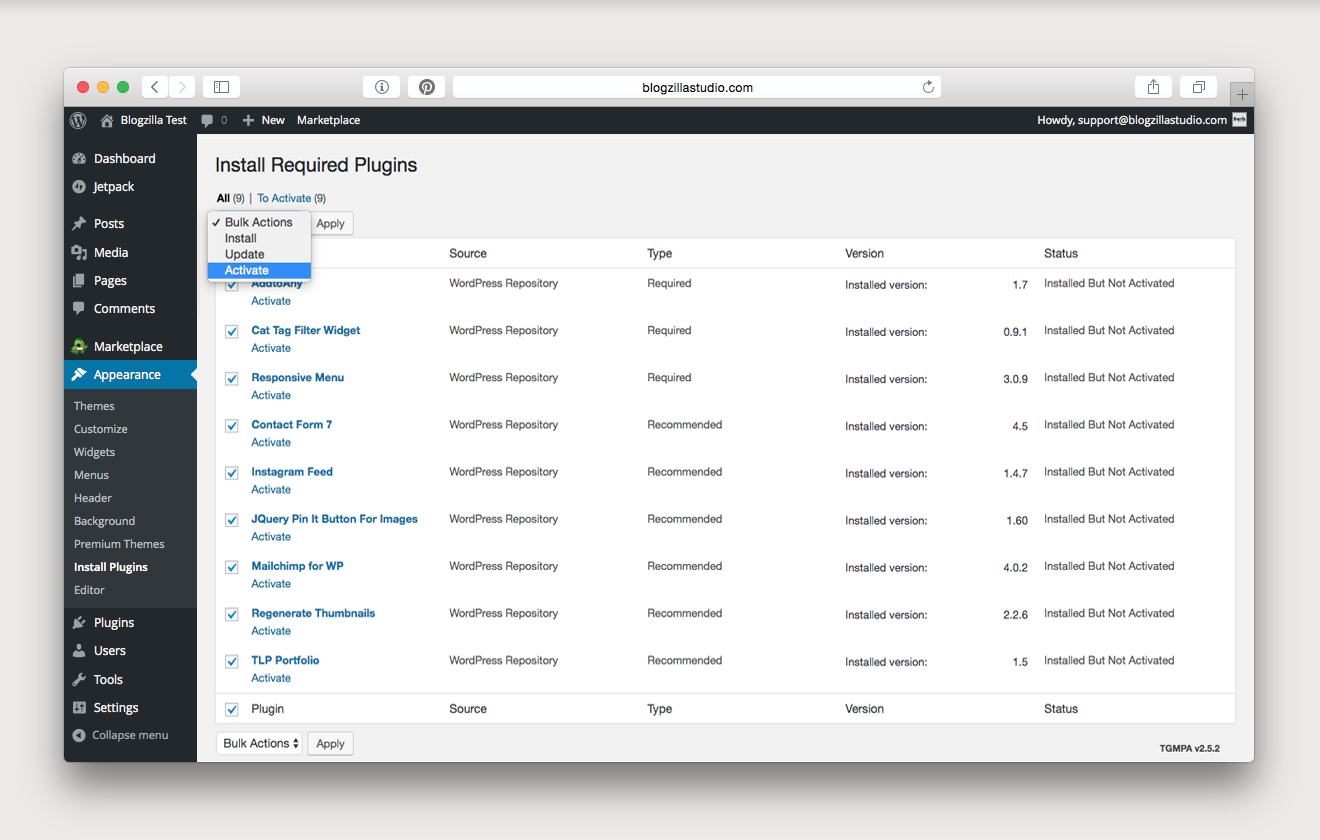
then, you’ll see a notice that this theme requires a few plugins and recommends several more plugins. click on begin installing plugins. you must install and activate the required plugins. it’s up to you which recommended plugins you choose to install!
General
after you’ve installed your theme, now it’s time to start customizing and adjusting your theme settings!
Header
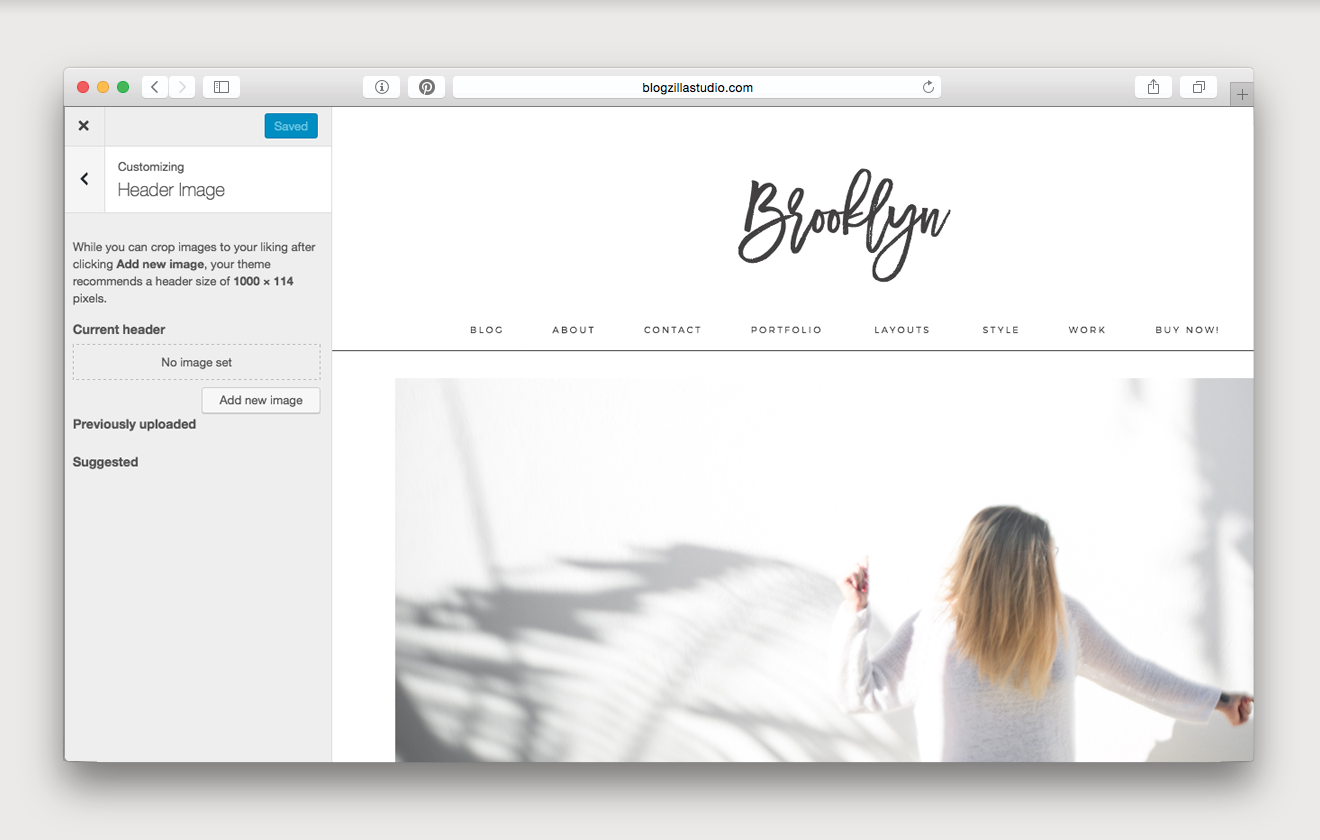
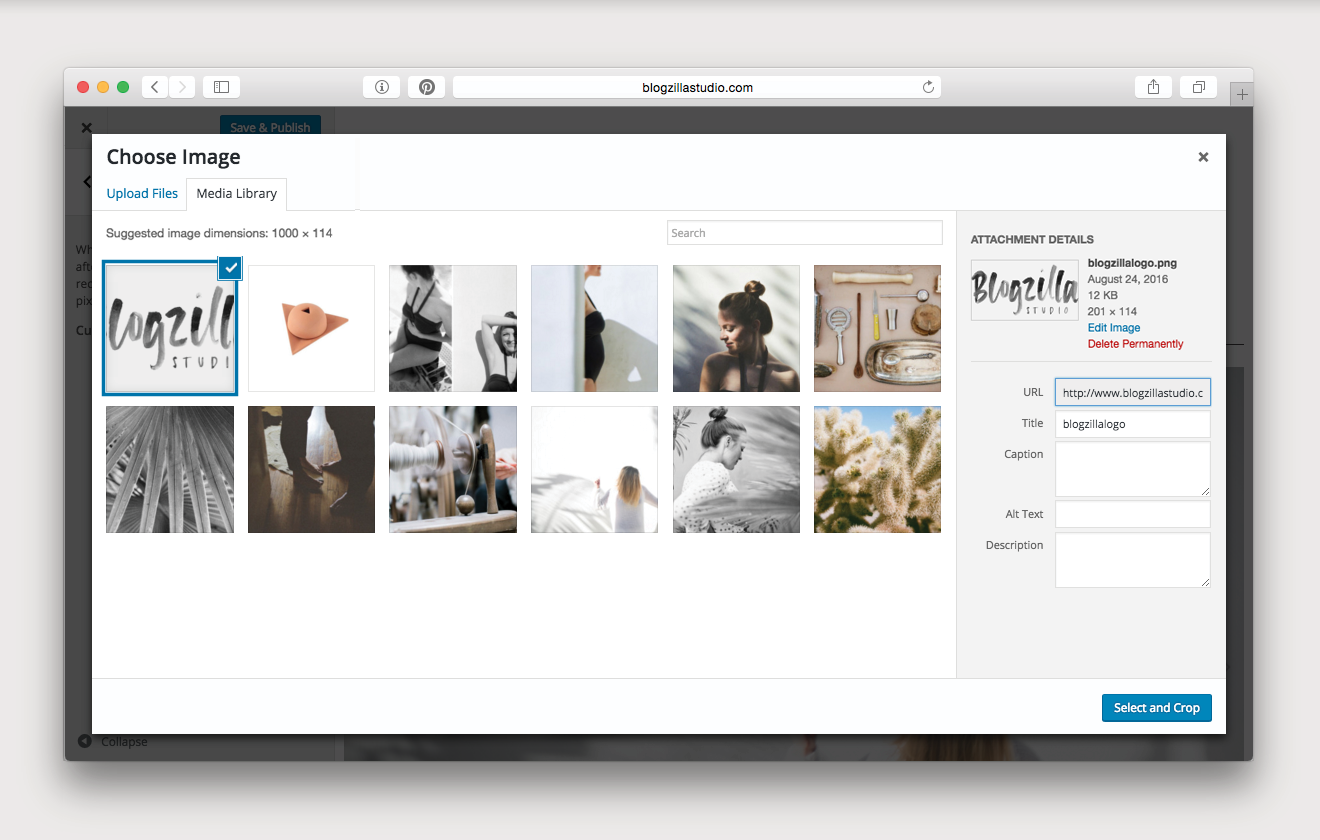
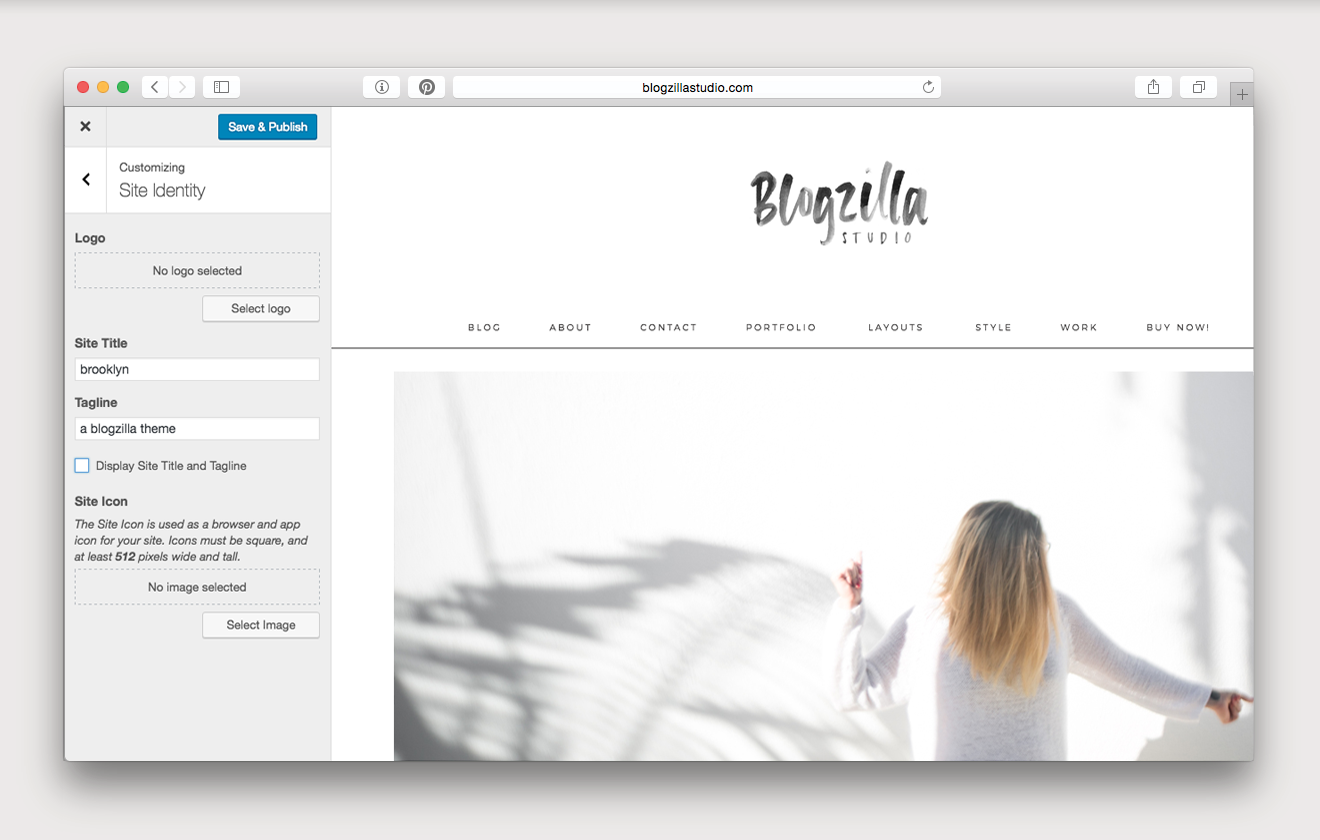
brooklyn includes a custom font so you can change your blog header to any name you’d like using that font. or, you have the option of installing your own custom logo. to adjust your header, go to appearances, and then customize on your dashboard. to set your blog title, go to site identity. to upload your own custom header, go to header image.
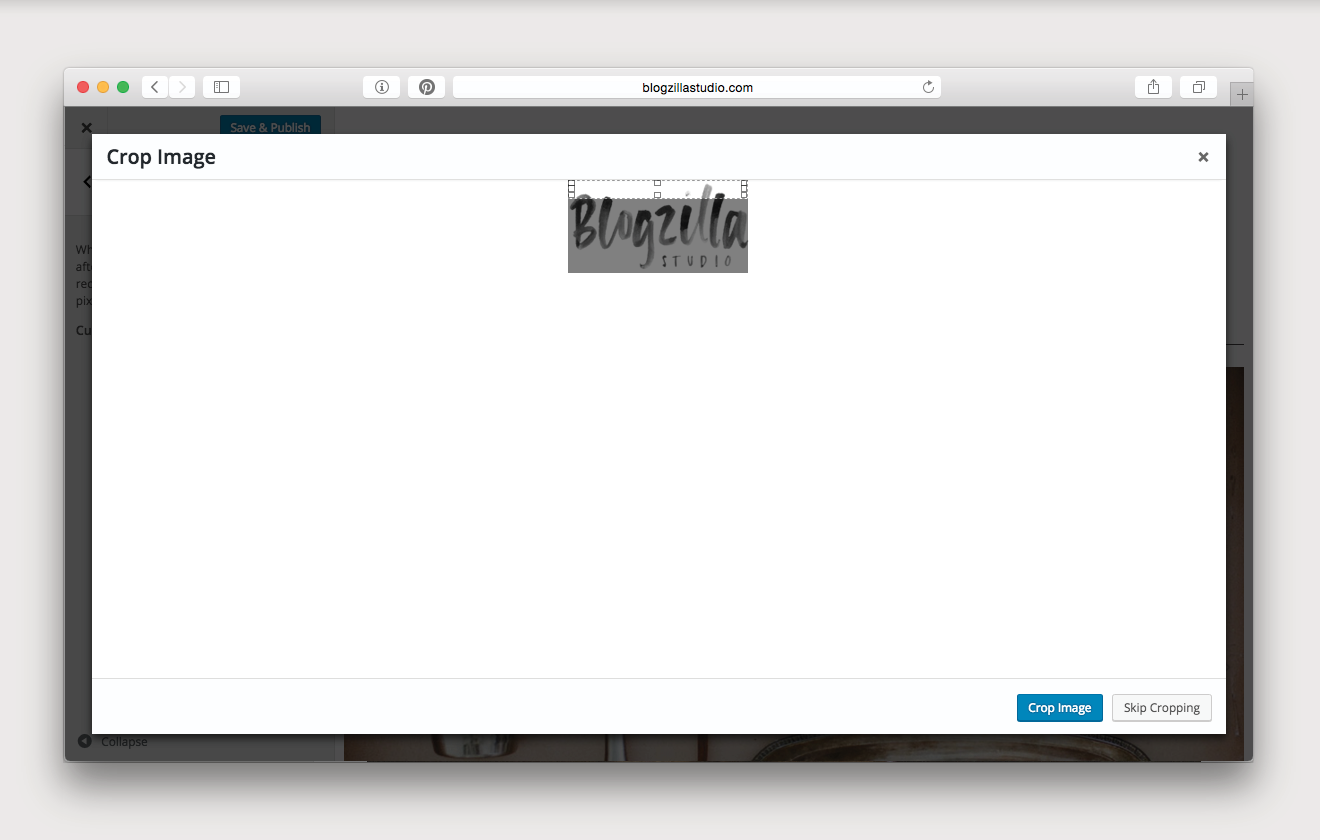
for the brooklyn theme, your header image must be exactly 114px tall, and can be up to 1000px wide. if you choose to upload a logo that is less than 1000px wide, select the skip cropping option after your upload.
if you activate your own header, you will want to turn off the display of your custom header text under site identity.
Colors
brooklyn has 5 preset color schemes for you to choose between, including the default color scheme. to adjust the colors on your theme, go to appearance, and then customize, and click on colors.
Custom Nav Menu
to add a custom menu to your theme, go to appearance and then menu. select any pages, categories, links, etc. that you would like to add, and drag them into your preferred order. once you have your menu as you would like it, click save menu, and make sure that you’ve selected primary menu as the menu location.
Home Page / Blog Page
on your theme, you have the option of making your blog page your home page, or setting up a custom home page. if you would like to have a custom home page, the first step is to create a home page and a blog page. navigate to pages, and then add new. create your two pages. there is no need to add any content.
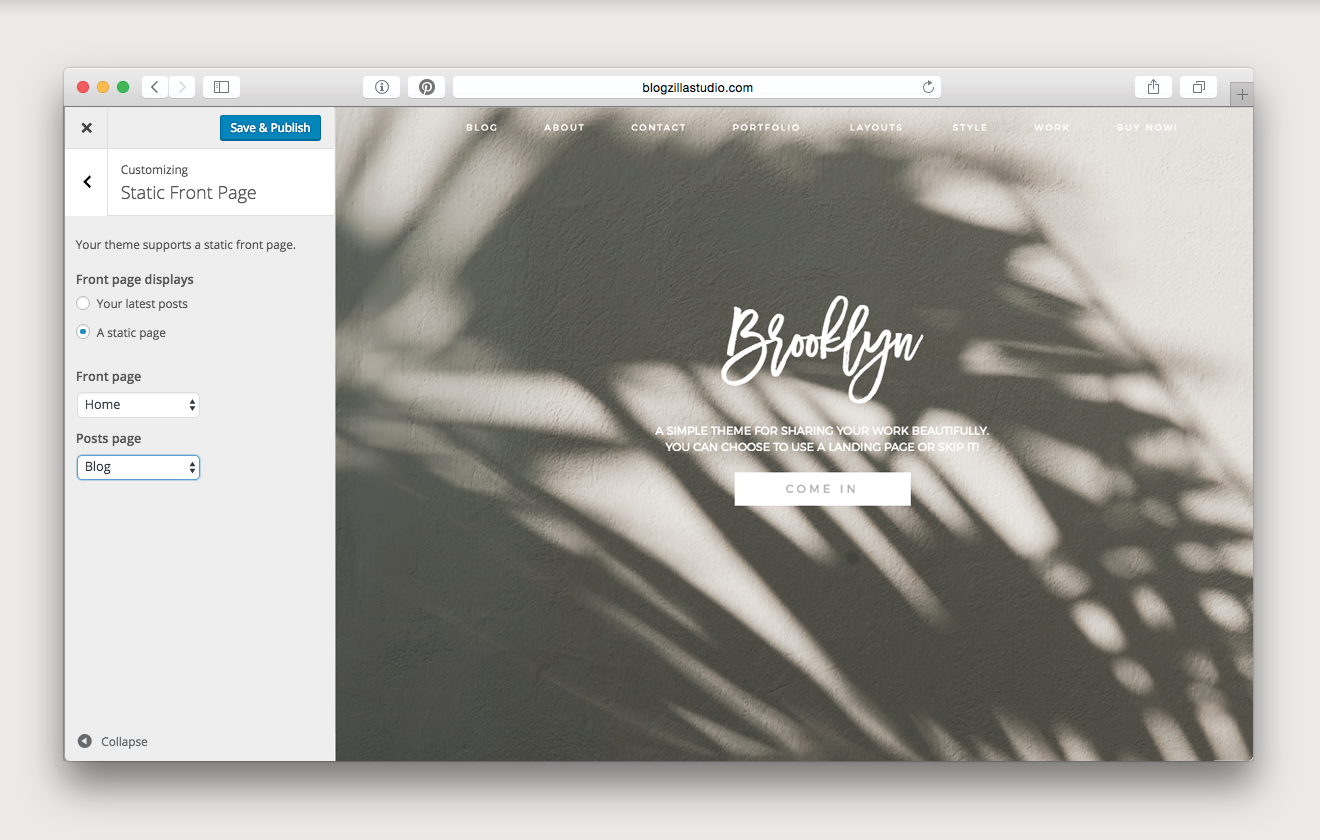
then, to select your home page preference, navigate to appearance, customize, and click on static front page.
if you would like to have your posts as your home page, select your latest posts.
if you would like to have a custom home page, select a static page. then, from the dropdown select your new home page as the front page option and your new blog page as the posts page option.
if you would like to set up a splash page as your home page (as shown on the brooklyn sample site), see the splash page setup portion of the instructions.
Featured Images
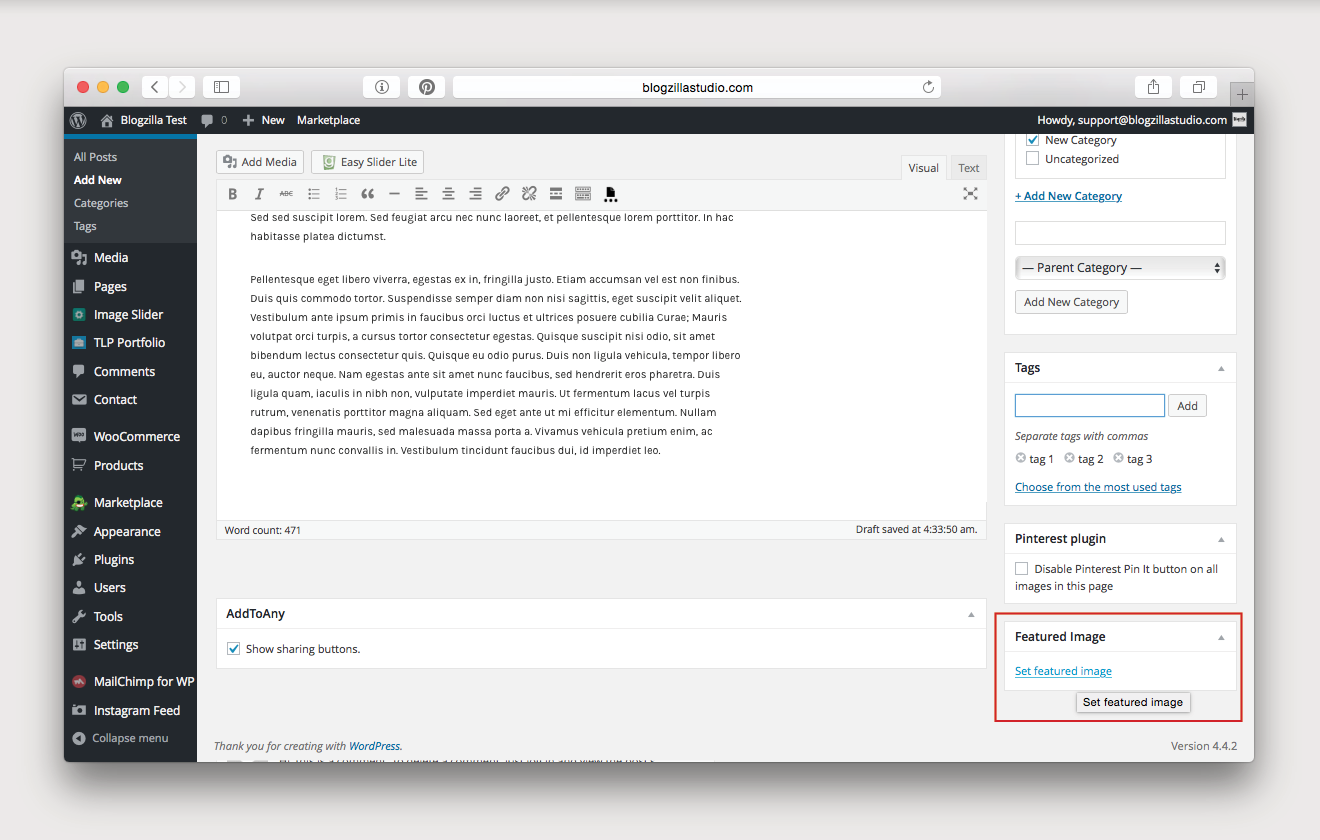
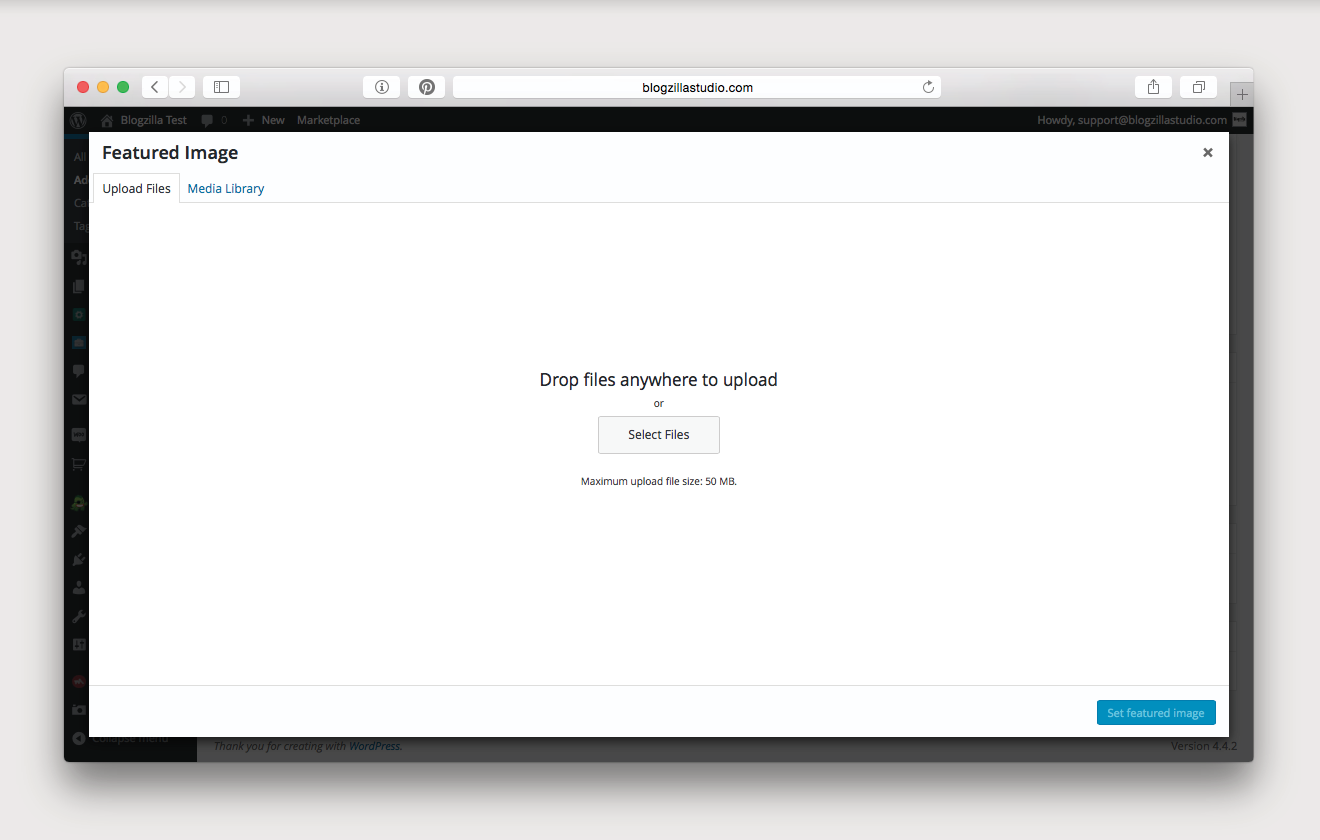
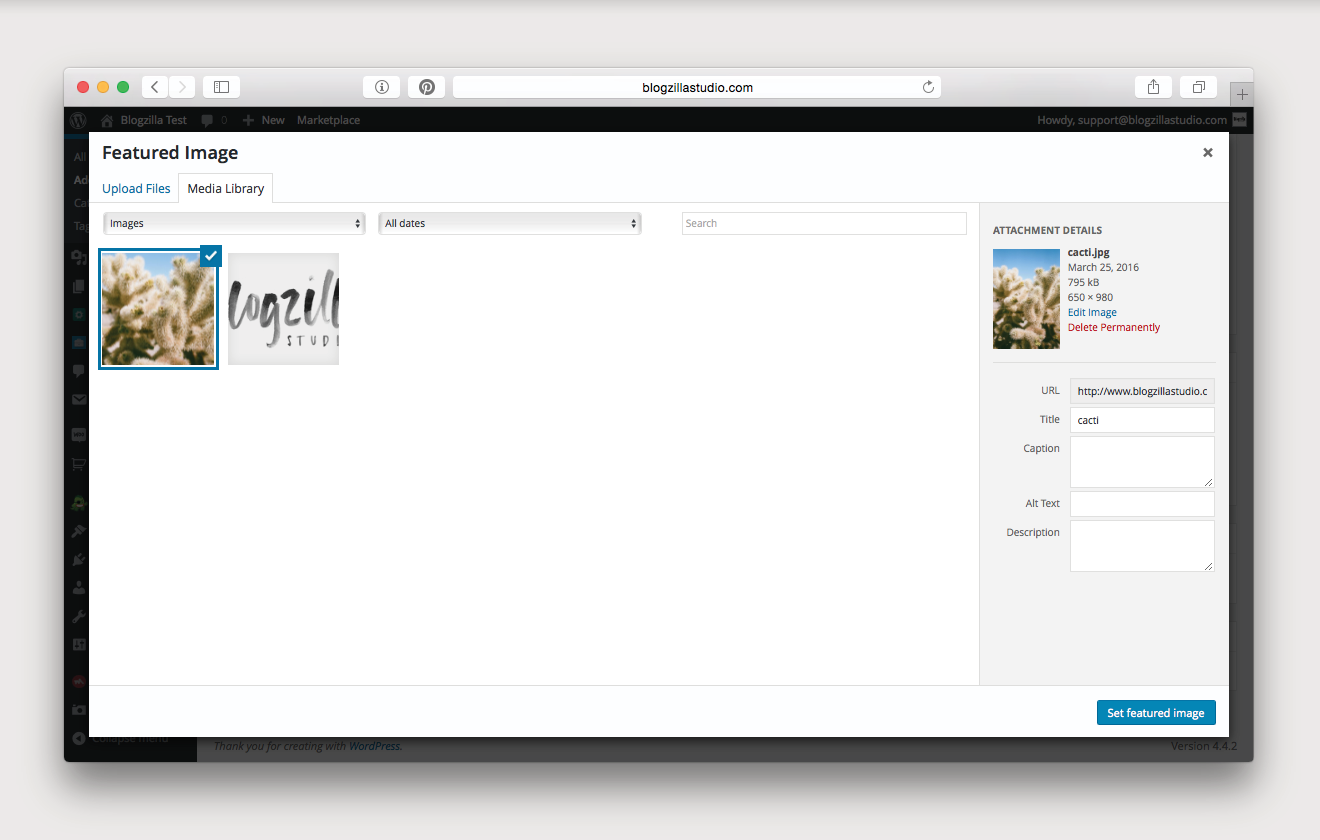
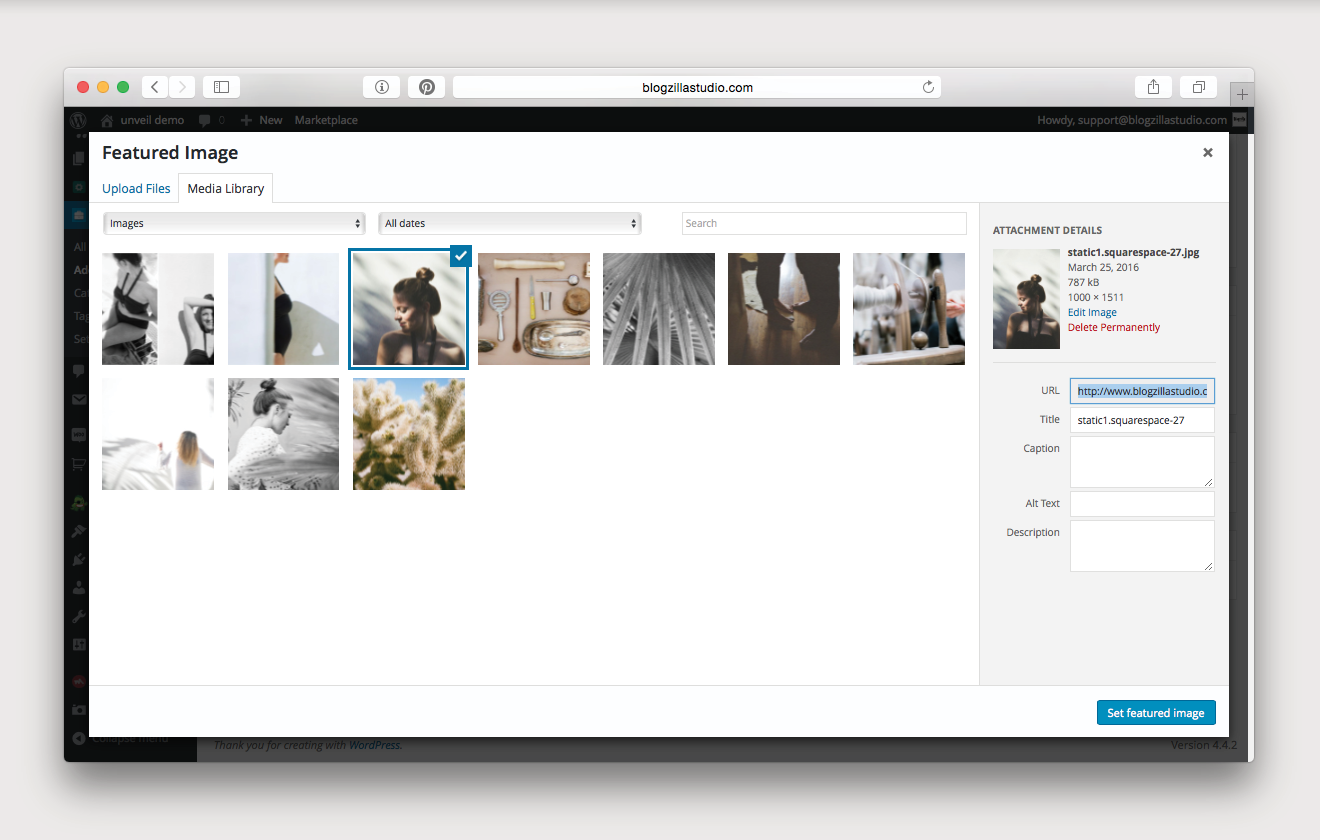
many of the features included in the brooklyn theme take advantage of featured images, so be sure to include them on all posts and pages. the featured image is the image that will represent your page or post on the categories page. to add a featured image when editing a page or post, scroll down to the bottom of the page, and under the featured image header, select set featured image.
note: featured images should be square or vertical, not horizontal, to work properly with this theme.
Image Sizes / Regenerate Thumbnails
for the category pages, blog slider, and portfolio main page (if you choose to create a portfolio) certain image size settings need to be adjusted. (for the portfolio settings, please view the portfolio portion of the instructions.)
to modify the media settings for the category pages, navigate to settings, and then click on media. here, you will need to change the thumbnail dimensions to 320 x 320. then, if you are going to create a portfolio, you will need to modify those settings as well (again, view the portfolio portion of the instructions for details).
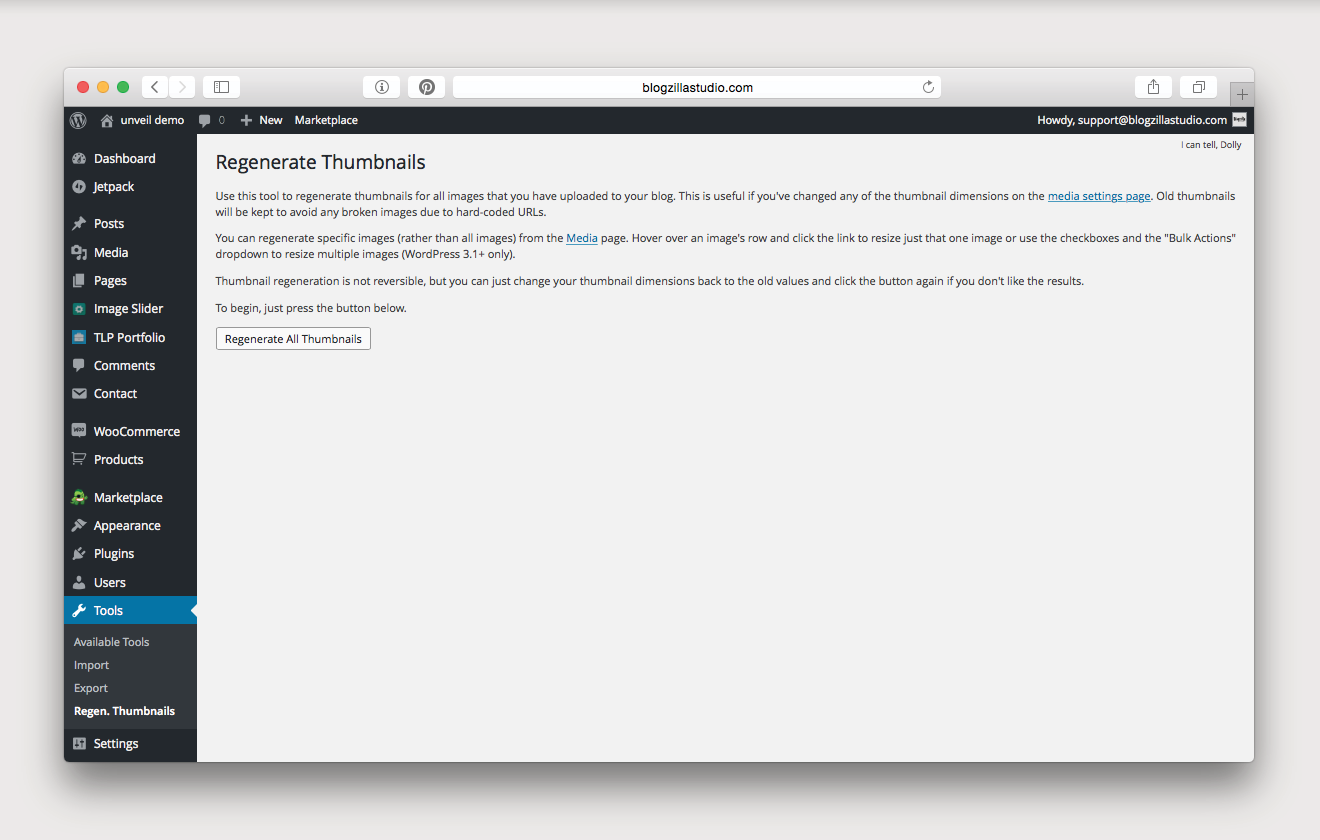
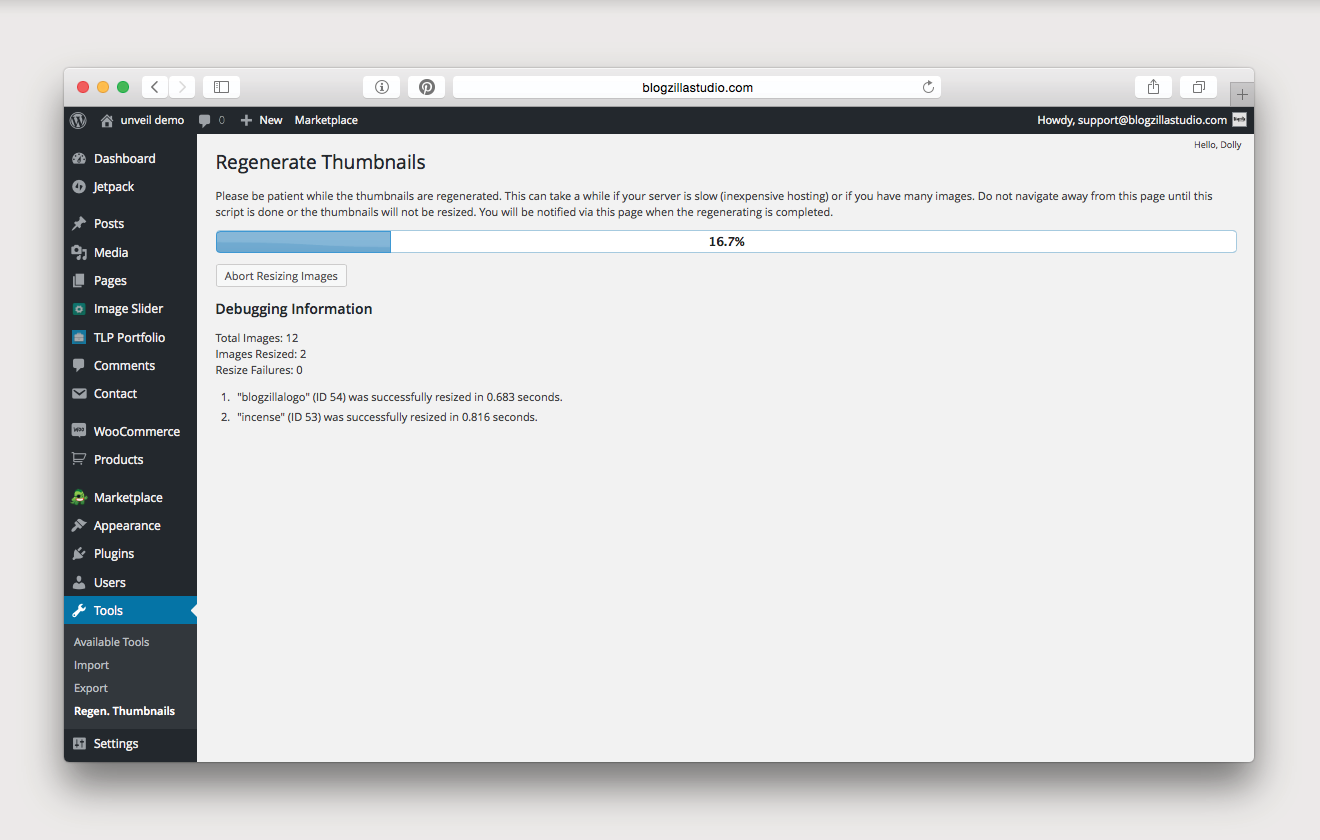
once these settings have been changed, if you have a pre-existing blog or any images already uploaded, you will need to run the regenerate thumbnails tool. (you will first have to make sure that you install regenerate thumbnails, which is a recommended plugin.) to run the tool, click on tools, regen. thumbnails. then select regenerate all thumbnails.
please note: you should always do a backup before running this tool!
IMPORTANT: all featured images (and product images) need to be square or vertical. horizontal images will not load correctly with the theme.
Blog
for more tips on how to make the most of a wordpress blog, please visit wordpress.org and check out all the information they have to offer.
Making a Post
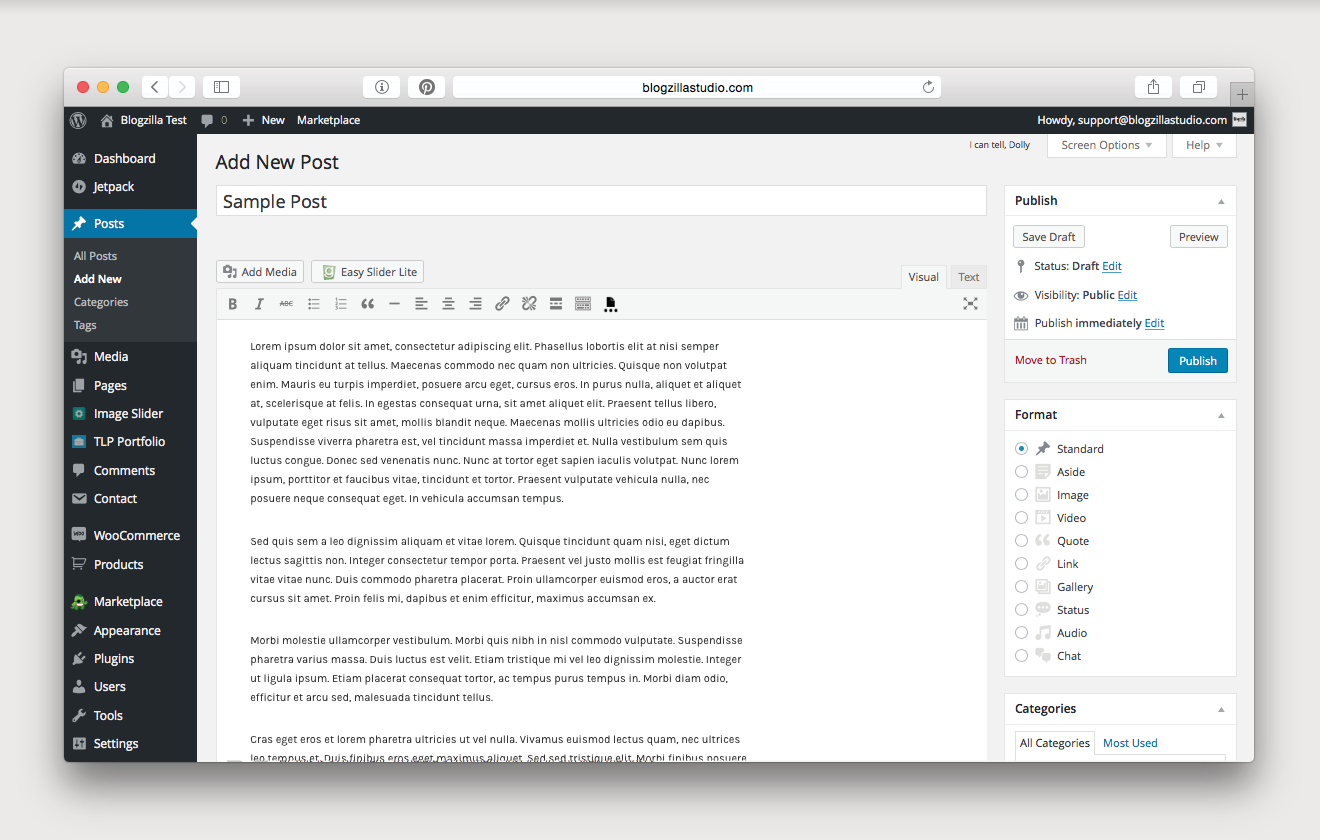
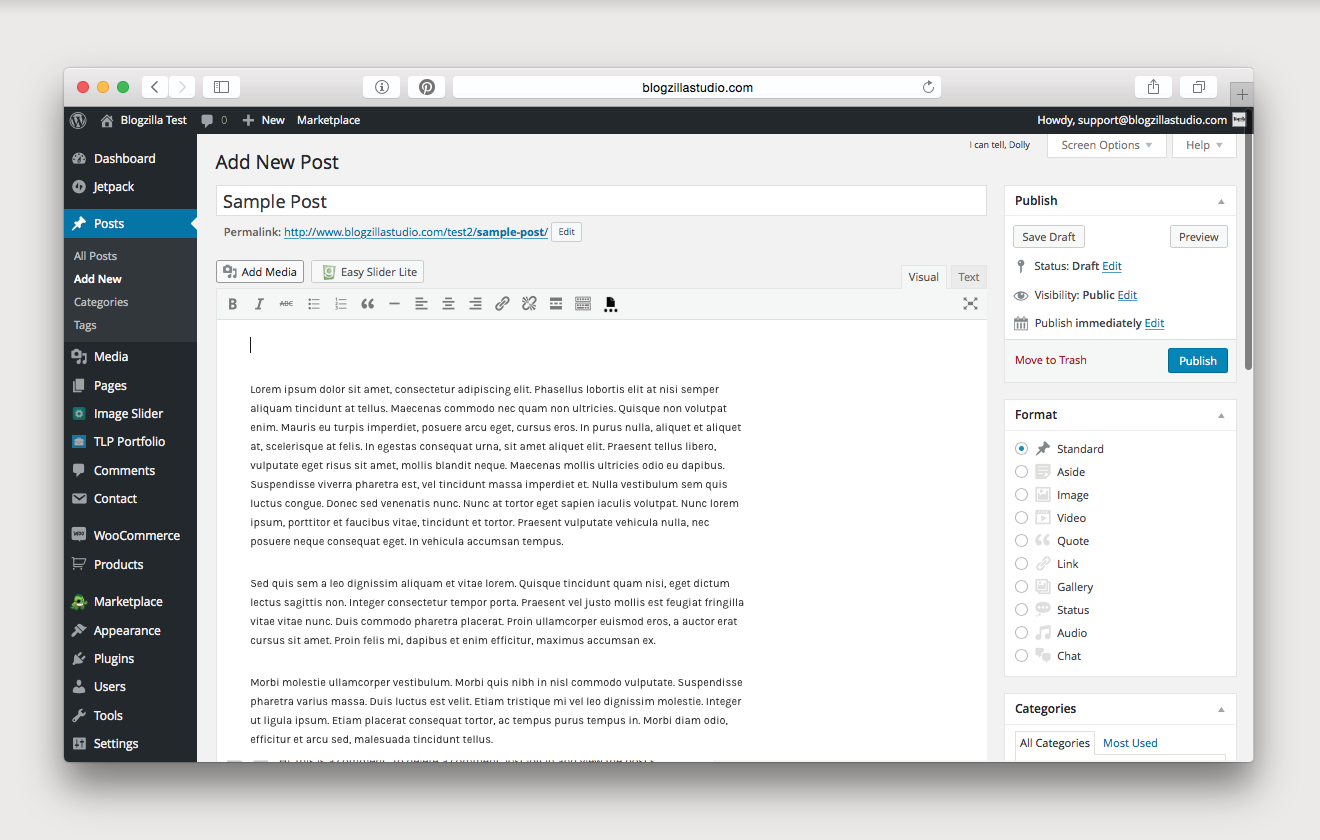
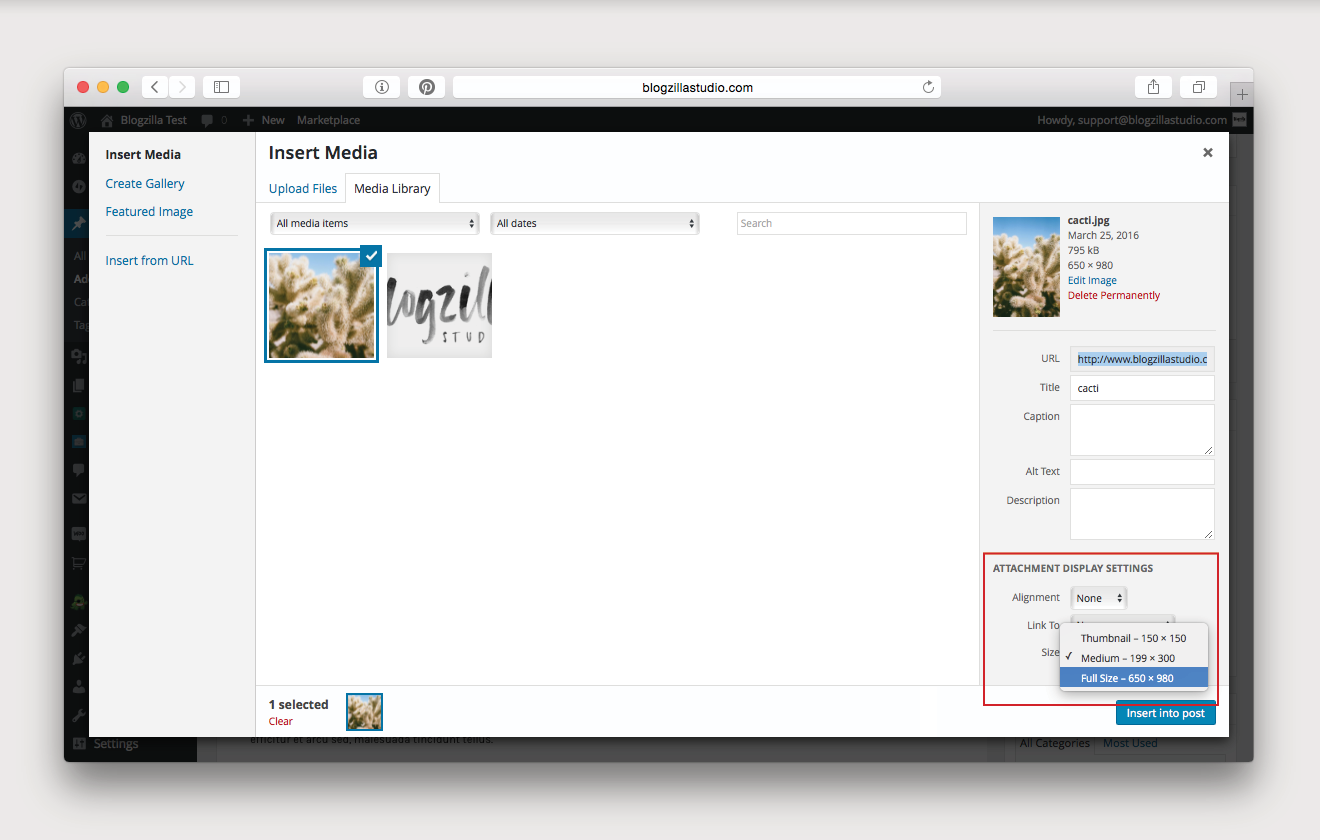
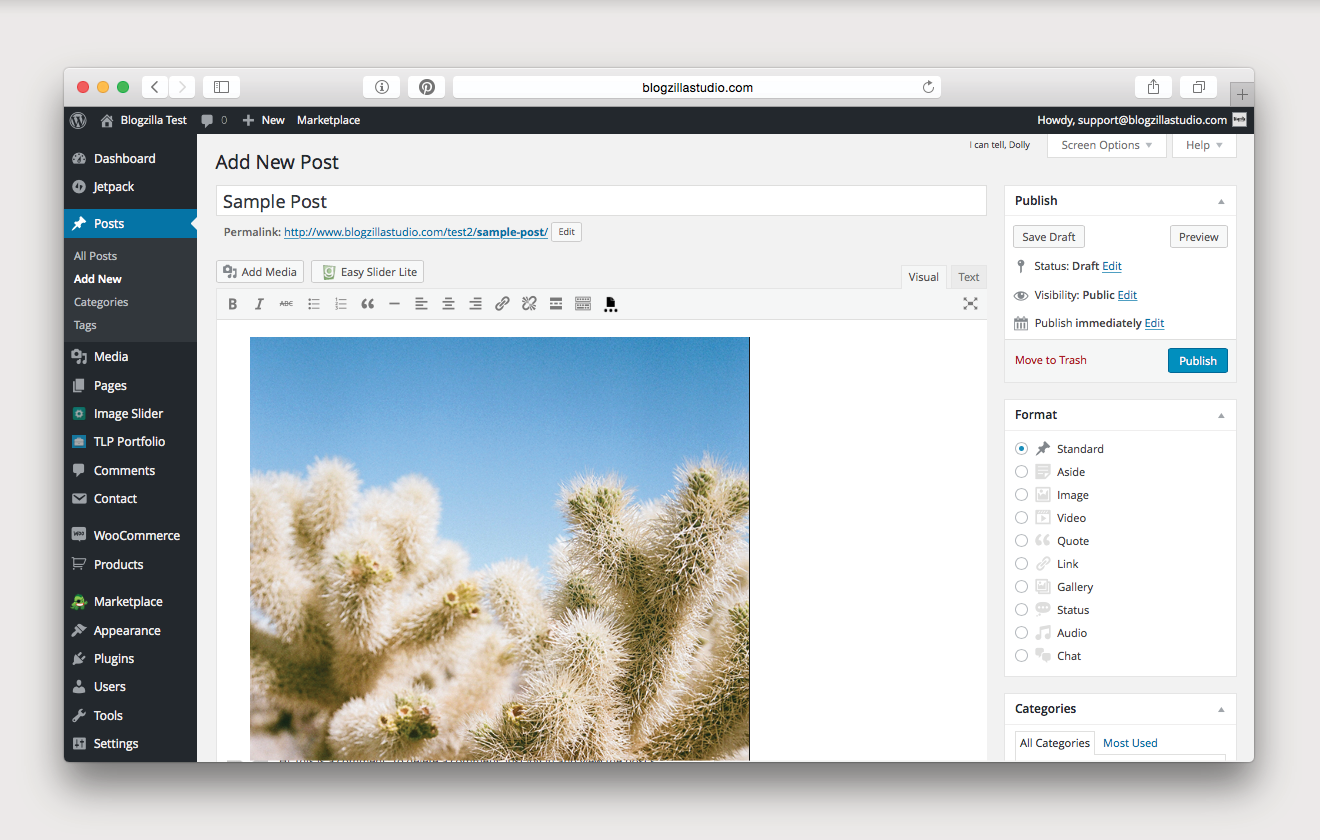
creating posts is very simple with wordpress. simply navigate to posts, and then click add new. from here, you can add whatever text and images you would like.
brooklyn has a 650px post width, so crop your photos to that size for the best aesthetics!
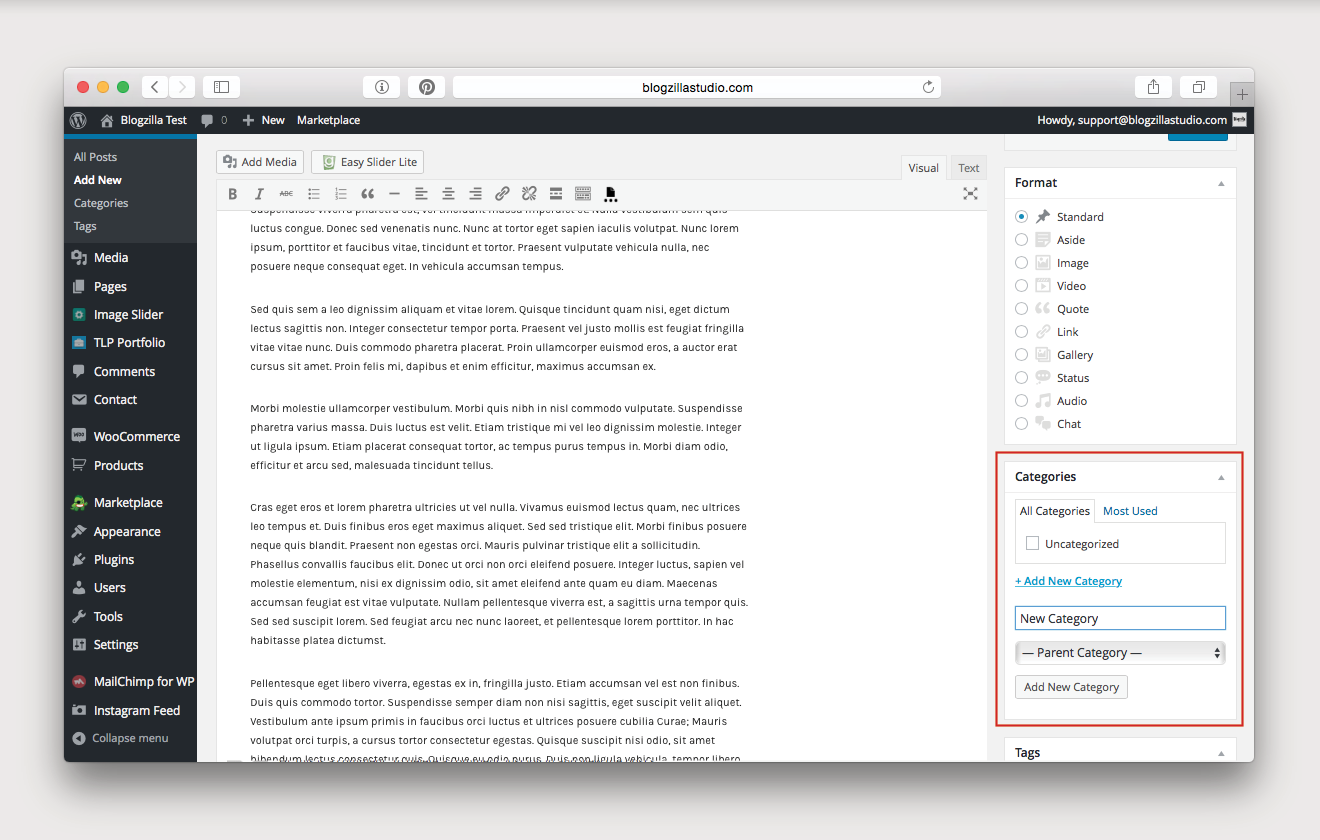
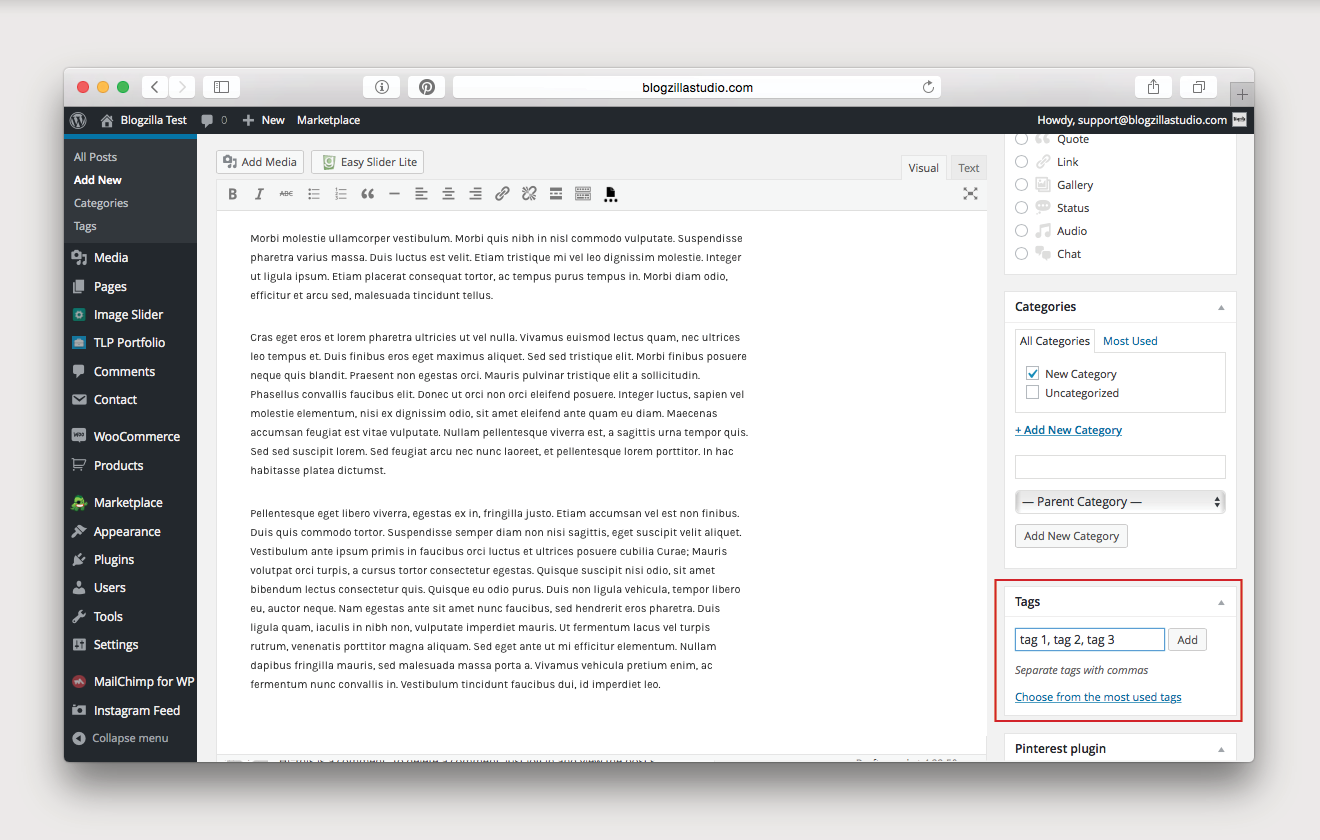
when creating your blog, you will also want to categorize (and potentially sub-categorize with tags) each post. you can do that in the sidebar under categories and tags. on category pages, you will be able to filter by your categories and then by your tags.
also, remember, you must insert a featured image with your post!
Read More Button
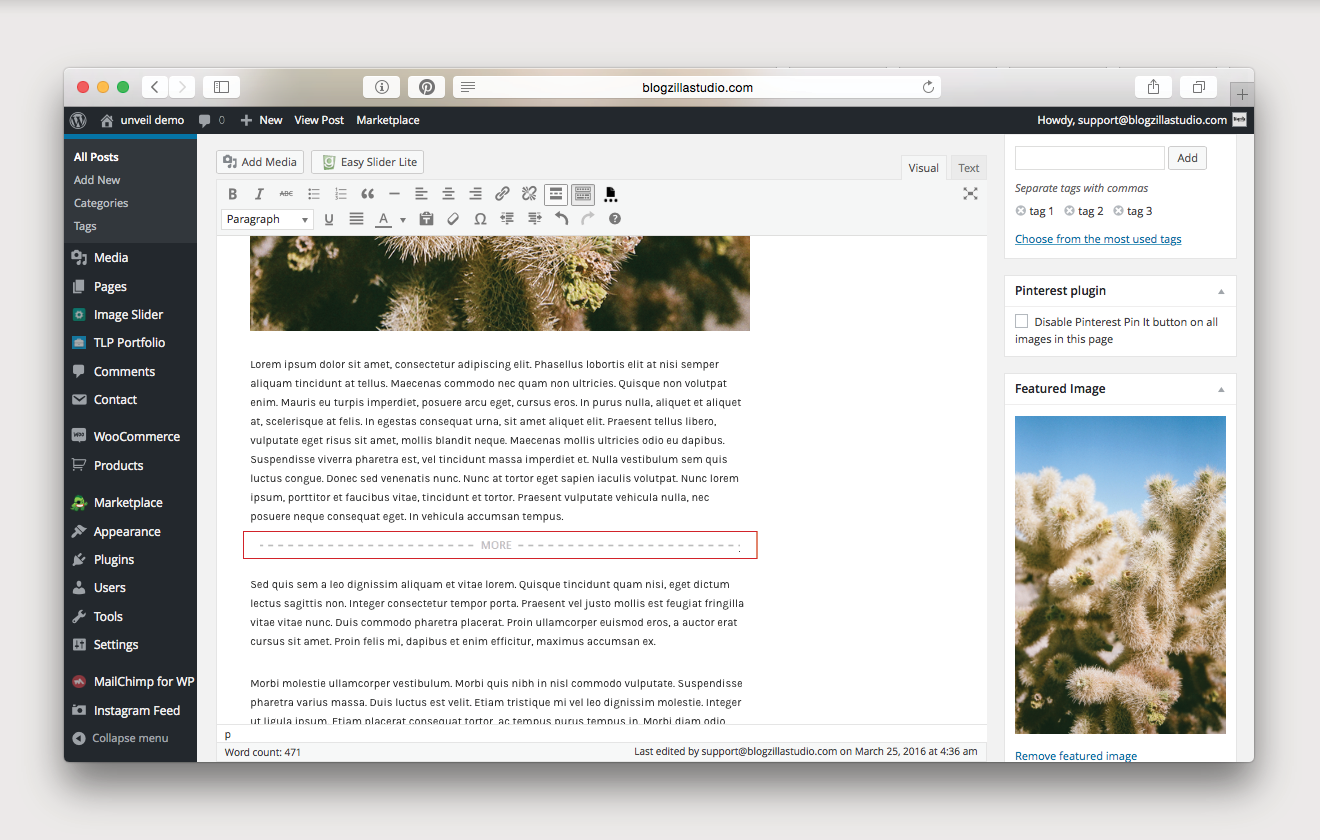
adding a read more button to your posts allows you to determine what portion of your post shows up on the main home page. a custom read more button is built into brooklyn, so to add it, all you need to do is place your cursor where you want the link to show up, and then click insert read more tag on the toolbar. if you are putting it inline with your text, be sure to add a couple spaces before clicking insert.
please note: the summary option under settings, reading will not create summary posts. you will use the read more button instead.
Sharing
the brooklyn theme automatically includes sharing at the bottom of your posts, but it is tied to allowing comments. in order for your sharing to work, comments must also be active.
Blog Page Slider
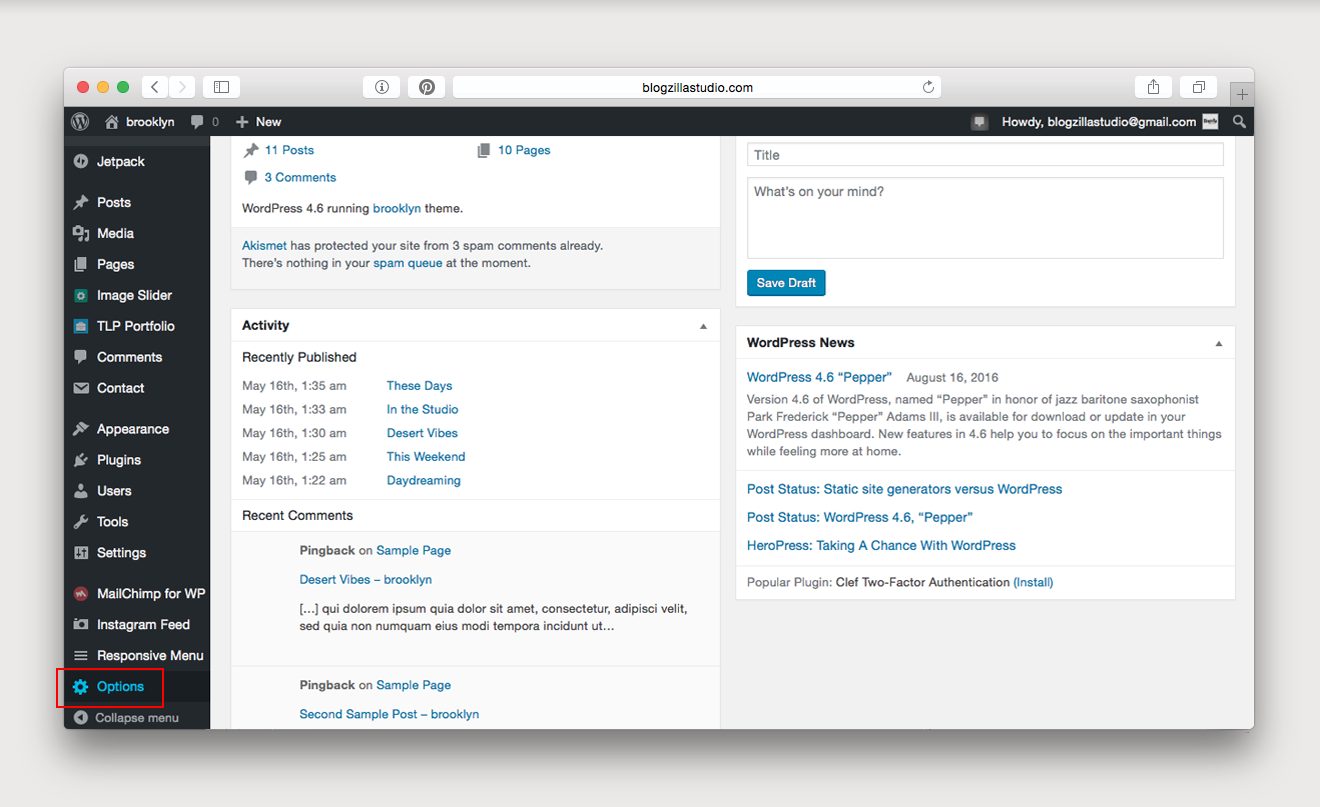
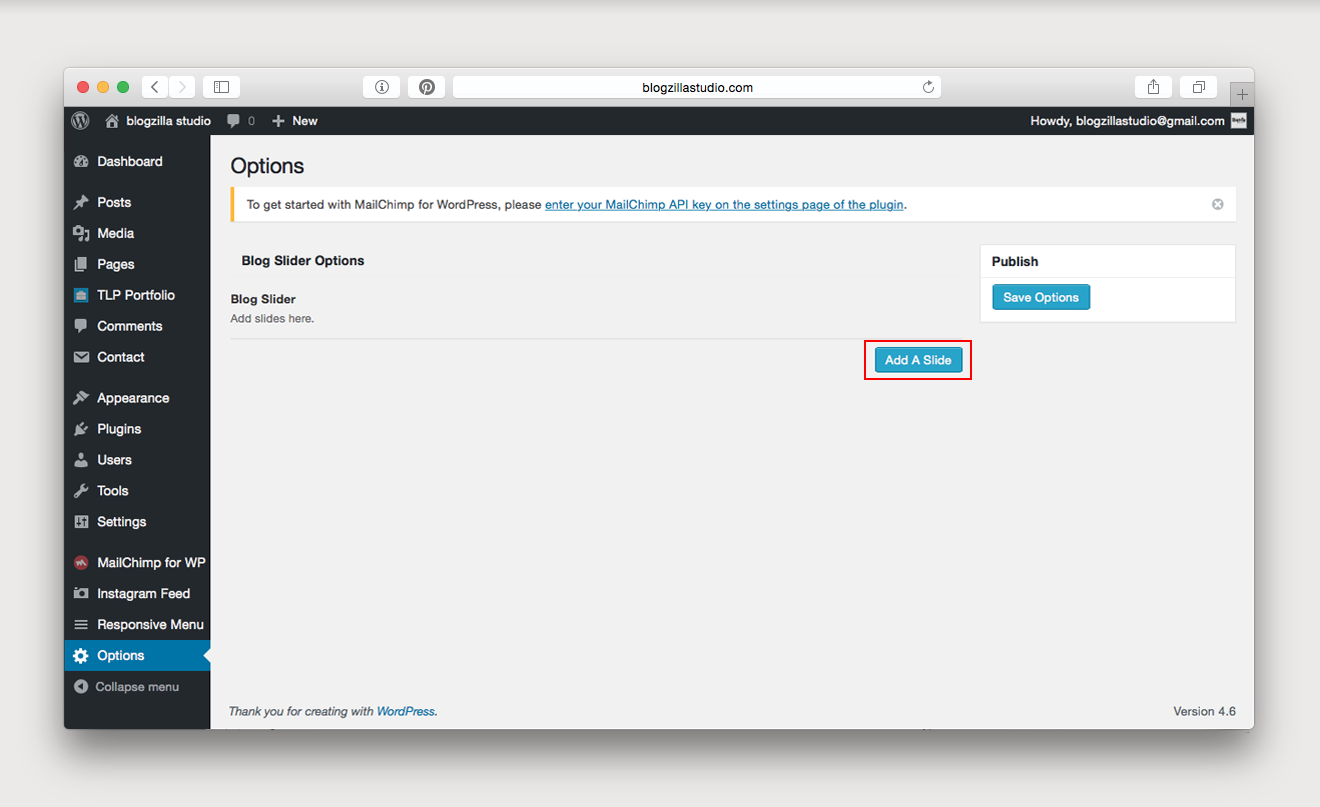
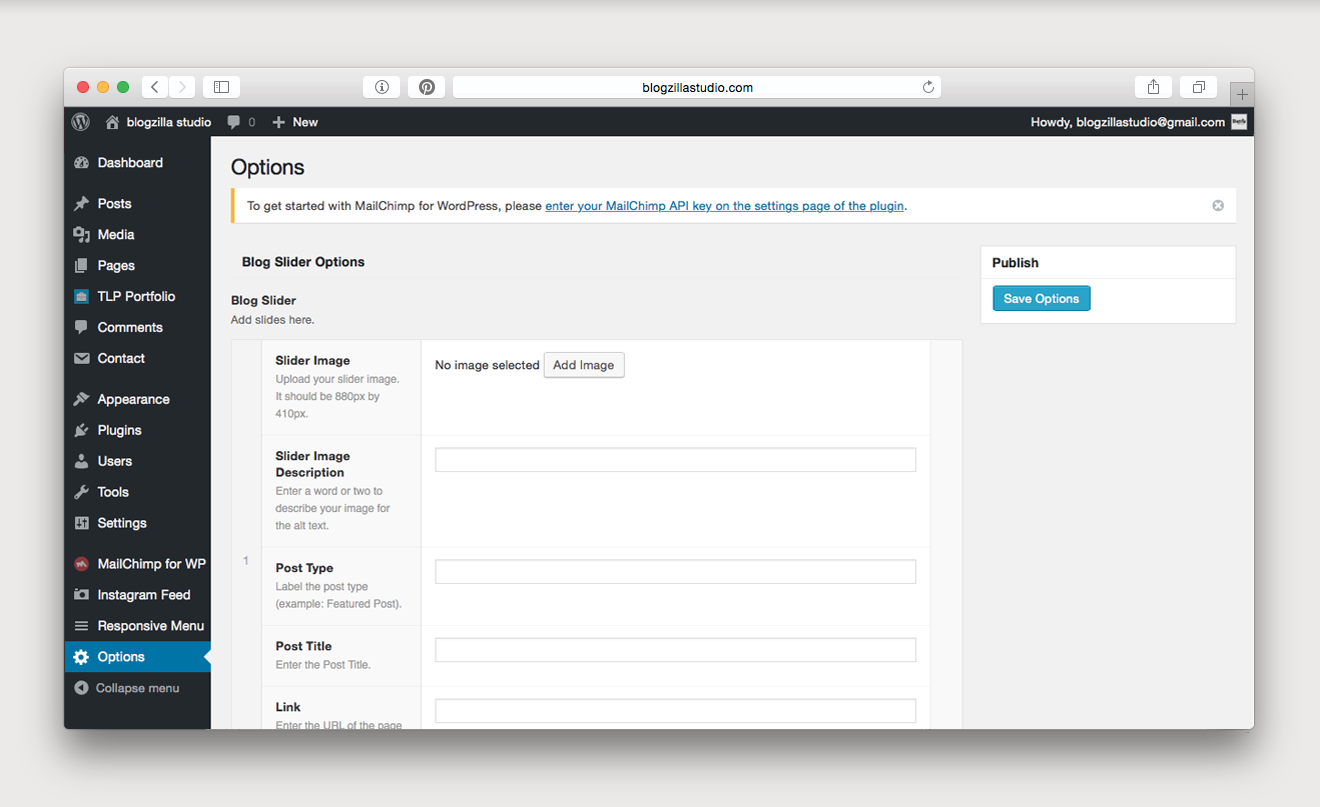
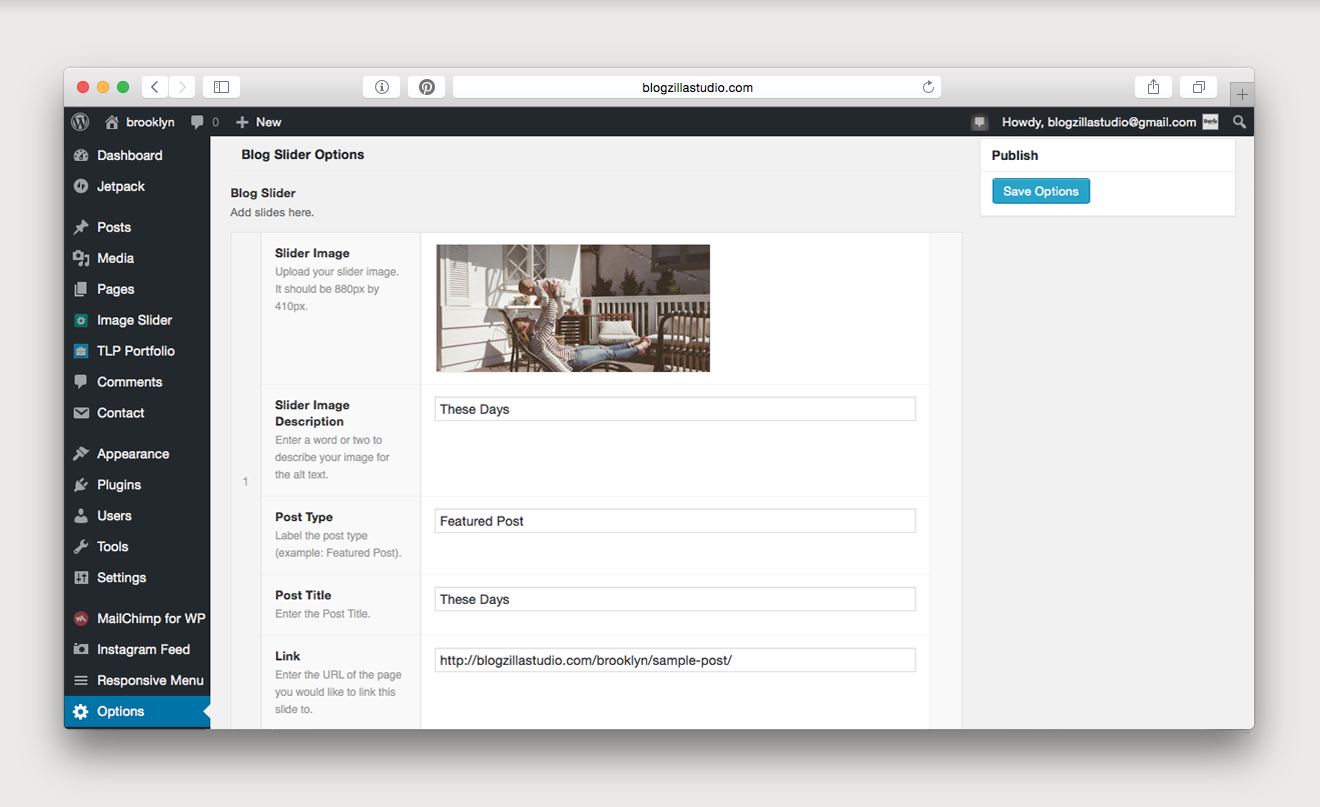
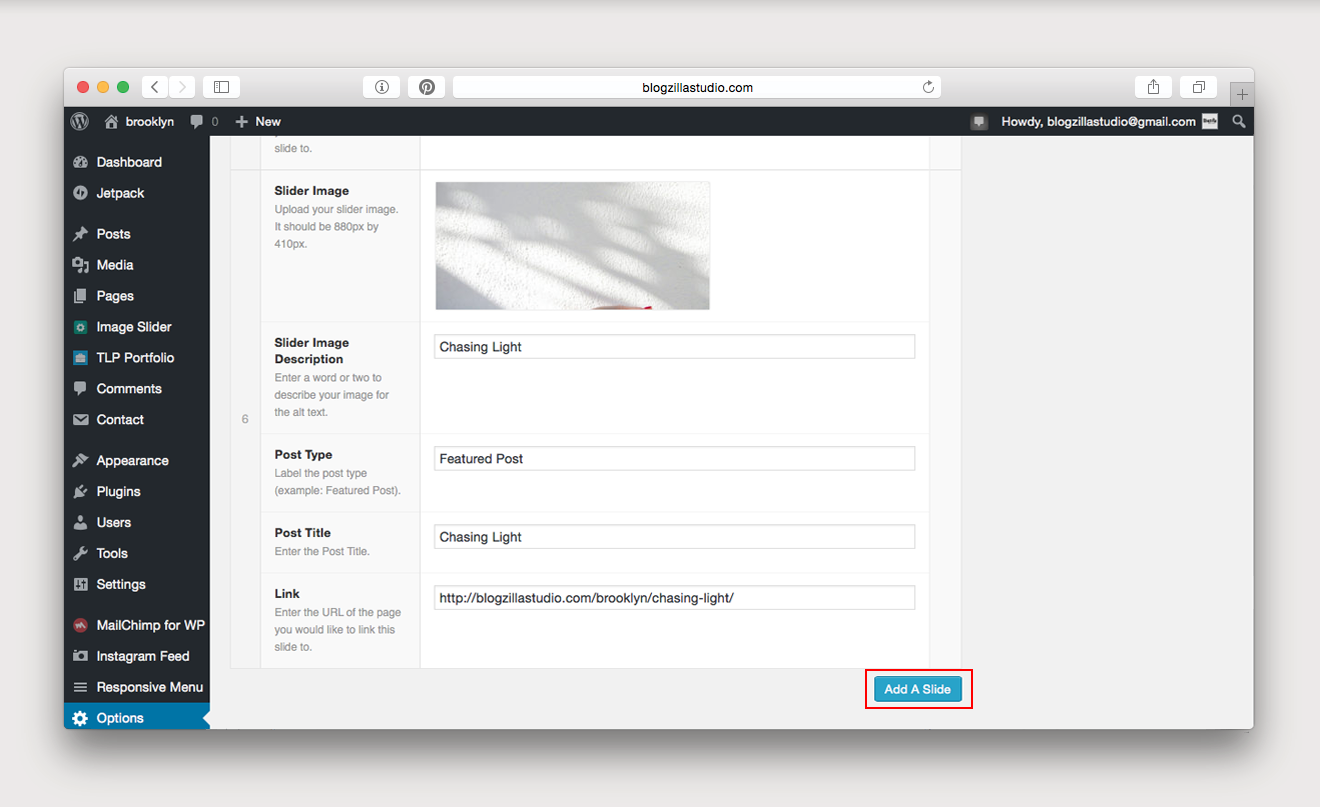
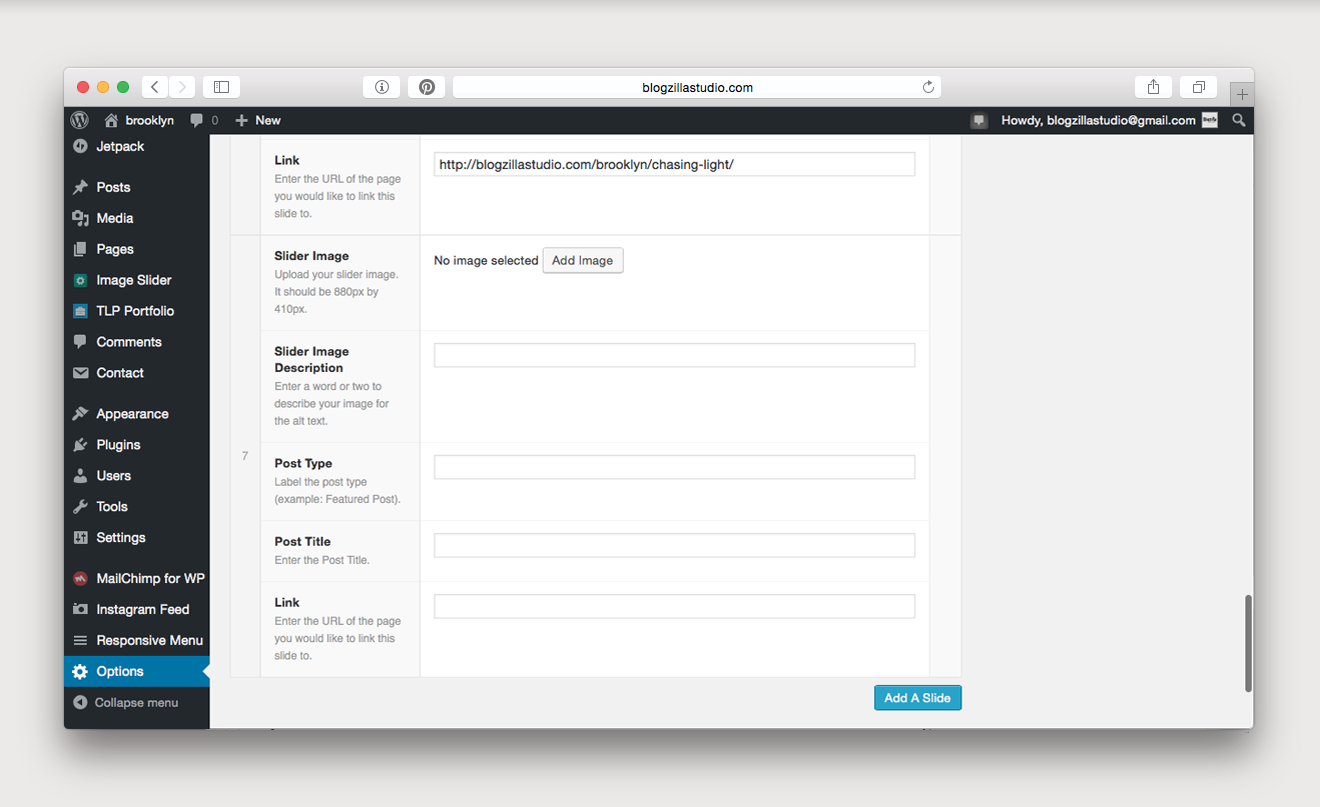
a blog page slider is automatically included with brooklyn, and it is very easy to setup. simply navigate to the options page on the lower left of your screen. first, click add a slide. then, you can manually add as many or as few (we recommend 3 minimum) images to the slider by clicking add a slide again for each one. you have the option to modify the text, images, and links to your liking.
Number of Posts
to control how many posts are included on your main blog page, navigate to settings, and then click on reading. under blog pages show at most, indicate your desired number of posts.
the categories page will automatically included 30 items per page.
also, don’t forget that a scroll to top button is included with brooklyn, so that will help ease the navigation of longer pages!
Sidebar
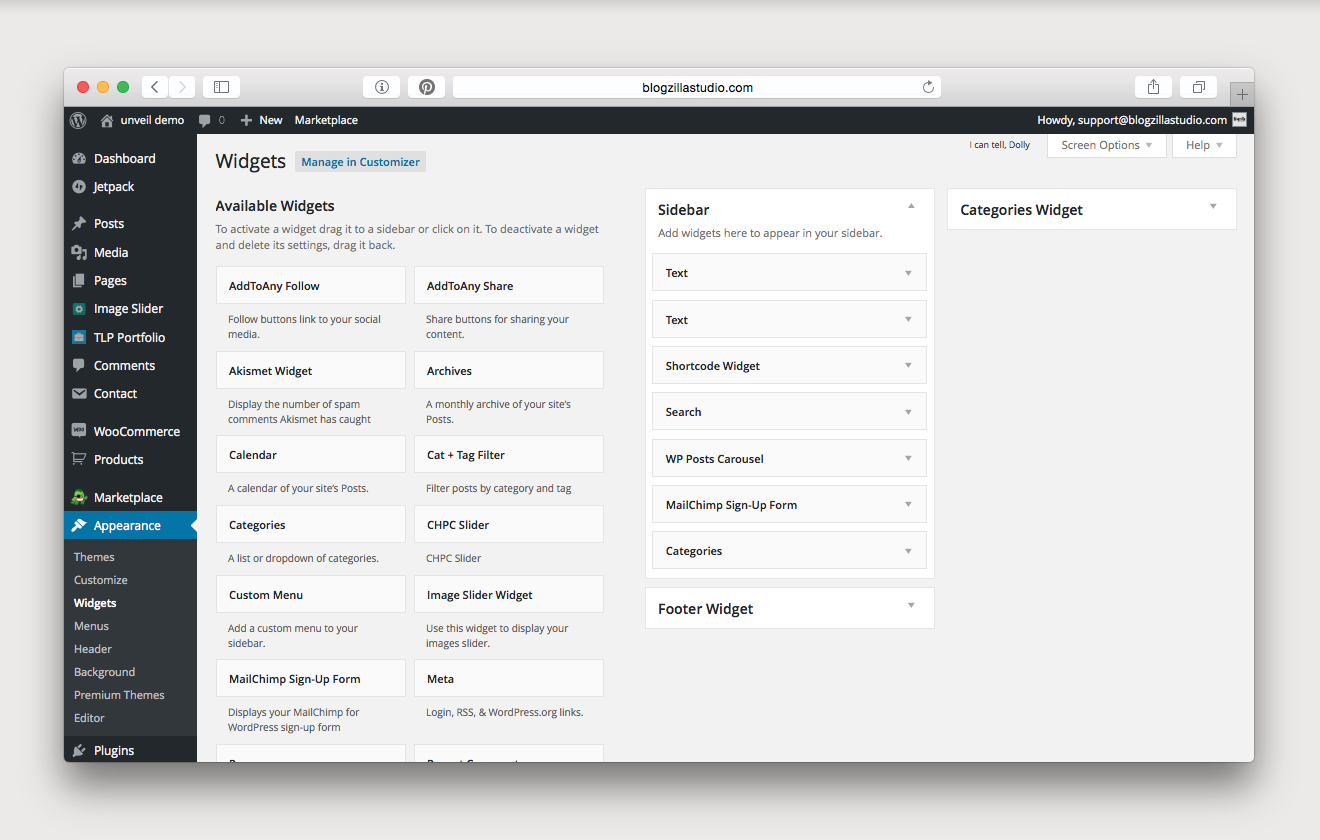
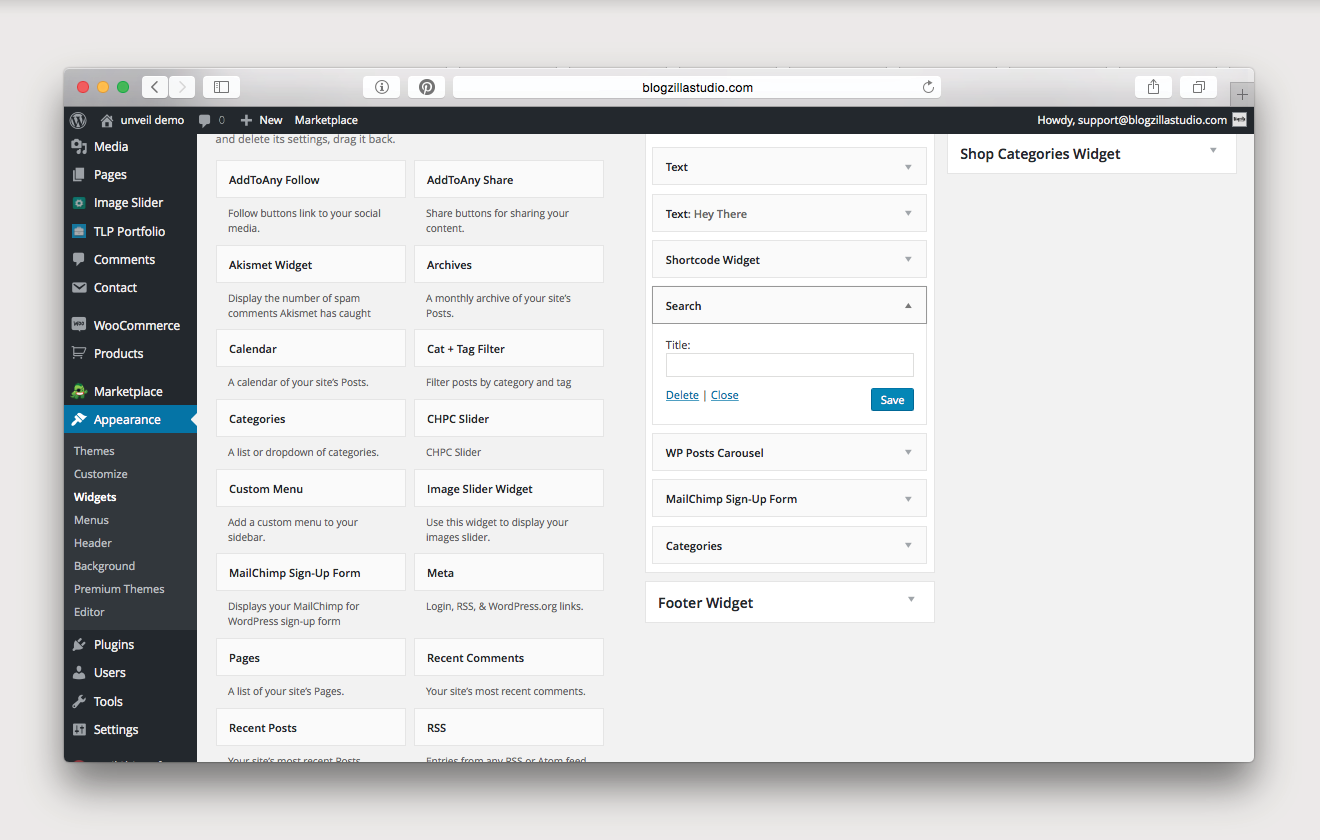
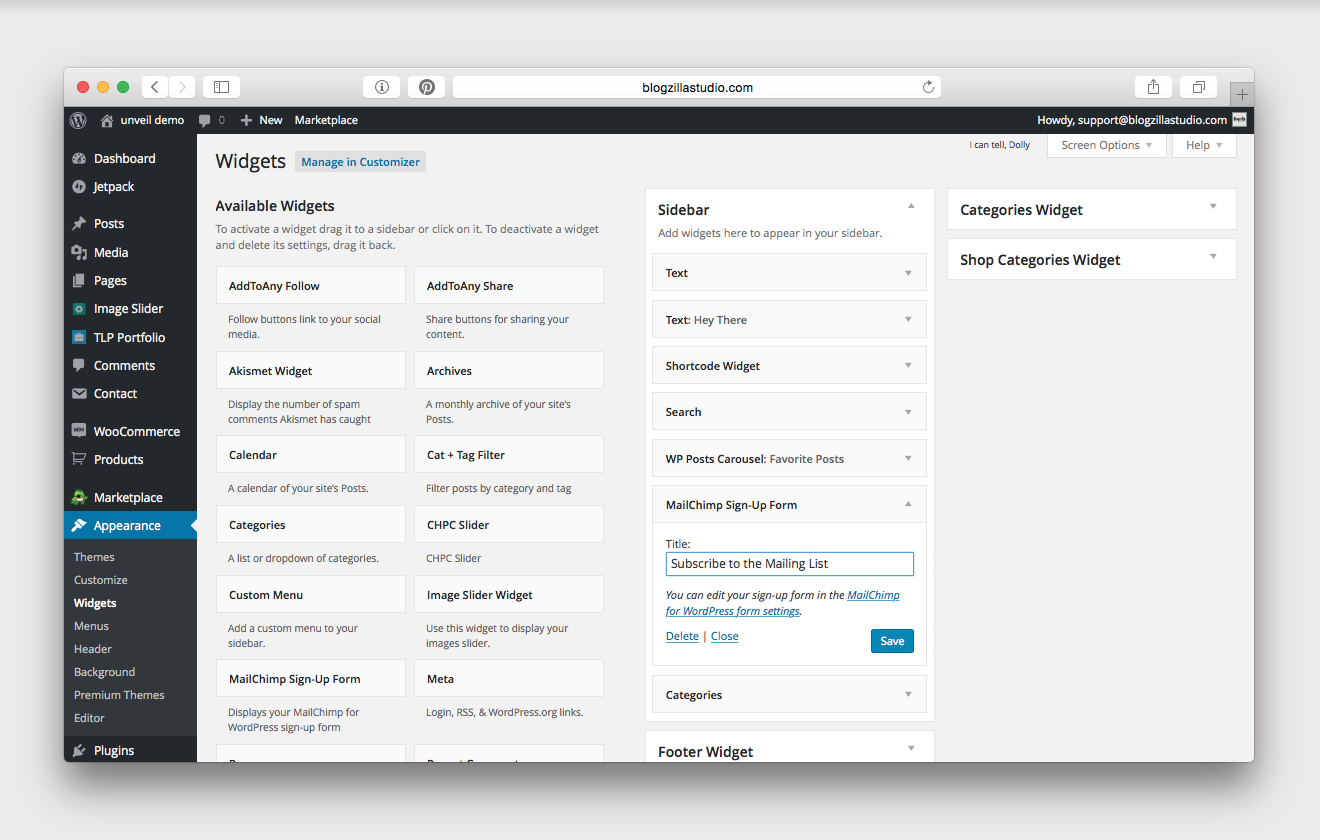
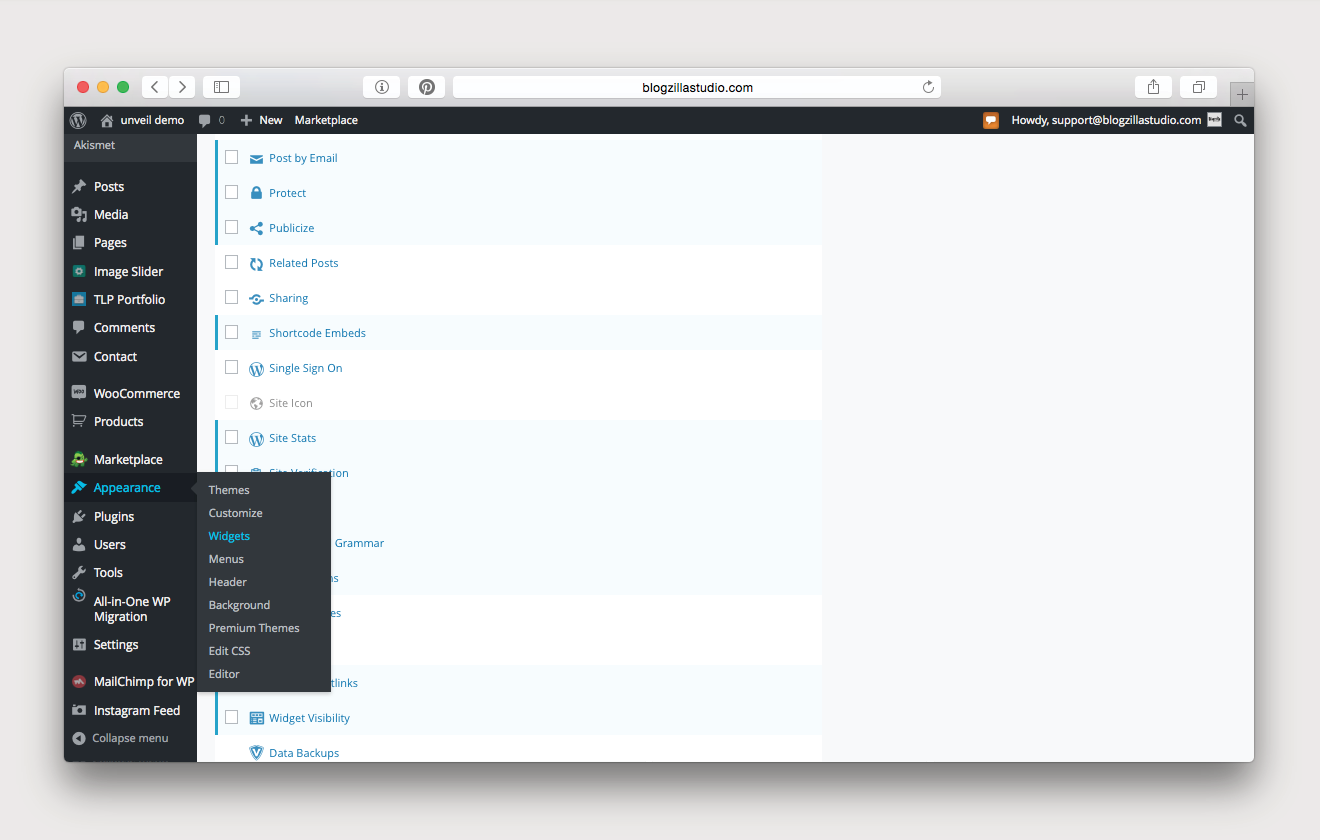
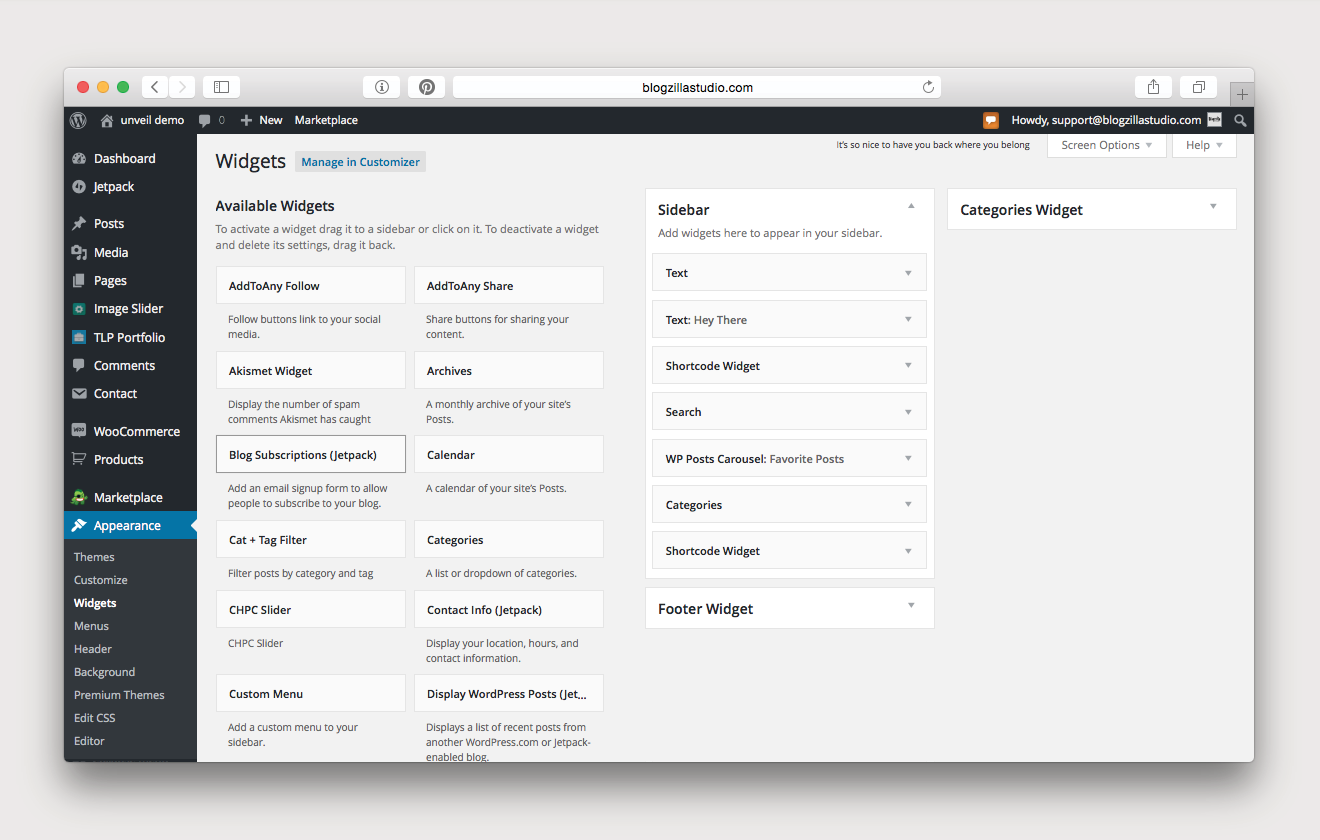
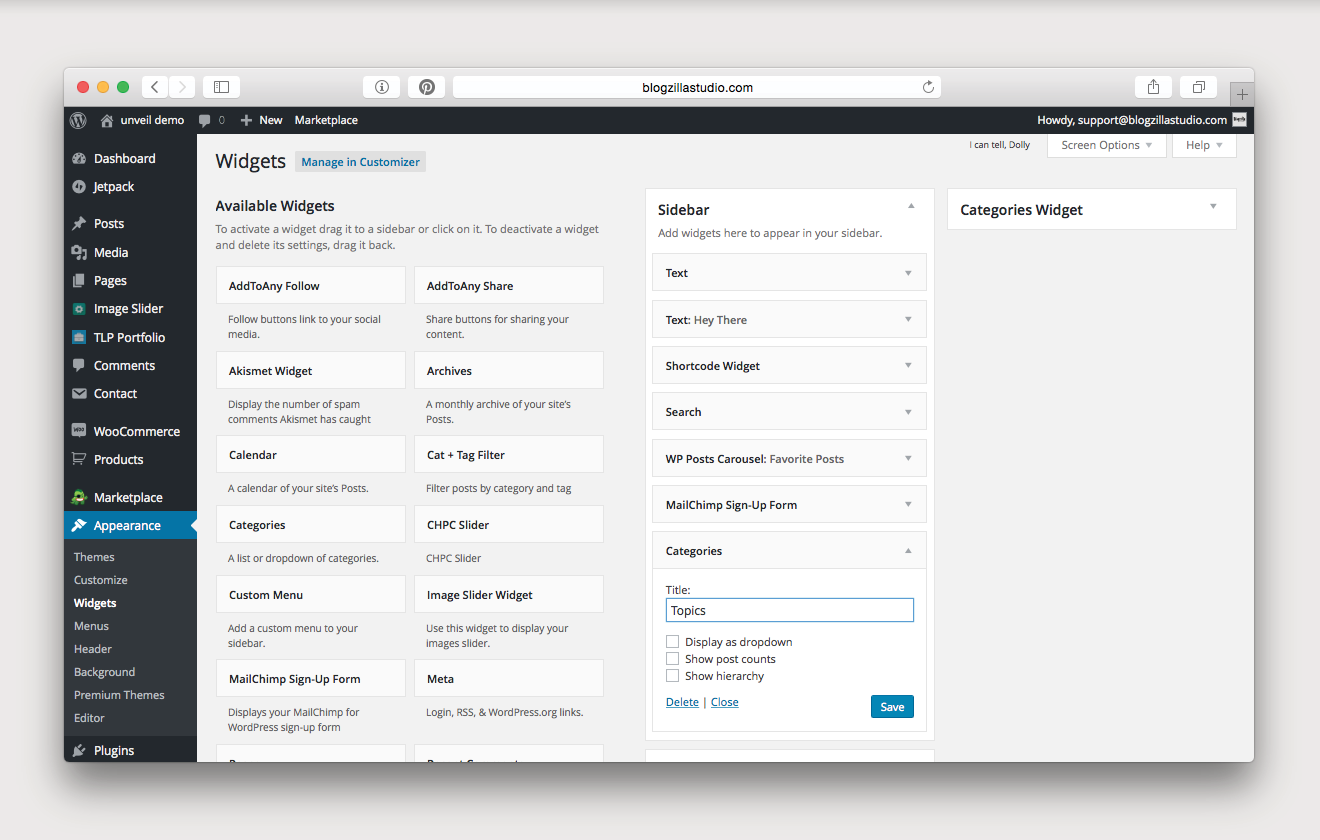
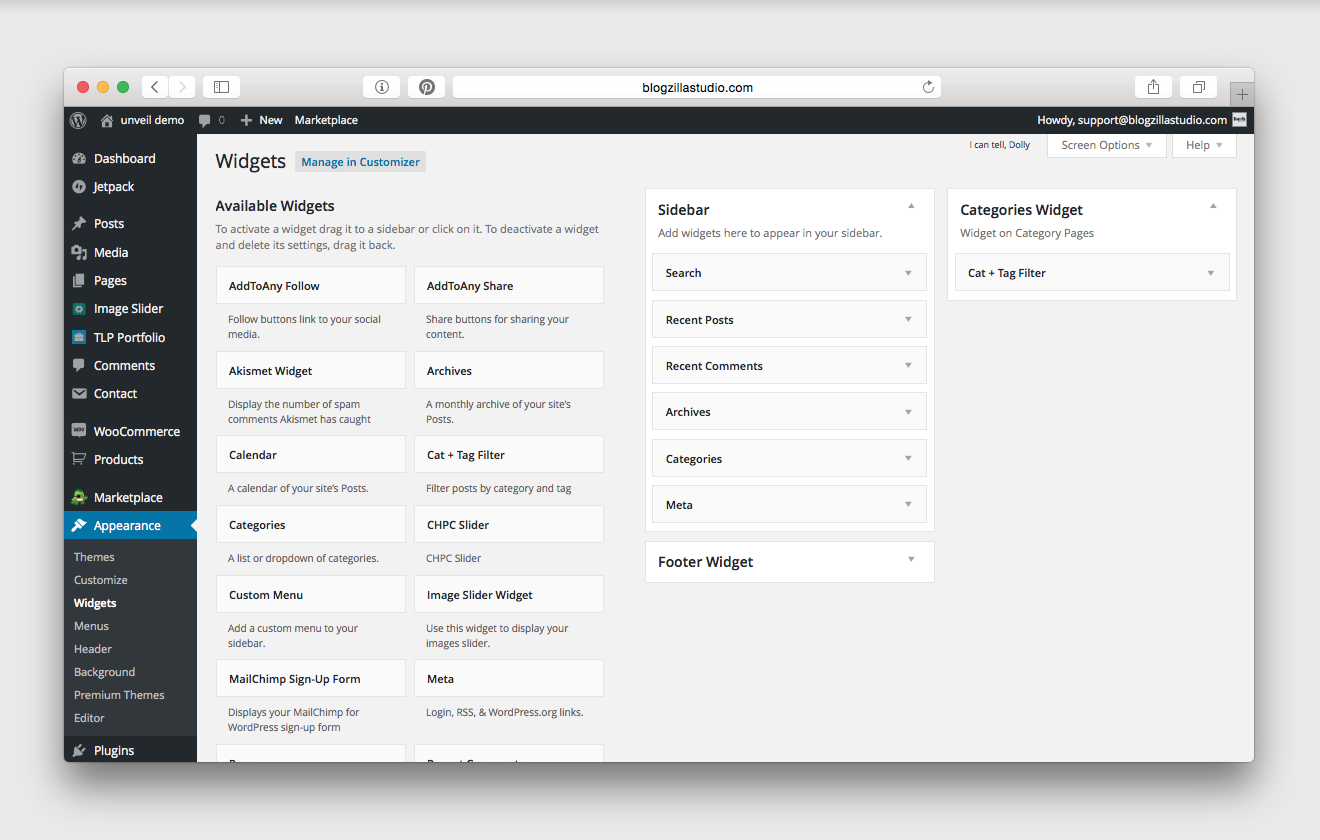
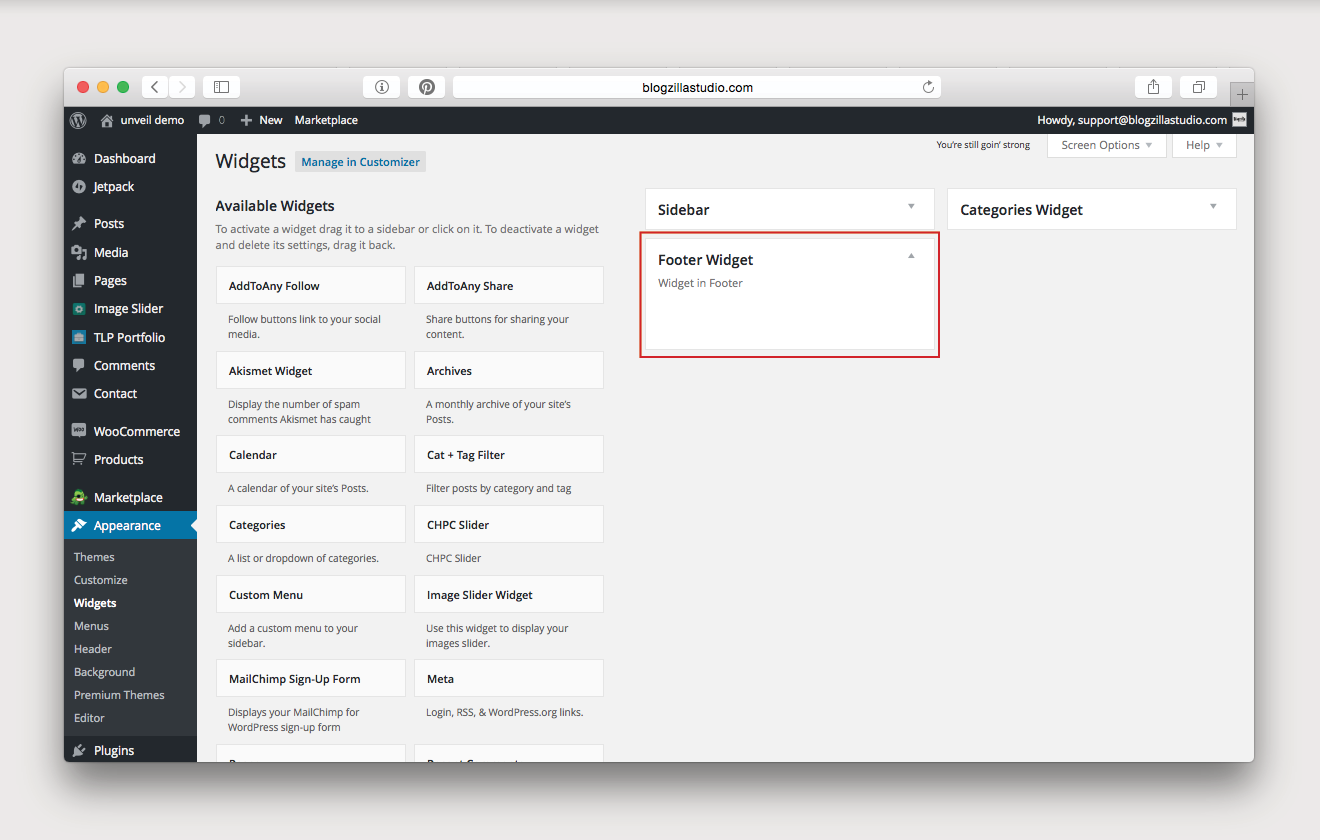
one of the most customizable parts of your blog is the sidebar. to edit your sidebar, go to appearance, and then click on widgets. there are three different widgets included with brooklyn: sidebar, footer widget, and categories widget. the sidebar is the one you will edit for your blog pages. the below widgets are the ones featured on our brooklyn demo, but you can choose to include any mix and match of the available widgets!
Welcome Image
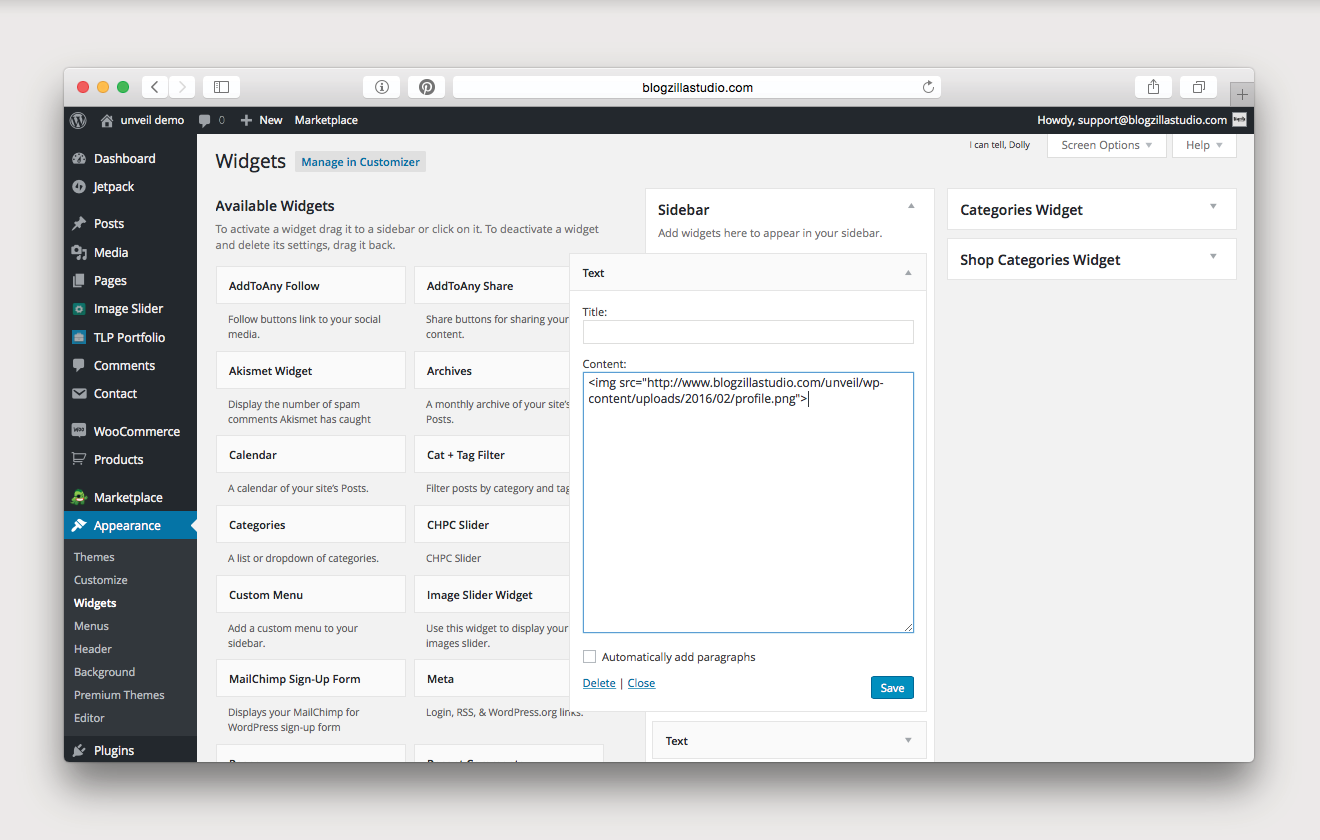
to add your welcome image, you can either create a text widget (which requires some basic html) or install a plugin like image widget to upload your image directly.
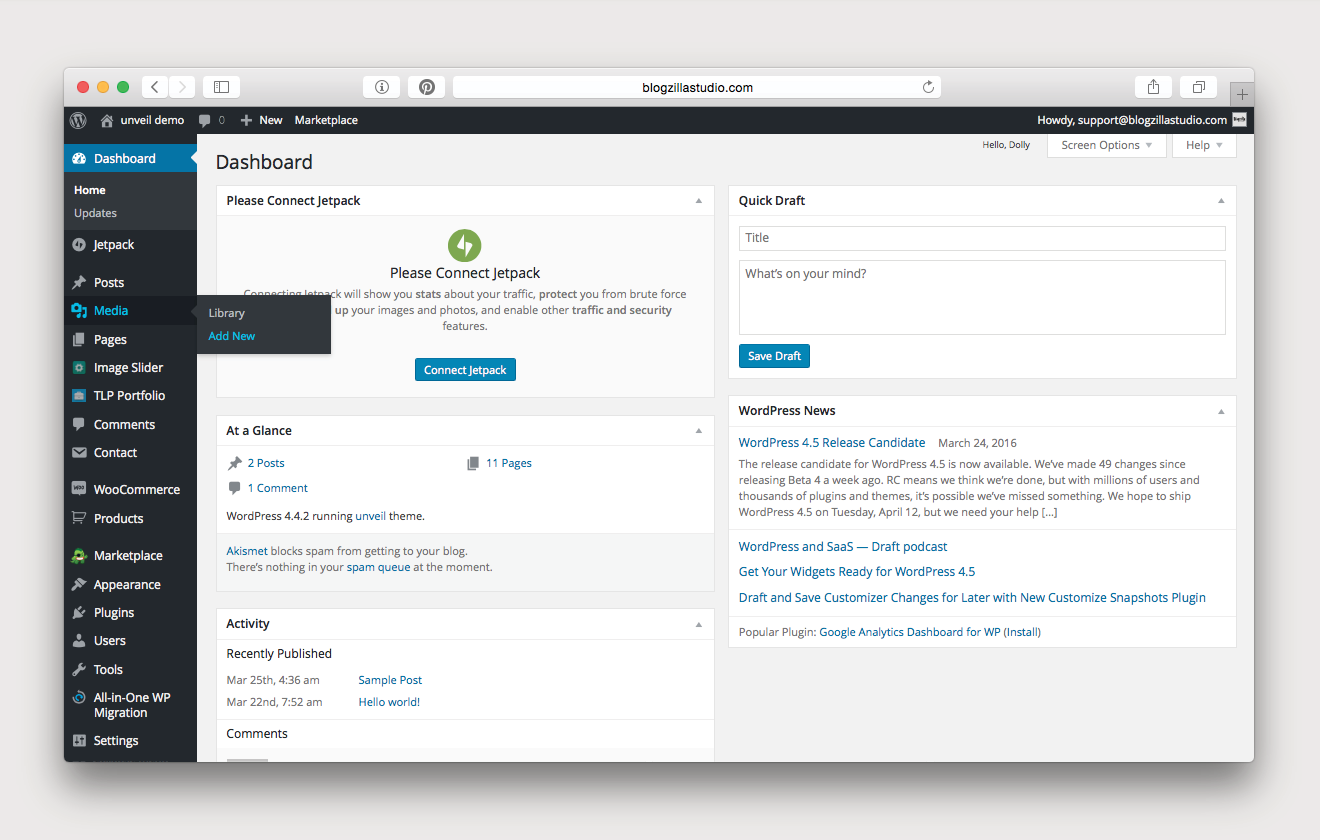
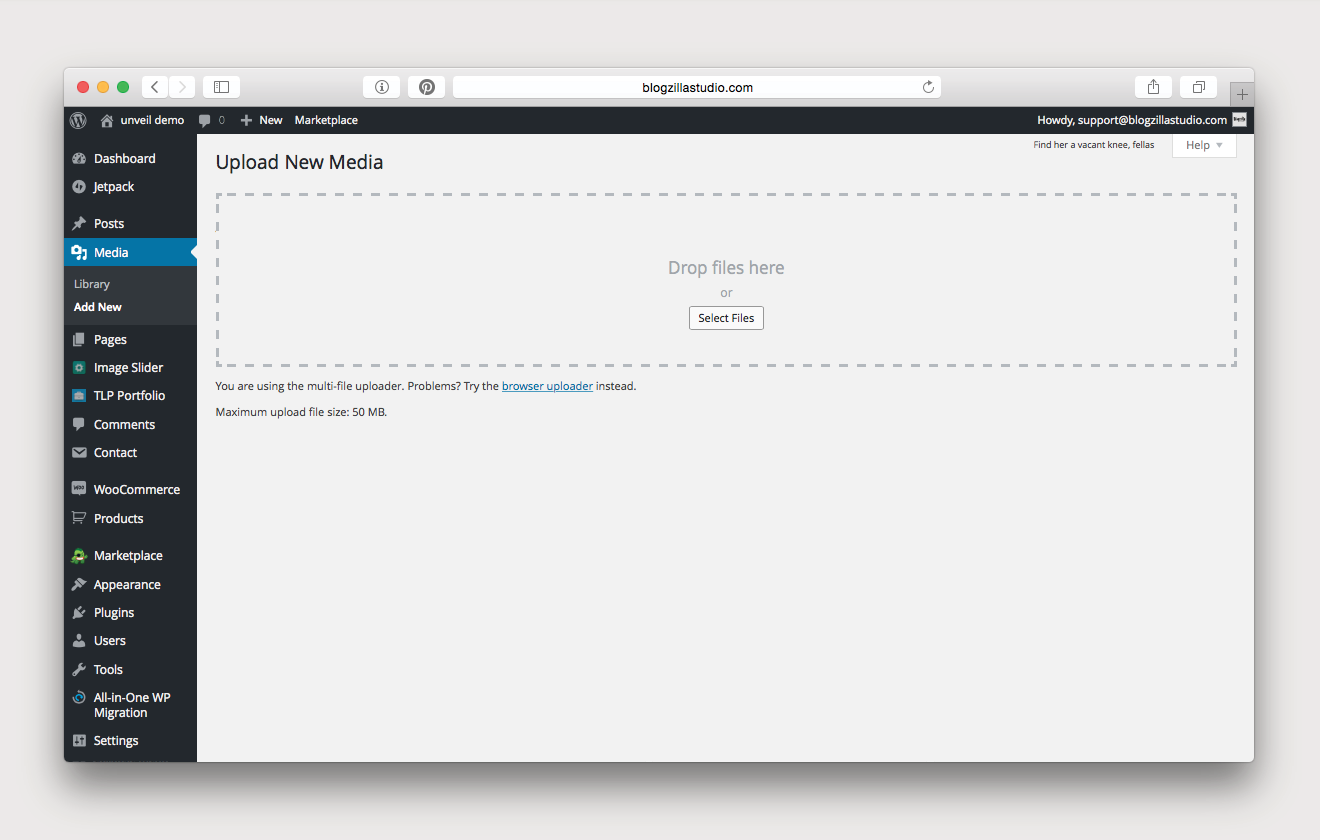
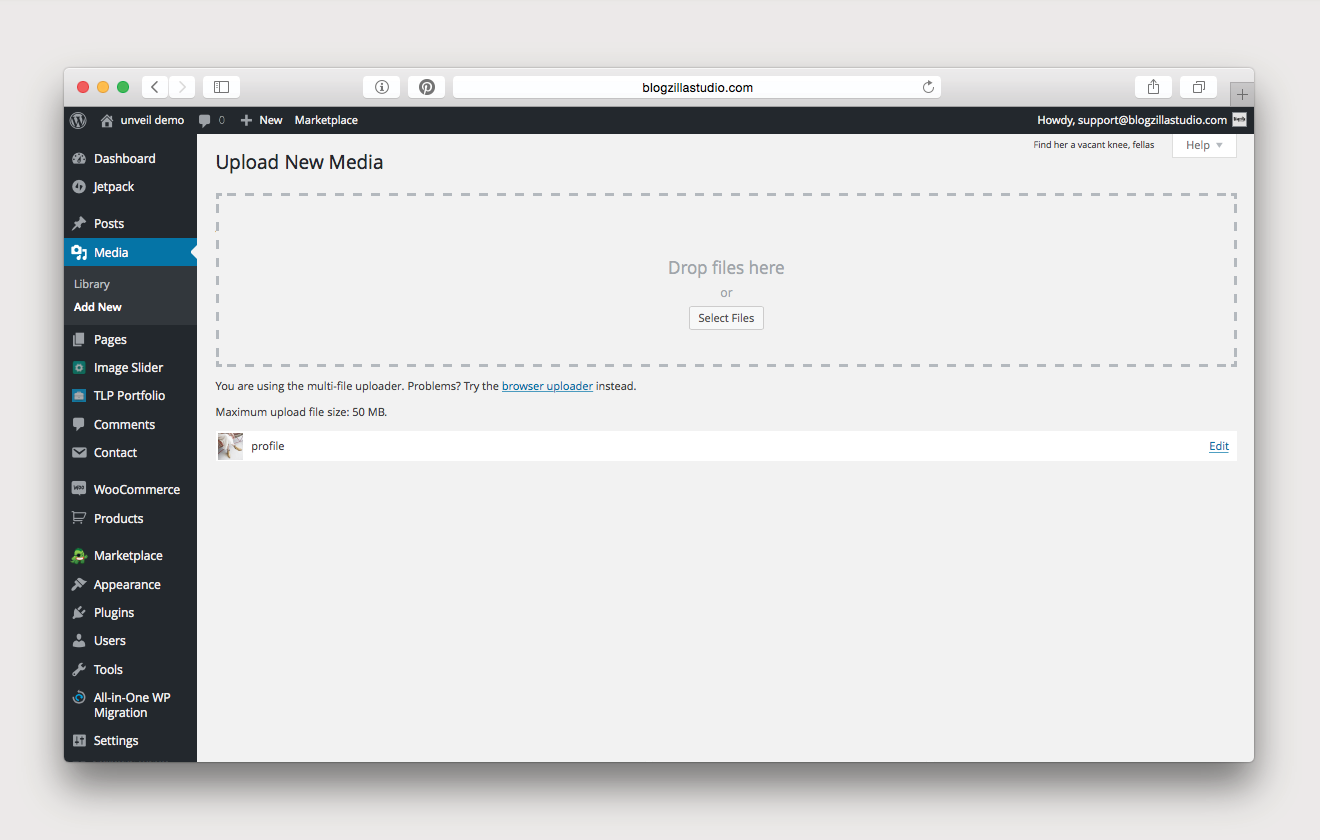
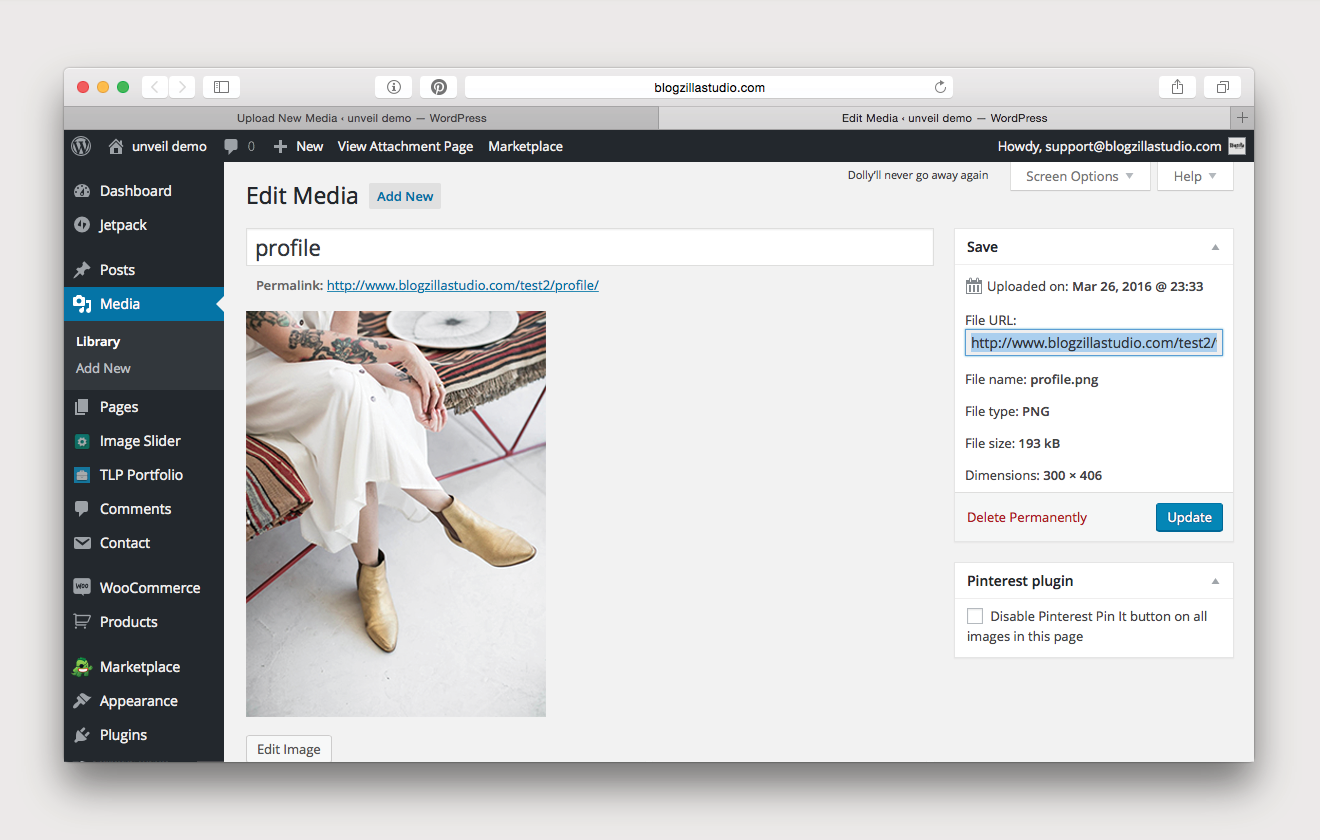
if you choose to do a text widget, you will first need to upload your welcome image. navigate to media, and then add new. upload your welcome photo. your sidebar is 300px wide, so your welcome photo should be, too. once you have uploaded the image, click edit. in the upper-right-hand corner, you’ll see file url. copy that url.
in your text widget, add the following code (replacing # with the url for your image):
<img src="#">
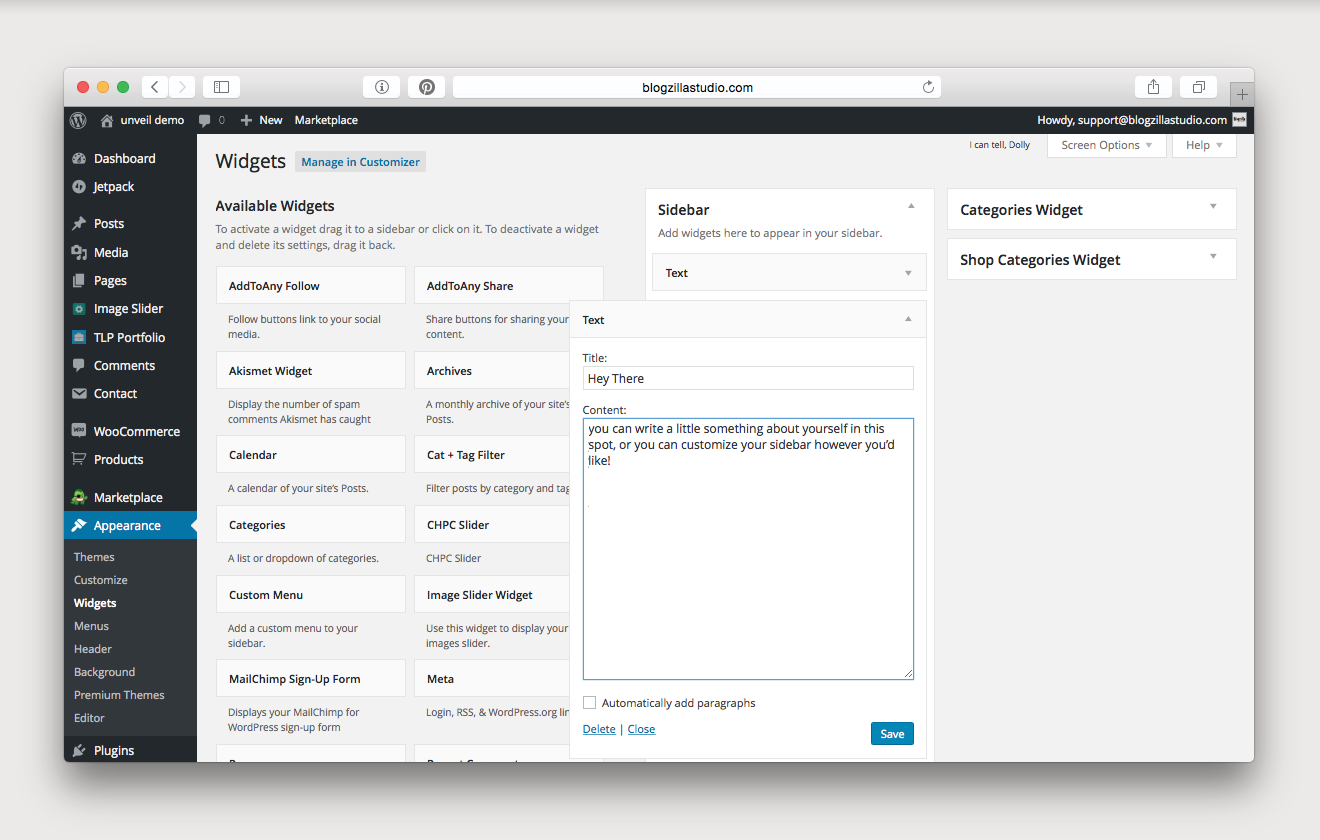
Welcome Message:
your welcome message can be created in a text widget. simply type whatever you’d like and click save!
Social Media:
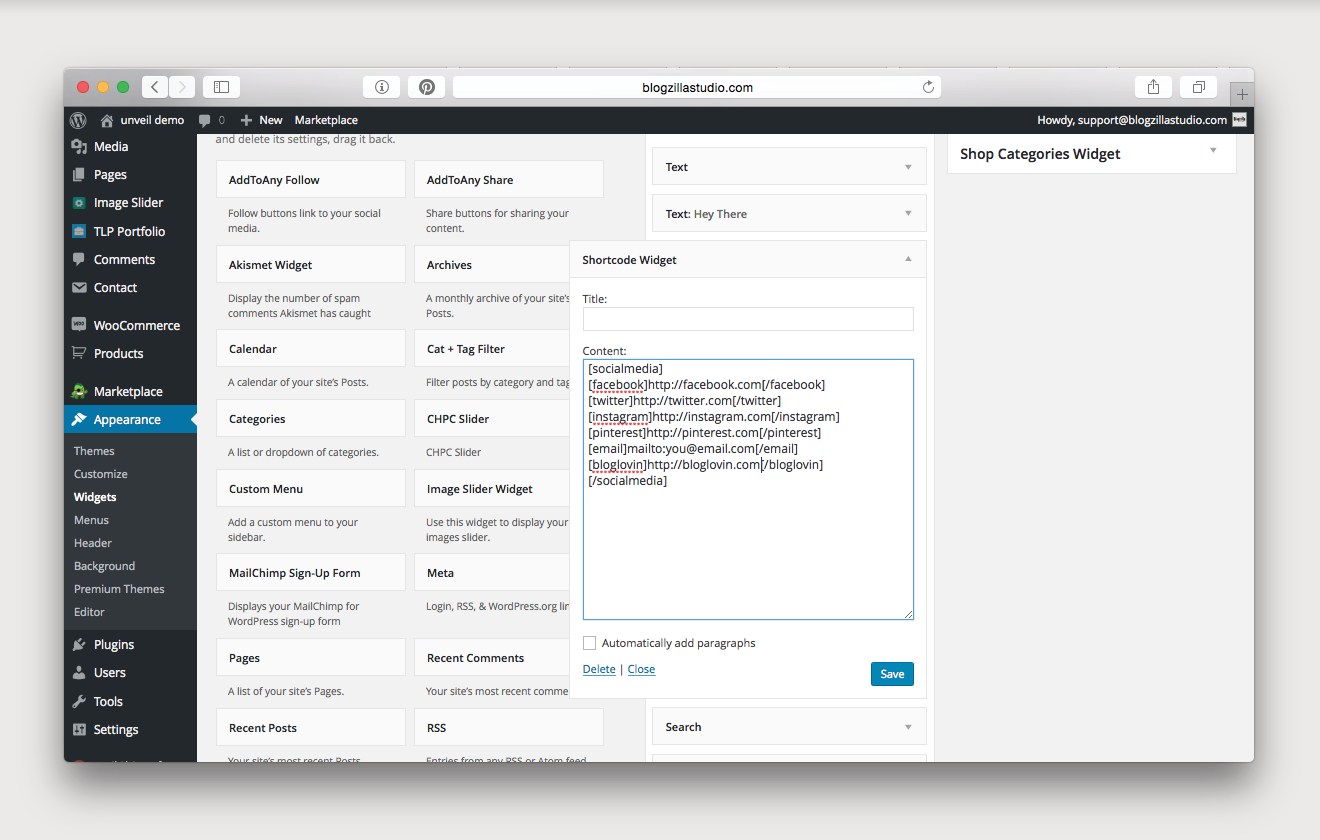
to add the social media icons to your sidebar, you will use simple shortcode. first, add the shortcode widget to your sidebar. then you will add your desired shortcode.
all of the included social icon shortcode is listed below. between each open and close shortcode, you will need to insert the url for your social media (replacing the # with the correct url):
[bloglovin]#[/bloglovin]
[dribble]#[/dribble]
[facebook]#[/facebook]
[flickr]#[/flickr]
[instagram]#[/instagram]
[linkedin]#[/linkedin]
[email]#[/email]
[pinterest]#[/pinterest]
[rss]#[/rss]
[tumblr]#[/tumblr]
[twitter]#[/twitter]
[vimeo]#[/vimeo]
[youtube]#[/youtube]
once you have the shortcode for all of the social media you would like to include, you will need to surround it be the following shortcode:
[socialmedia][/socialmedia]
the example below shows everything working together as it is on our demo theme:
[socialmedia]
[facebook]#[/facebook]
[twitter]#[/twitter]
[instagram]#[/instagram]
[pinterest]#[/pinterest]
[email]#[/email]
[bloglovin]#[/bloglovin]
[/socialmedia]
Search
the search bar couldn’t be easier! just drag it onto your sidebar, and you’re set!
MailChimp Subscribe
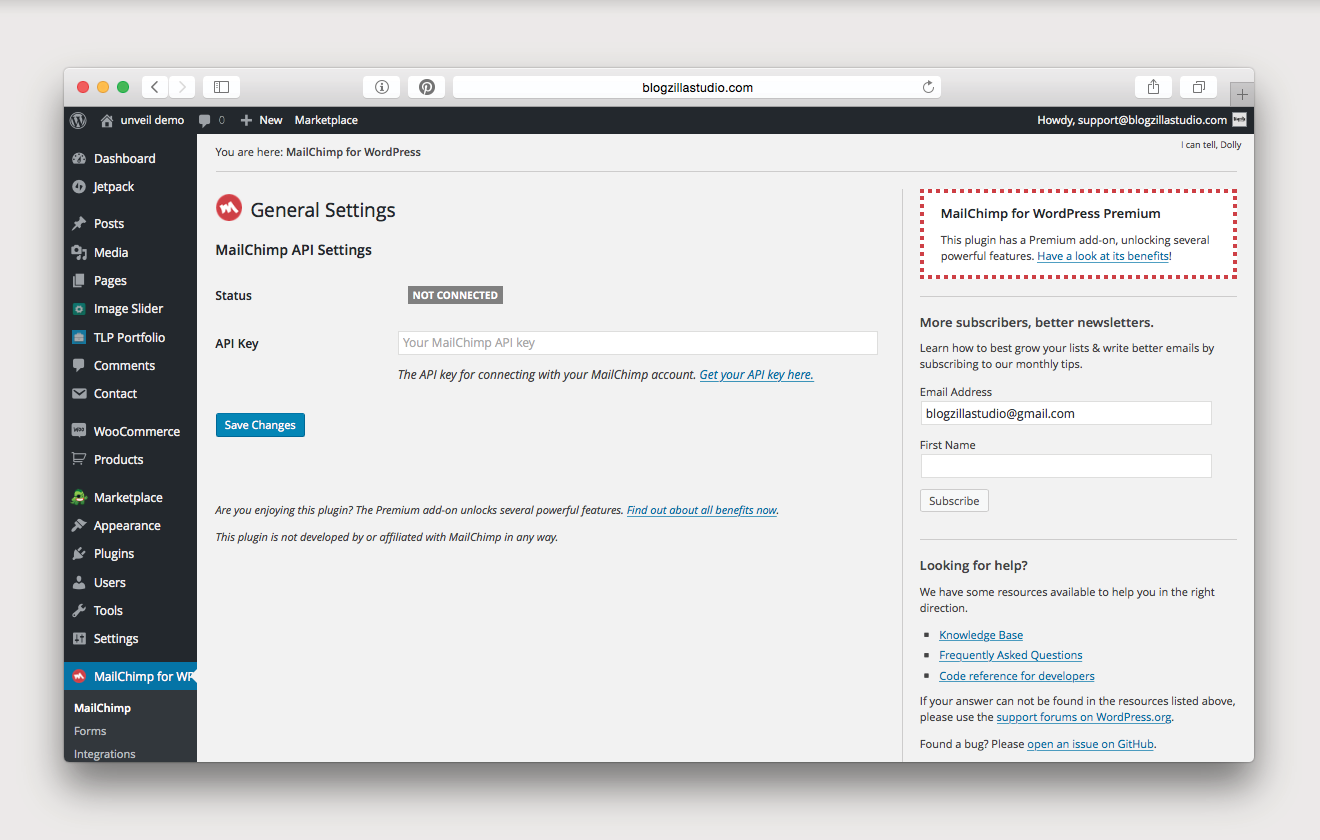
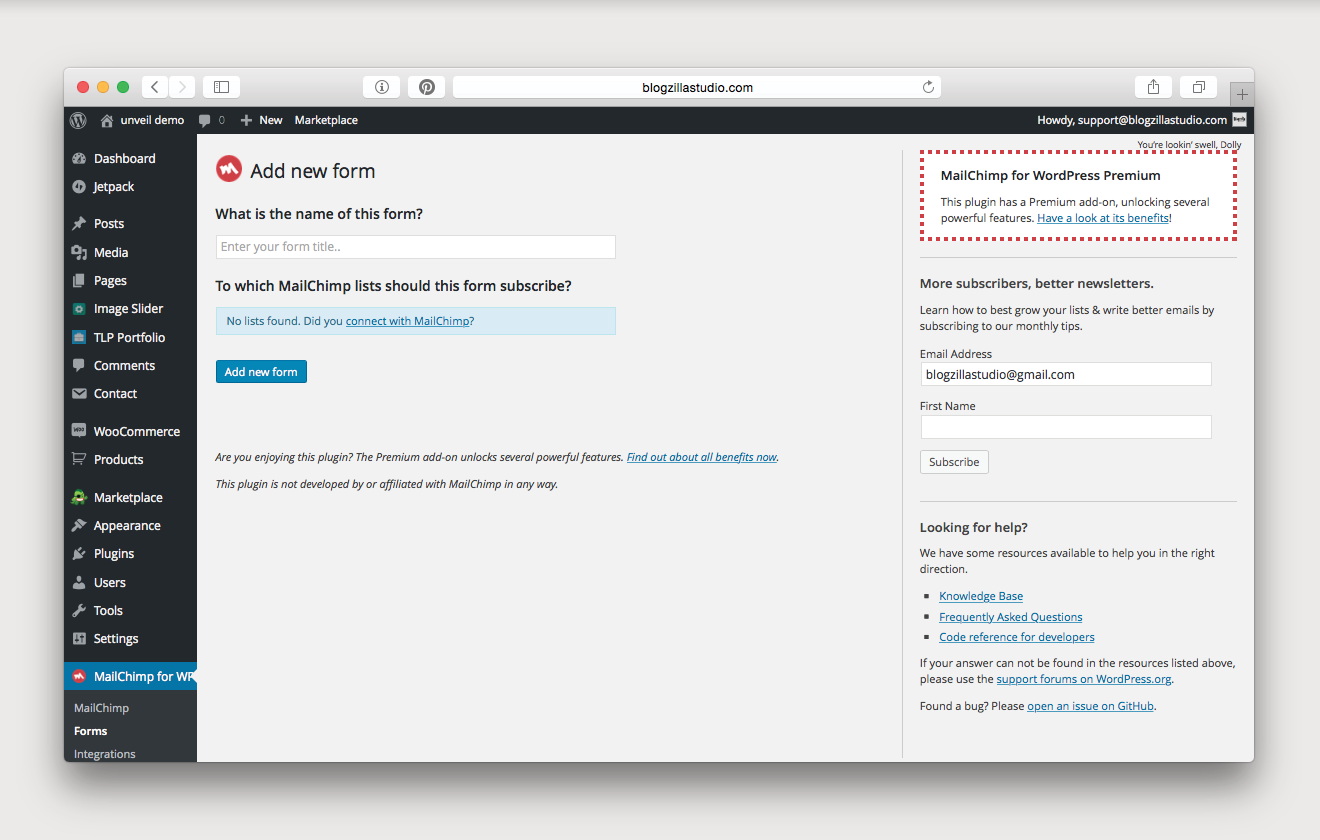
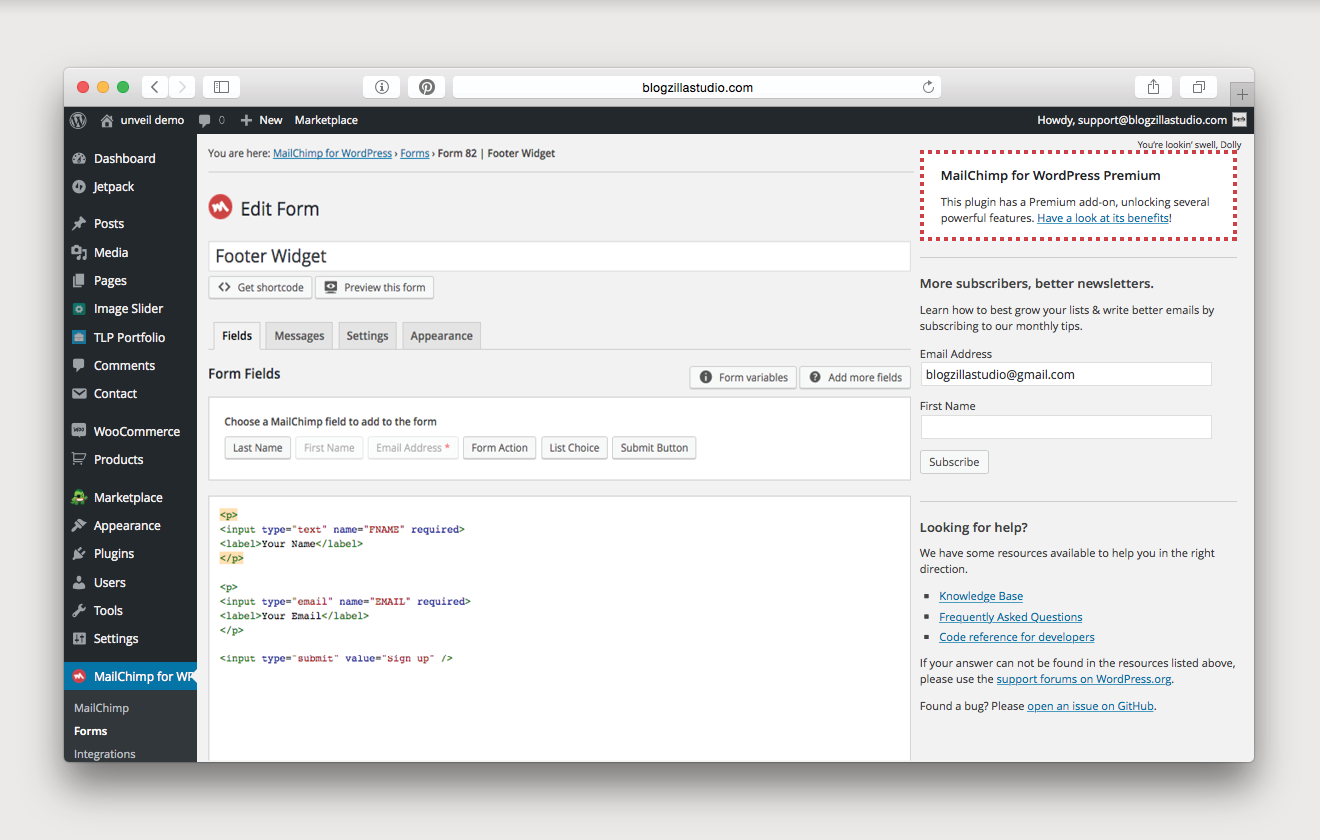
you can easily add a mailchimp subscribe form to your sidebar (or footer, if you’d like…). first, you need to install one of our recommended plugins: mailchimp for wordpress. then, click mailchimp for wp on your dashboard. here, you will need to follow the instructions to link your mailchimp account. once it is connected, you can create your form! please use the following code in your form fields (you can choose to omit or include name, but email must be included):
<p>
<input type="text" name="FNAME" required>
<label>Your Name</label>
</p>

<p>
<input type="email" name="EMAIL" required>
<label>Your Email</label>
</p>

<input type="submit" value="Sign up" />
</pre>
once your form is ready, simply drag the mailchimp sign-up form to your sidebar widget, and you are ready to go!
Email / Jetpack Subscribe
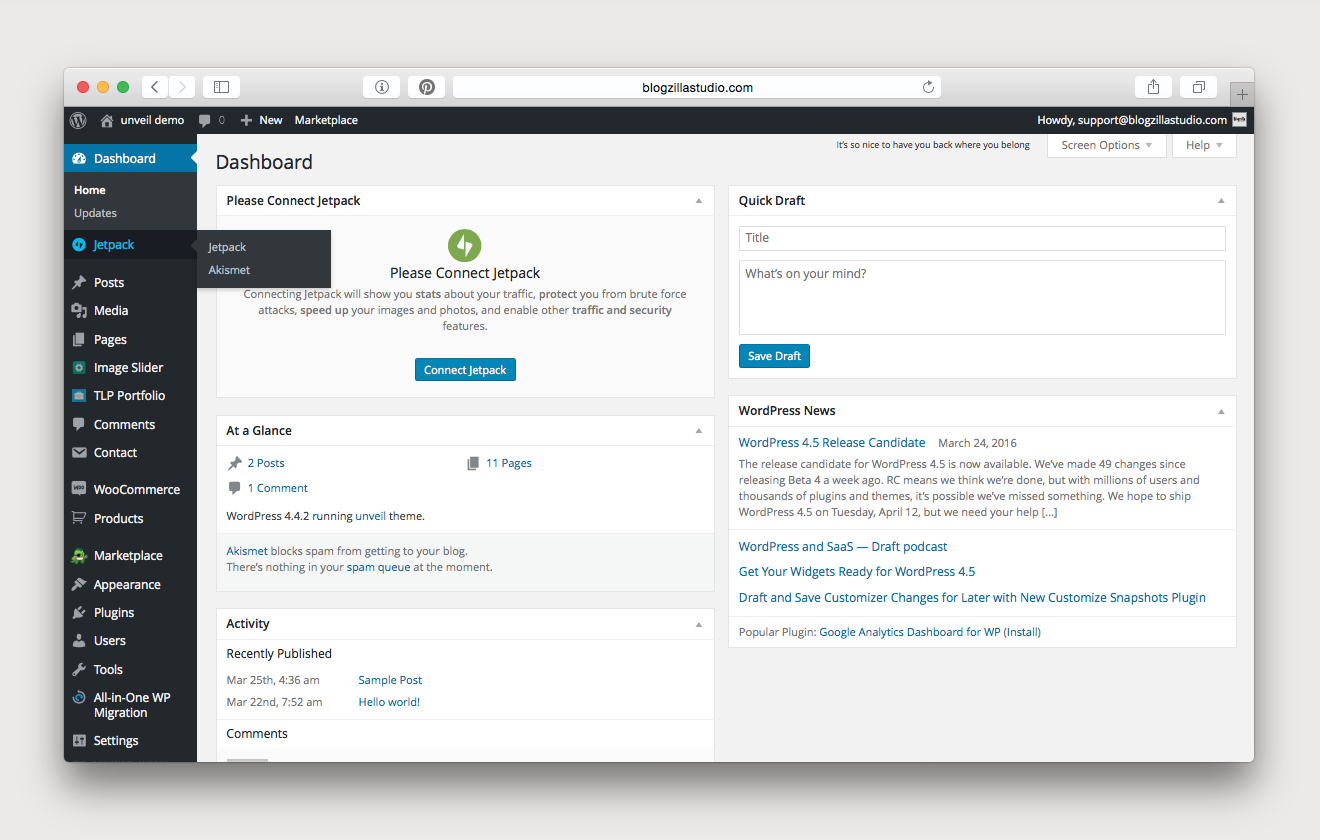
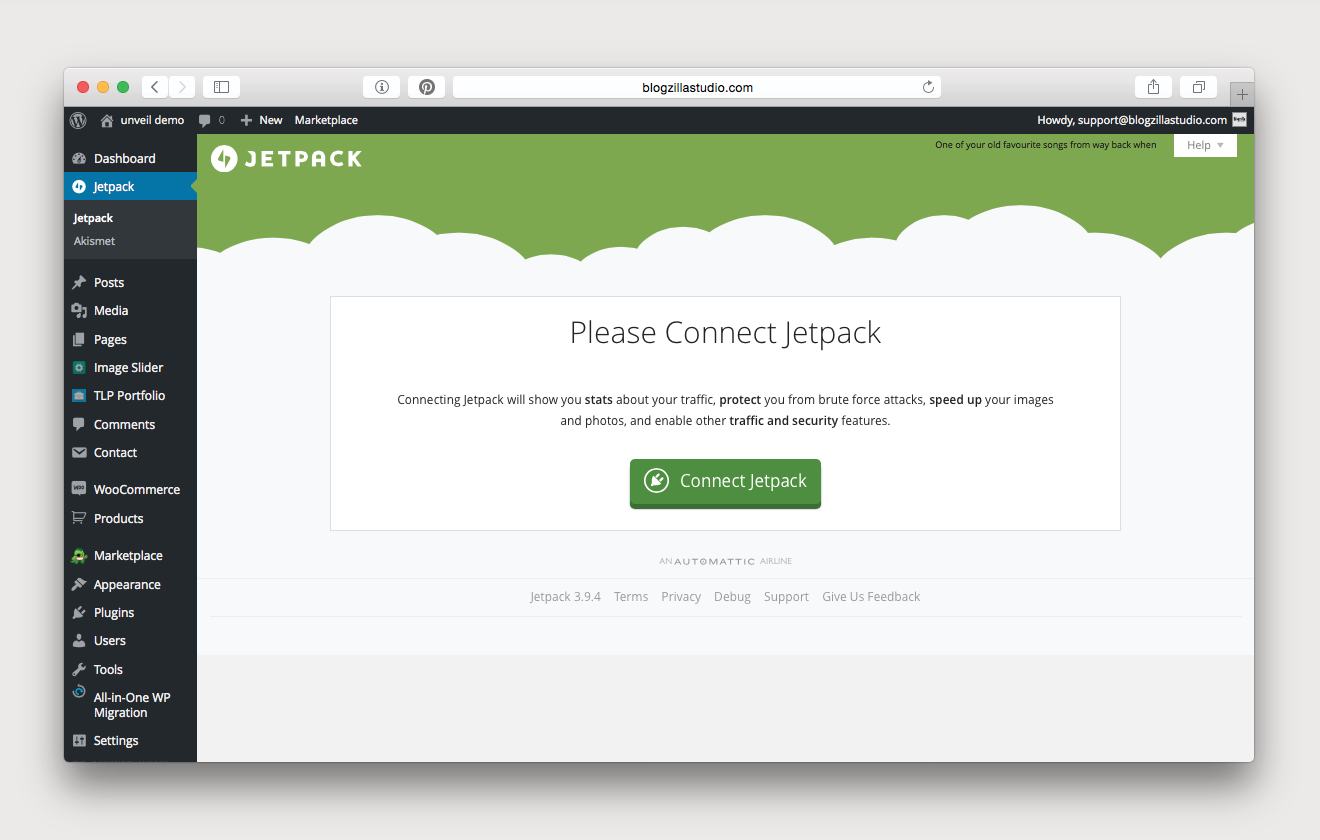
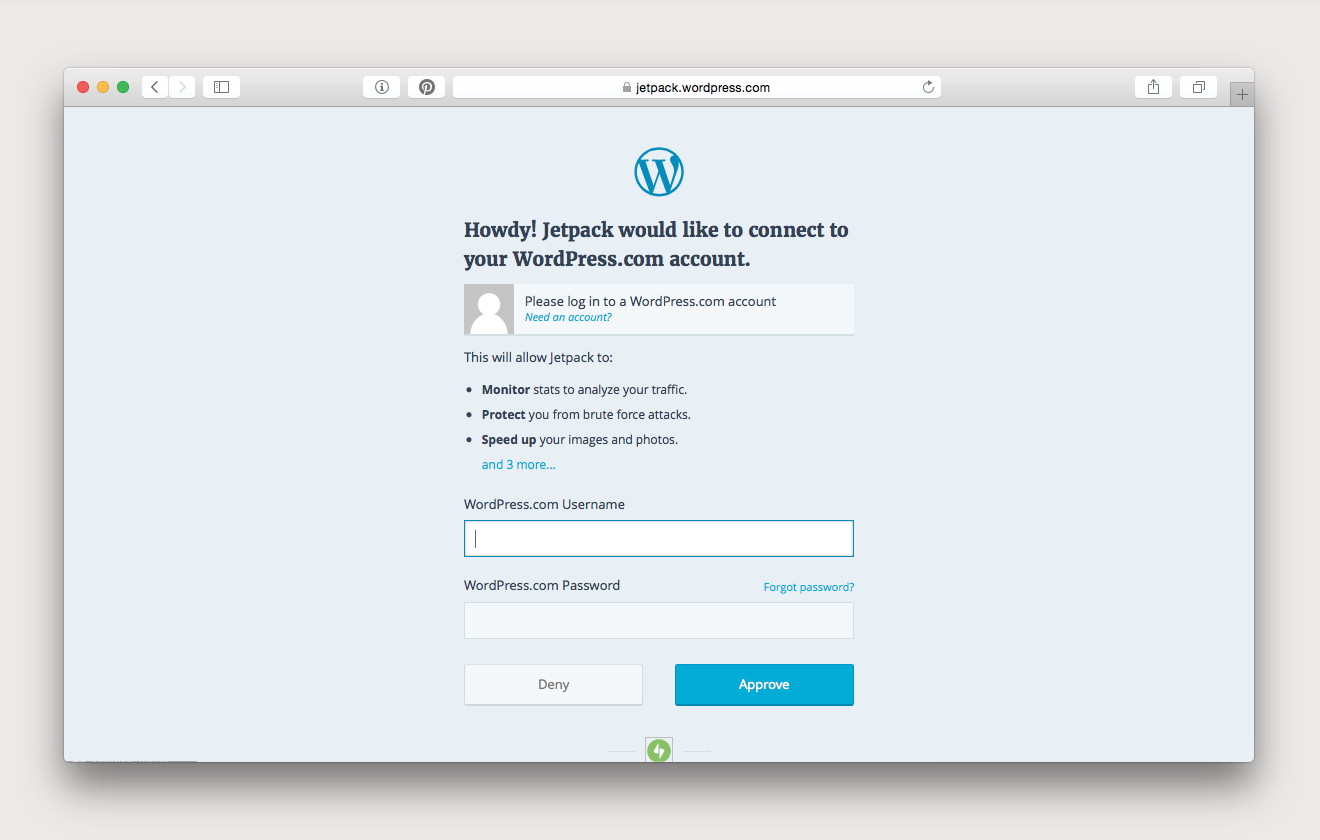
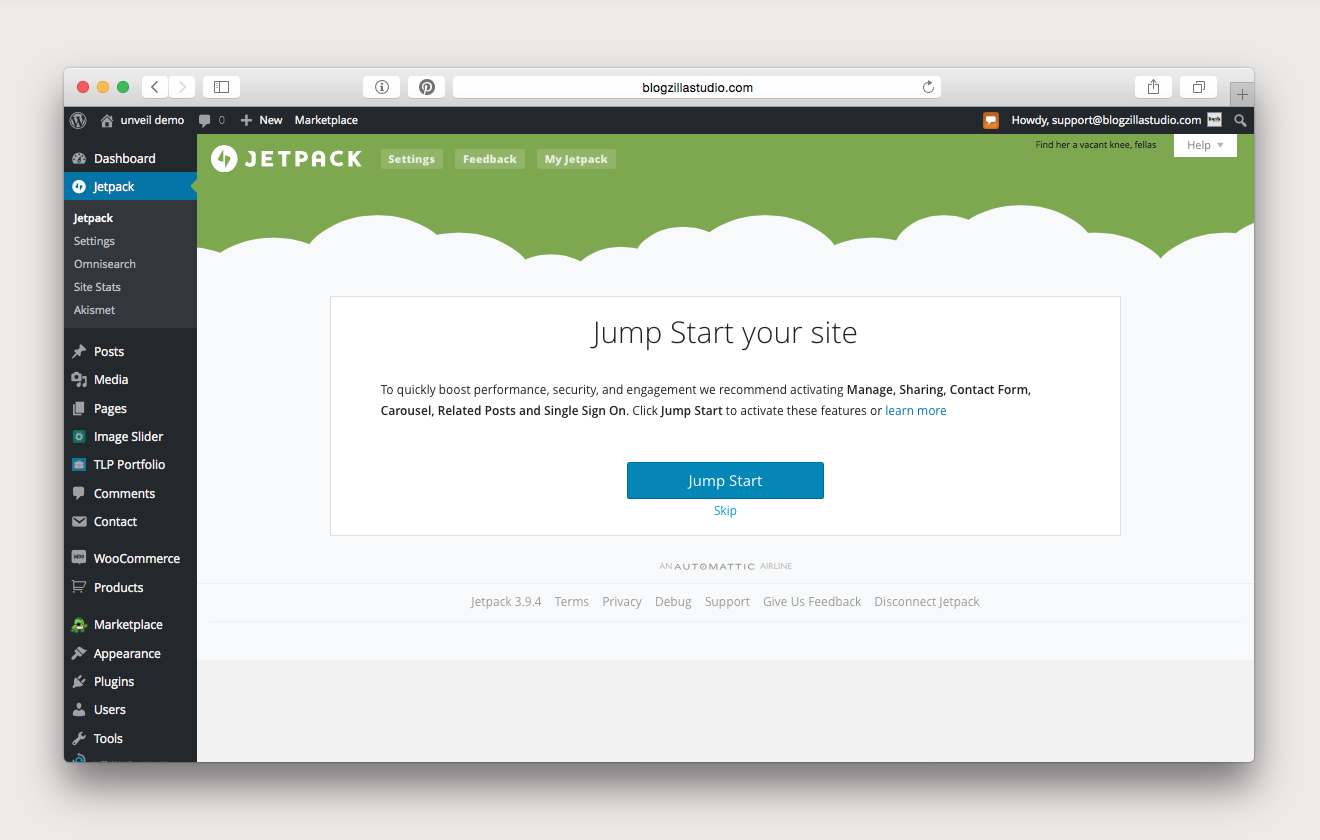
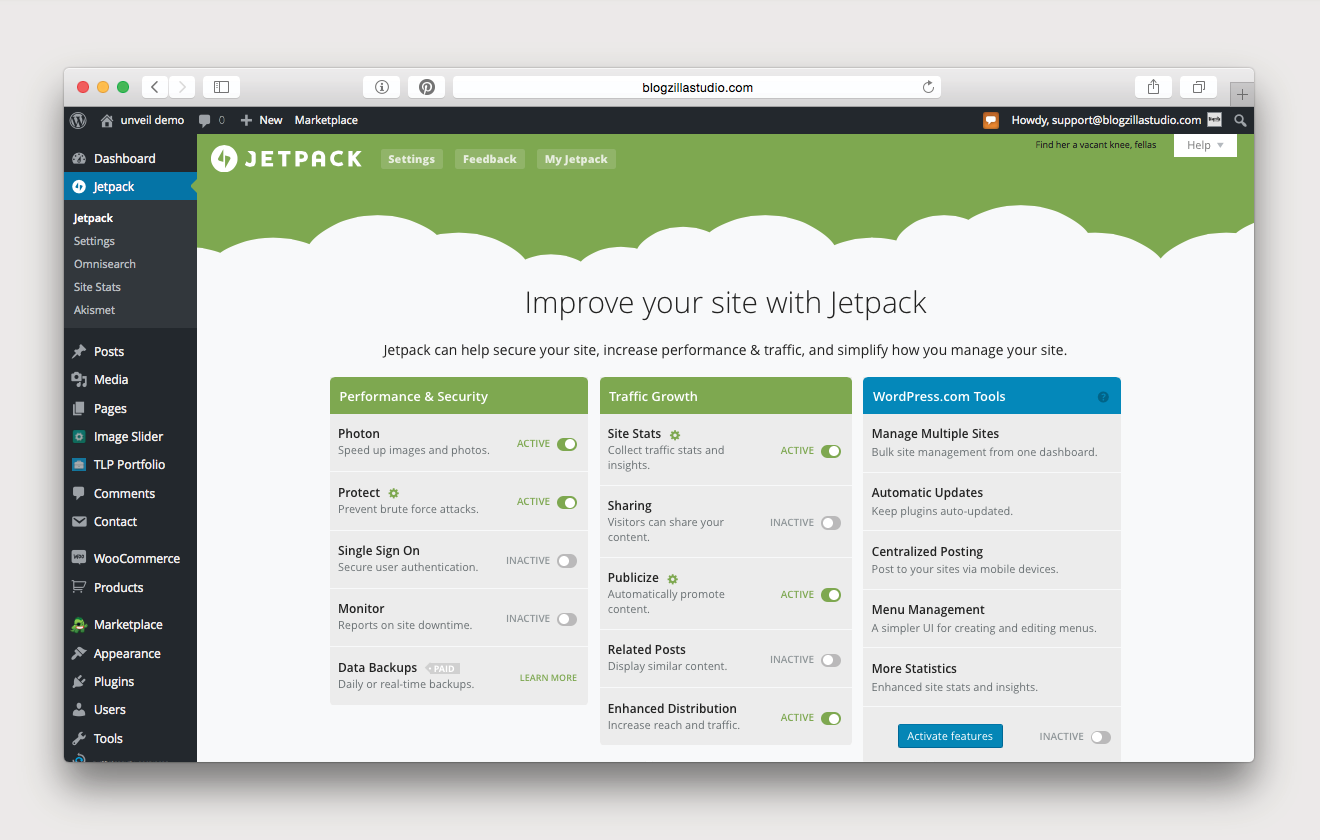
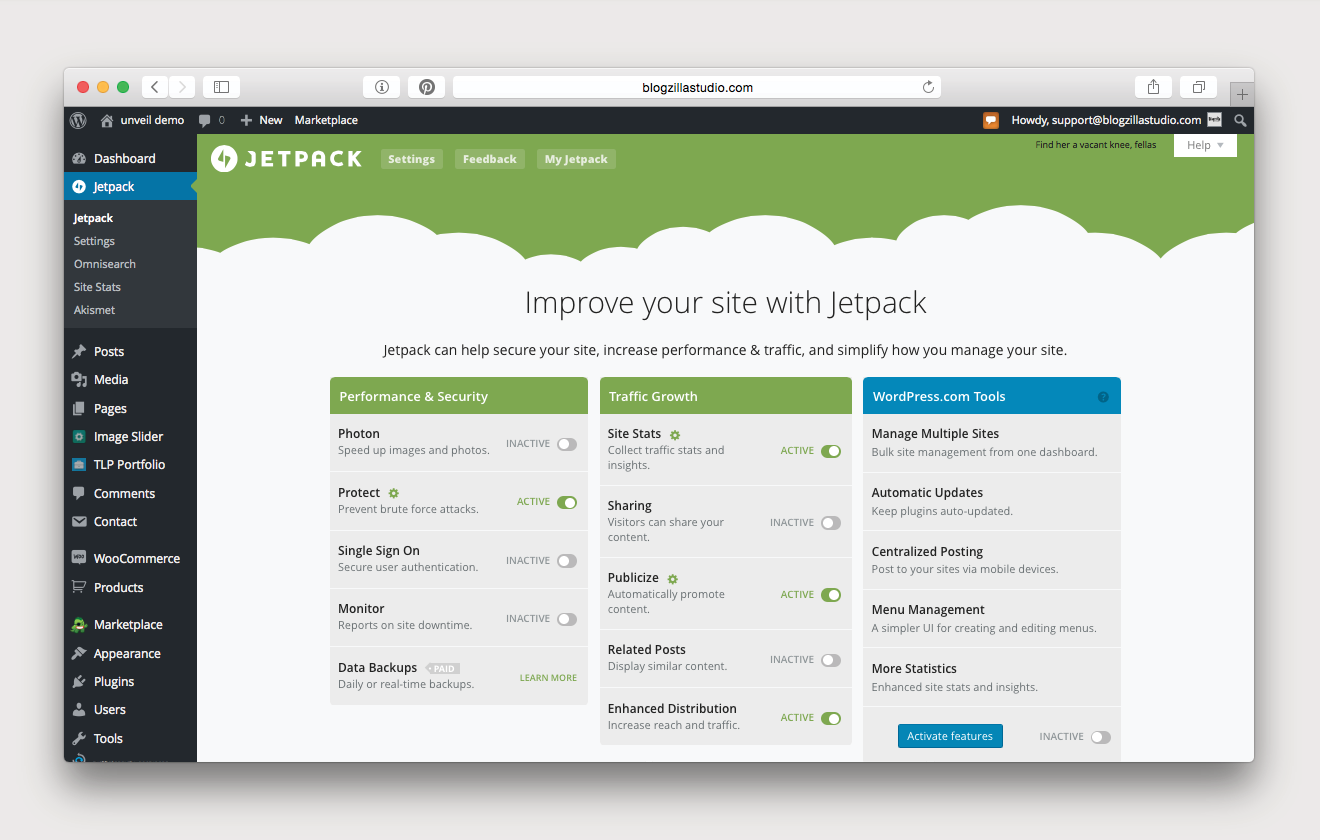
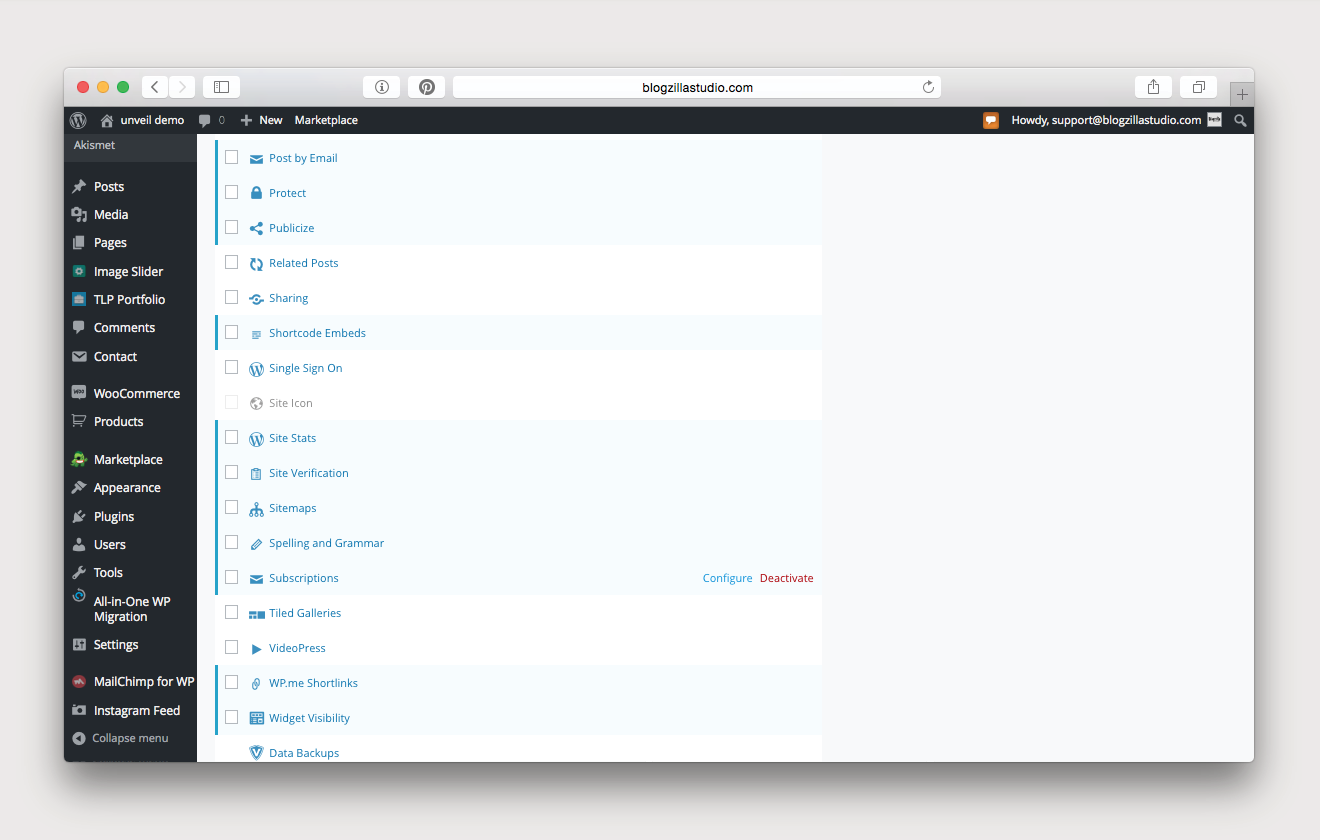
if you don’t use mailchimp, you can easily integrate a subscribe bar through wordpress. first, you will need to activate jetpack. you will see it listed on the right side of your dashboard. click it, and then click connect jetpack. this will send you to wordpress.com where you will either need to login if you already have a wordpress.com account (not wordpress.org), or you will need to create an account. once you have done so, you will be brought back to your site. you will be prompted to either jump start your site or skip. you can do whichever you prefer. either way, you will end up back on the jetpack page. on the main page, we recommend that you deactivate photon–it can help page load time, but it can also degrade your photos–so ultimately, it’s your call.
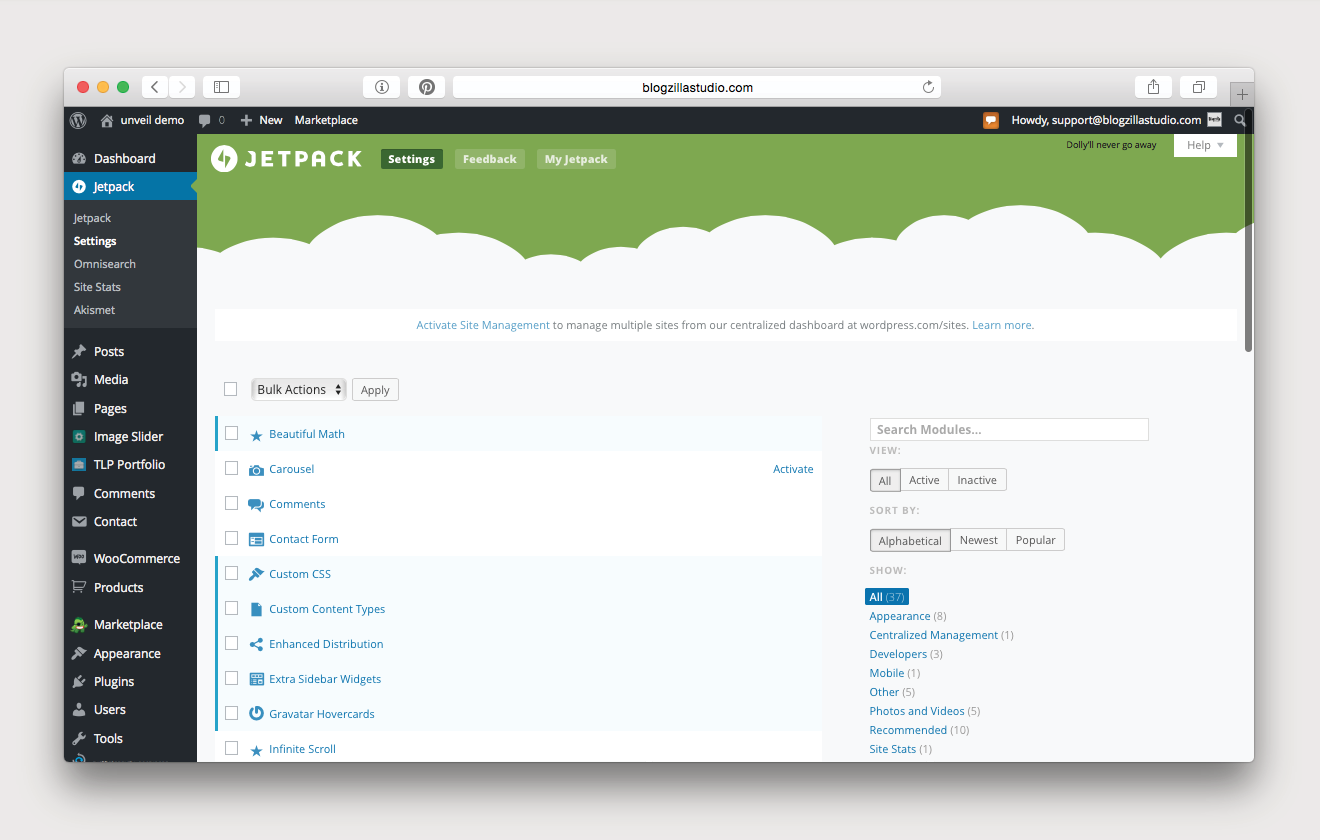
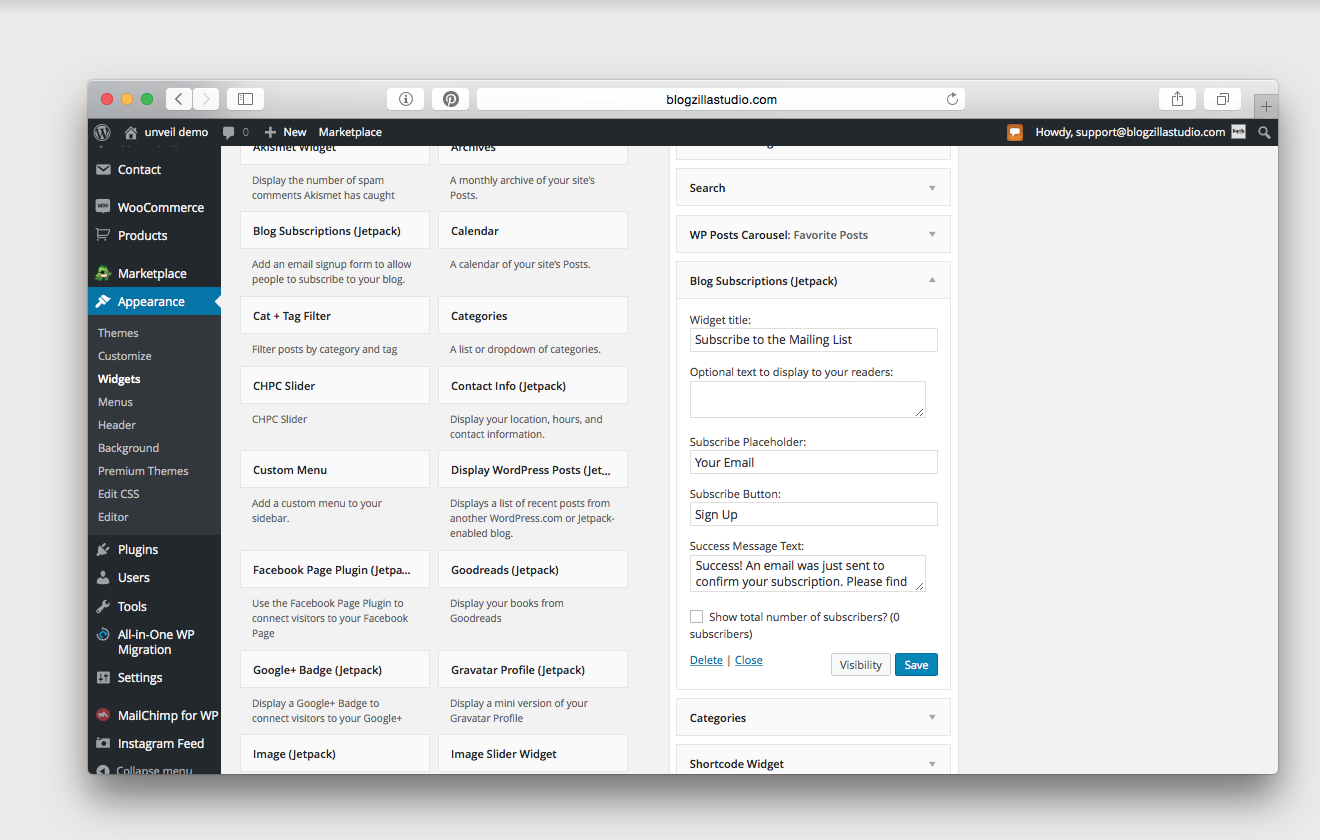
next, you will need to click on settings, under jetpack. scroll down until you see subscriptions, and verify that it is active. once it is active, navigate to appearance, widget. then, drag the blog subscriptions (jetpack) widget onto your sidebar. you can adjust the settings however you would like. our recommended setting are included in a screenshot.
Categories
this one is super easy! just drag the categories widget onto your sidebar, and label it whatever you’d like!
however, often, you will have more categories than you would like to display as a list. you can choose to display them as a dropdown, or you can create your own manual list with shortcode.
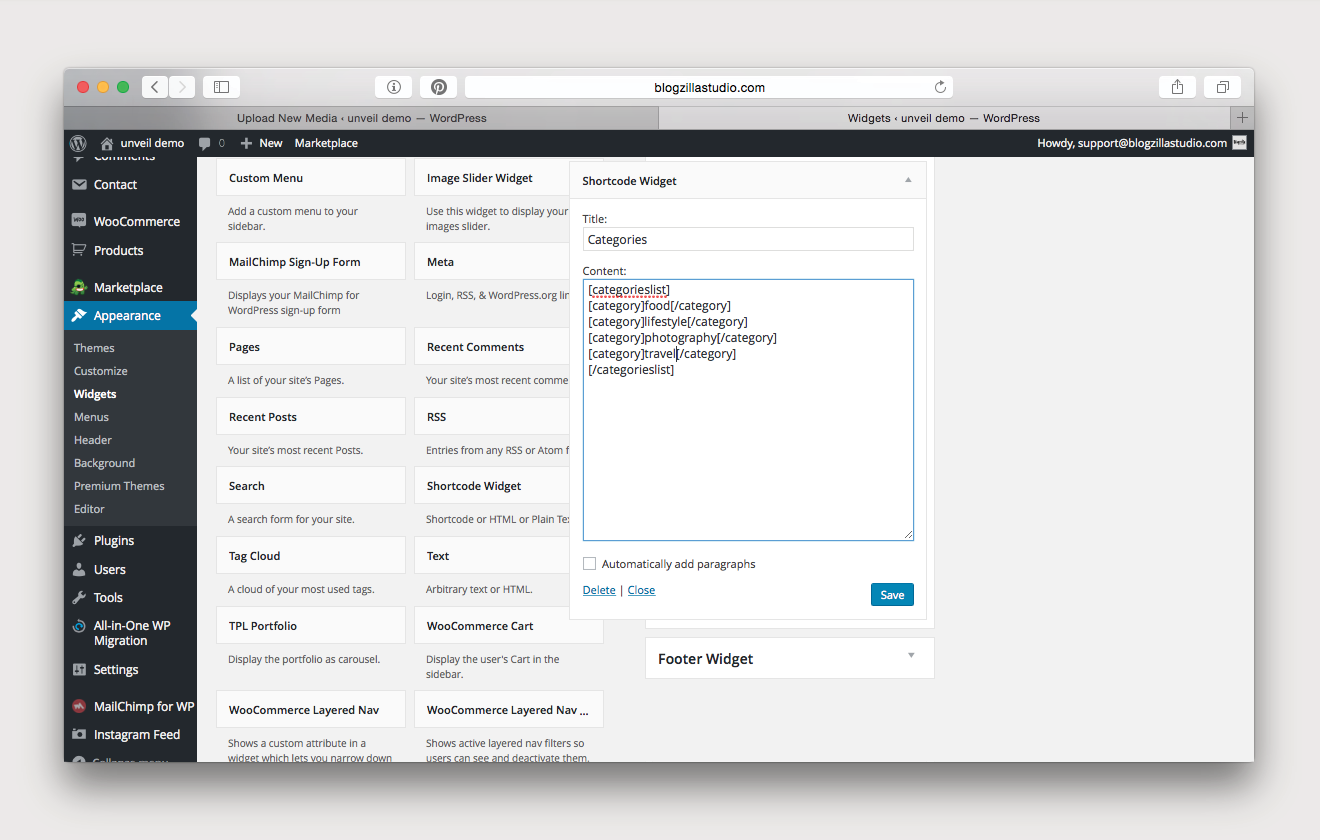
to create a manual list, you will use a shortcode widget and then add your desired category info. below is sample category code. just replace the # with your category name (be sure to write it exactly as it is written in the category).
[categorieslist]
[category]#[/category]
[category]#[/category]
[category]#[/category]
[category]#[/category]
[/categorieslist]
Pages
you have many options with your pages when using the brooklyn theme. you can create a landing page, a full-width page, a two-column page, a contact page, and a portfolio page. details are below.
Splash Page Setup
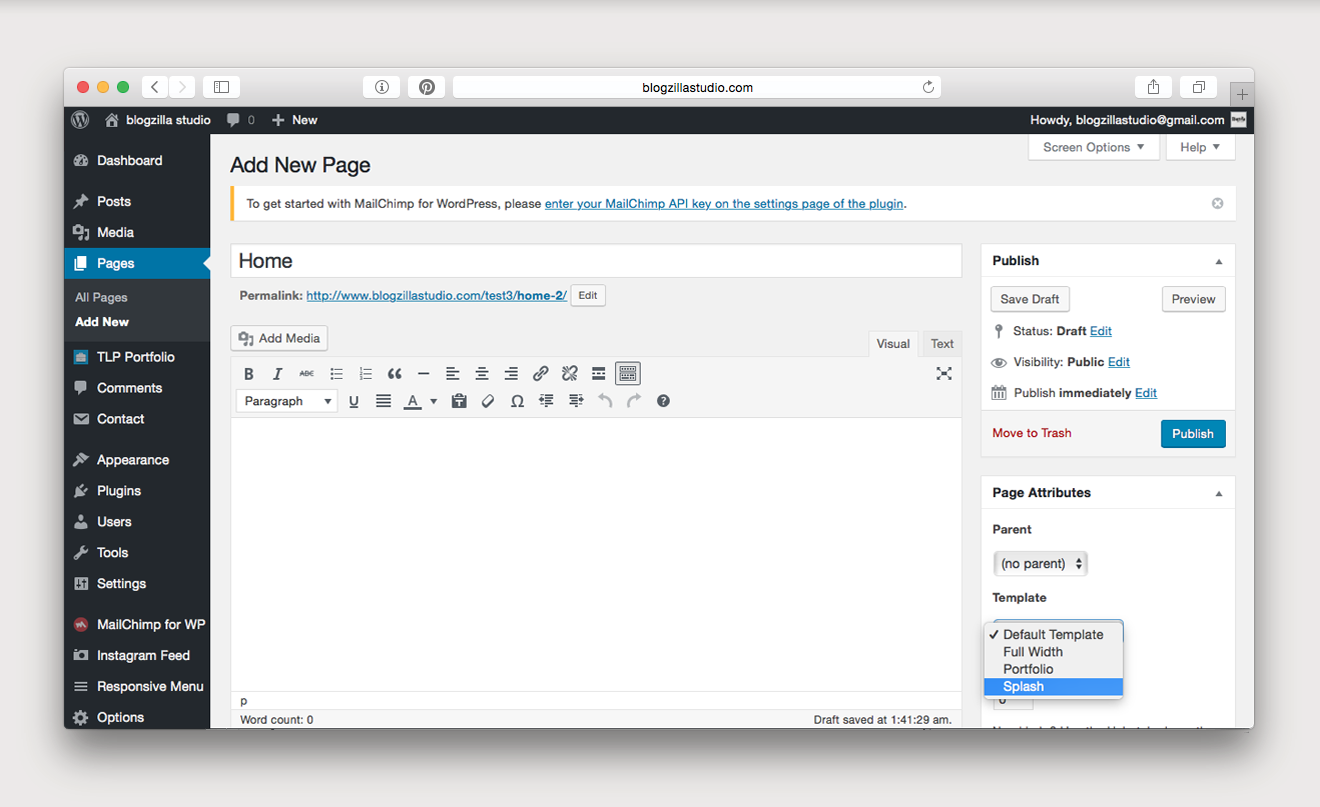
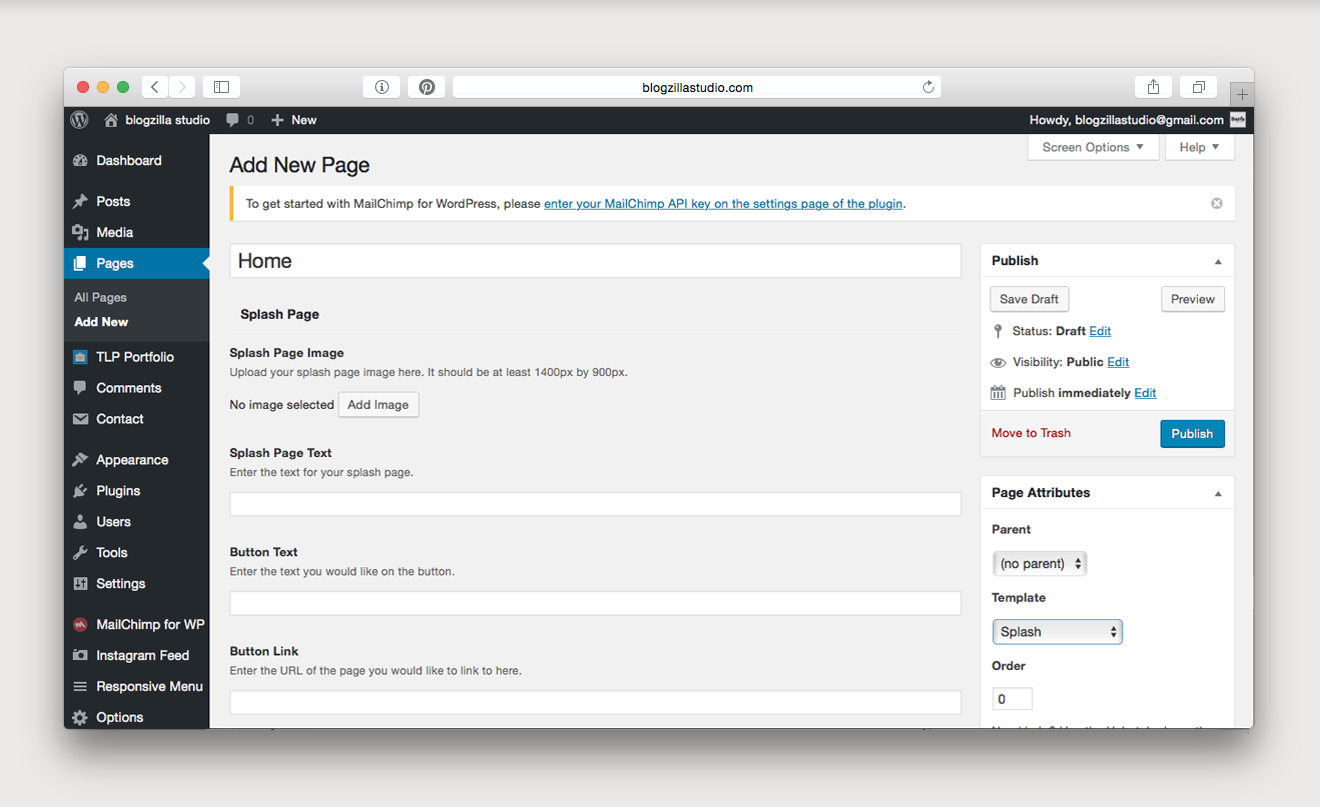
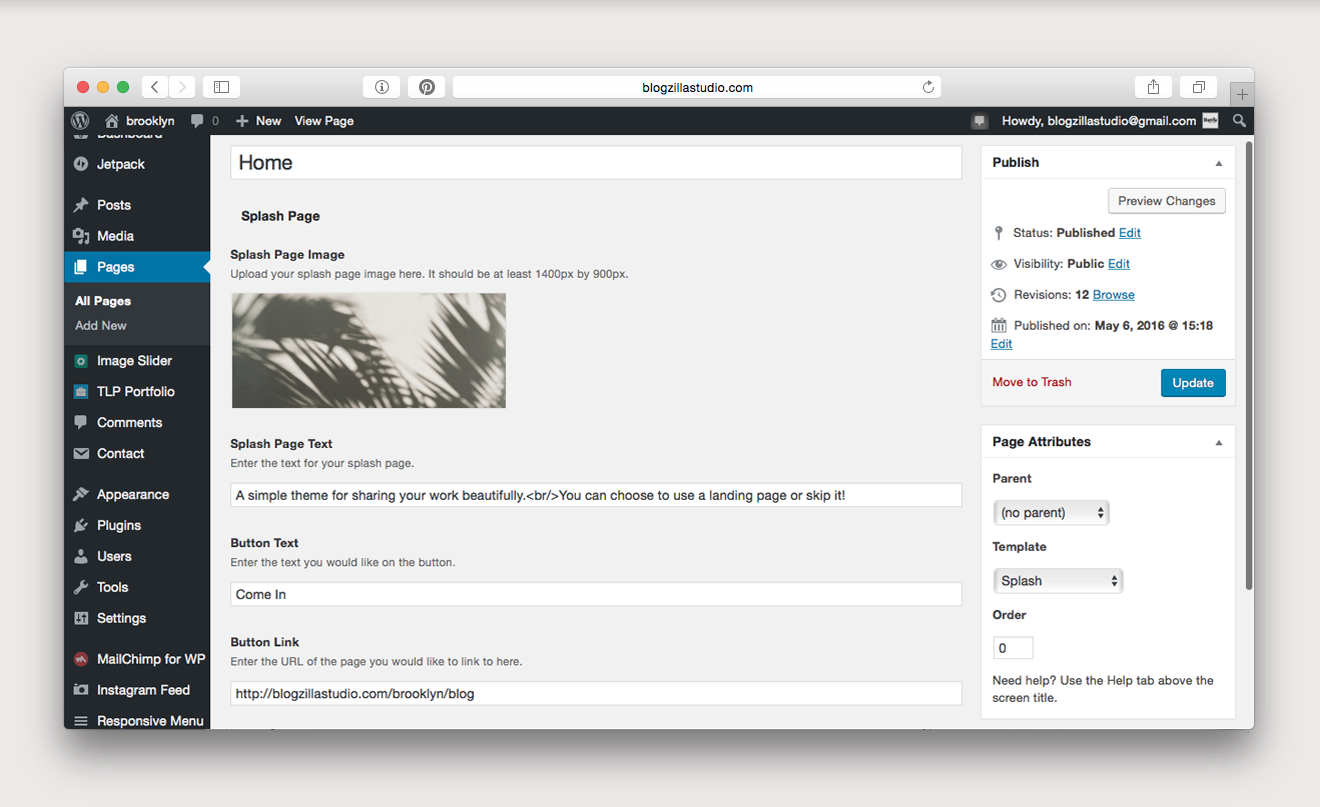
if you would like to have a splash page as your home page, simply navigate to pages, all pages, and then select the page that you have chosen as your home page. from the template options, select splash. at this point, several options will now be visible for your page. here, you can upload the photo for your splash page, and you can enter the text for the page and for the button. save your page after inputting that information, and you’re all set!
Full Width
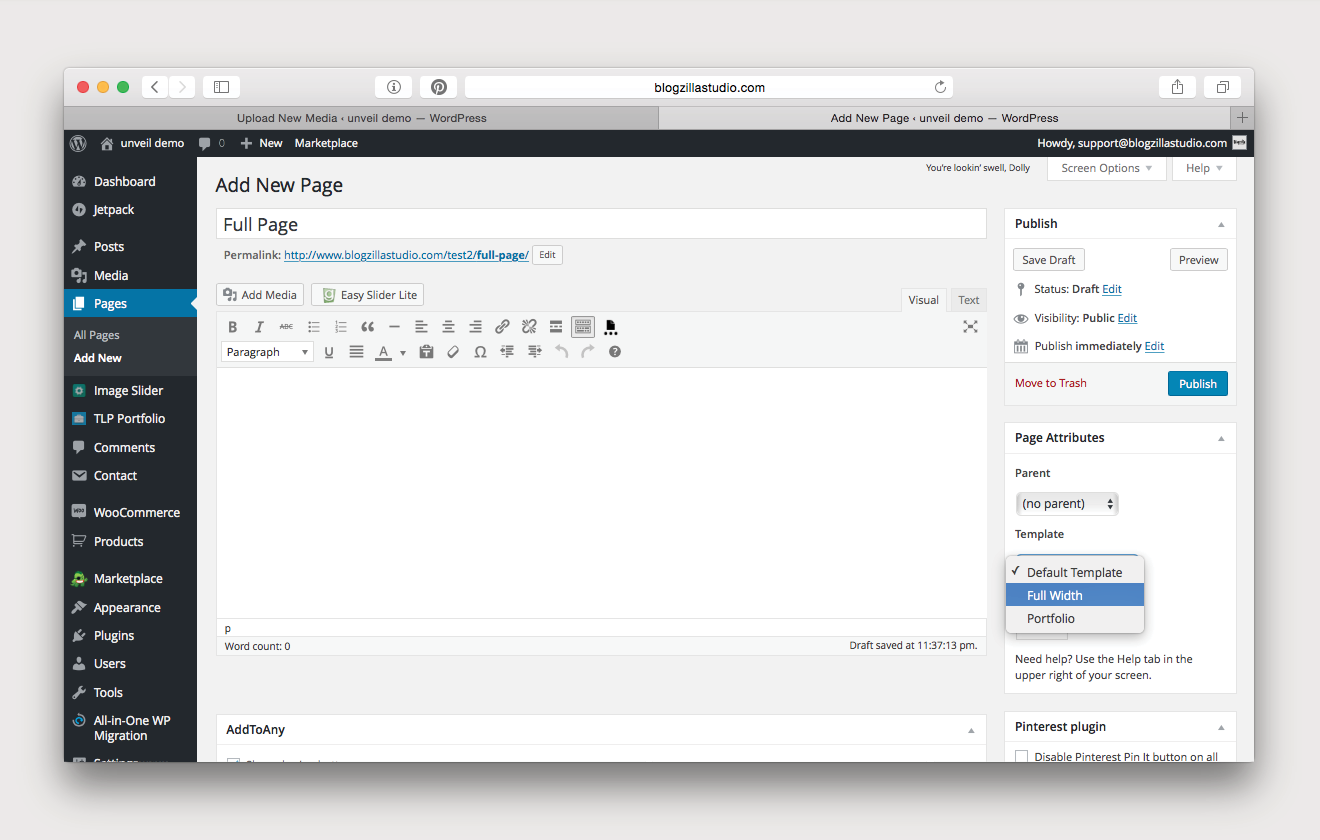
creating a full width page is as easy as selecting full width from the template options on the right-hand side of your post editor.
Two Column
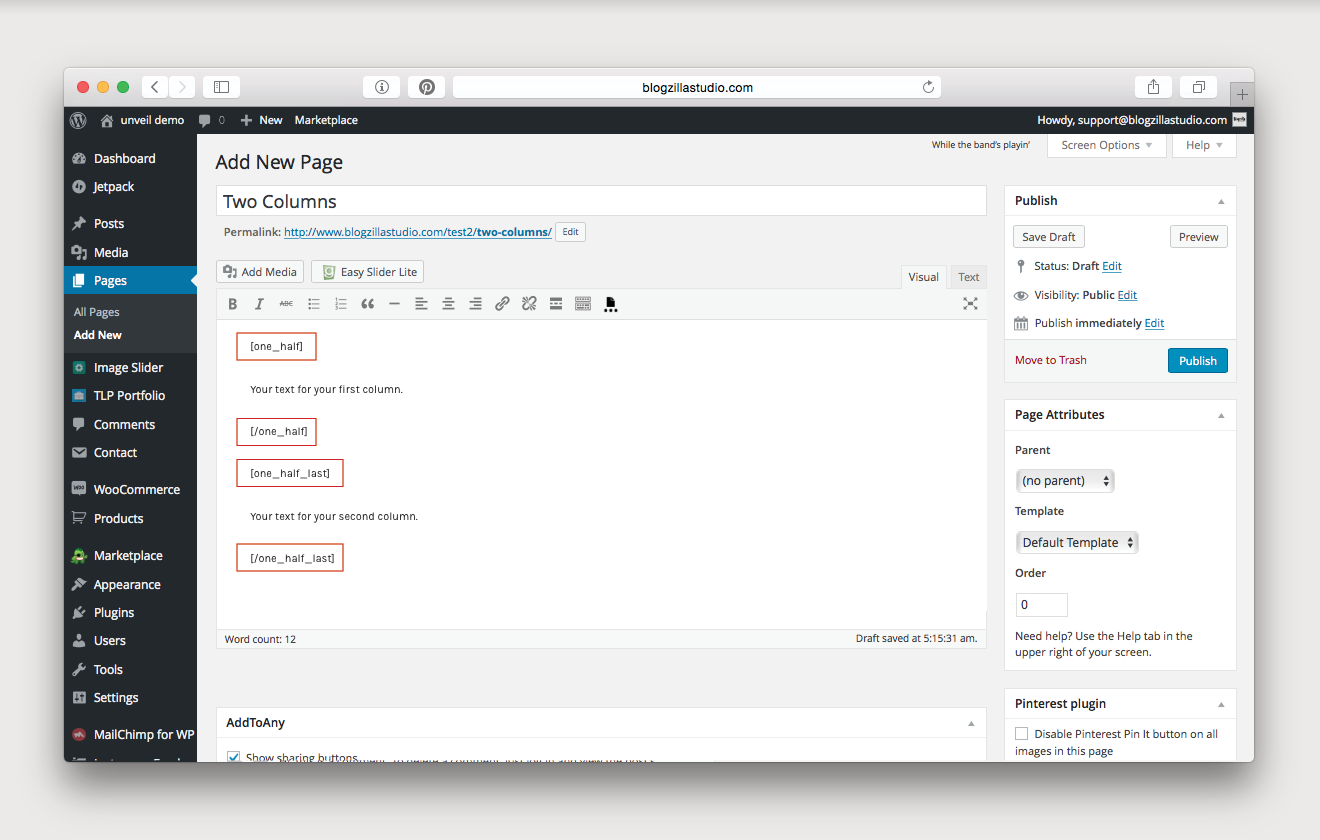
You can easily make the text on any page into two columns! First, decide where you would like to break up the text into two columns. Then, use the following shortcode around your first column: [one_half] [/one_half]. For the second column, use this shortcode: [one_half_last] [/one_half_last].
Headers
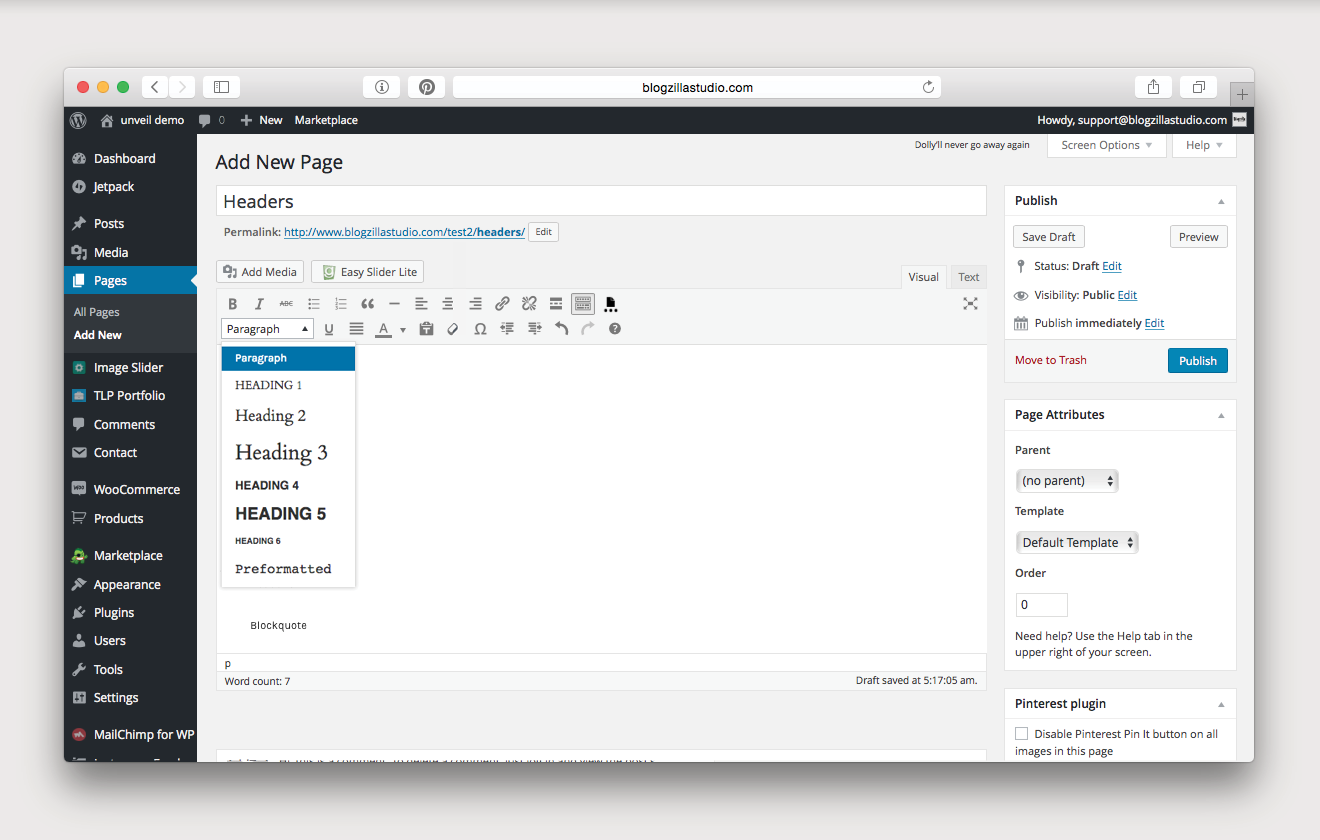
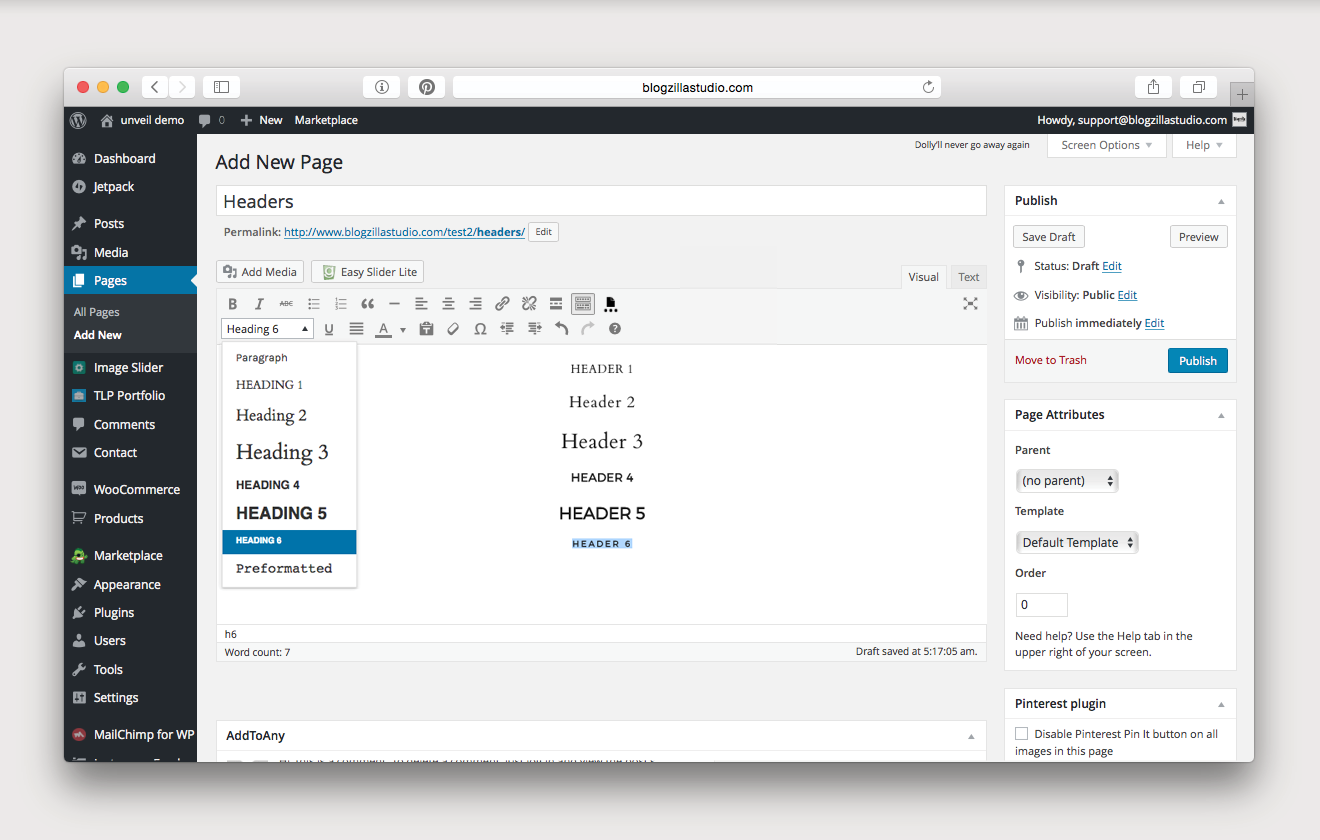
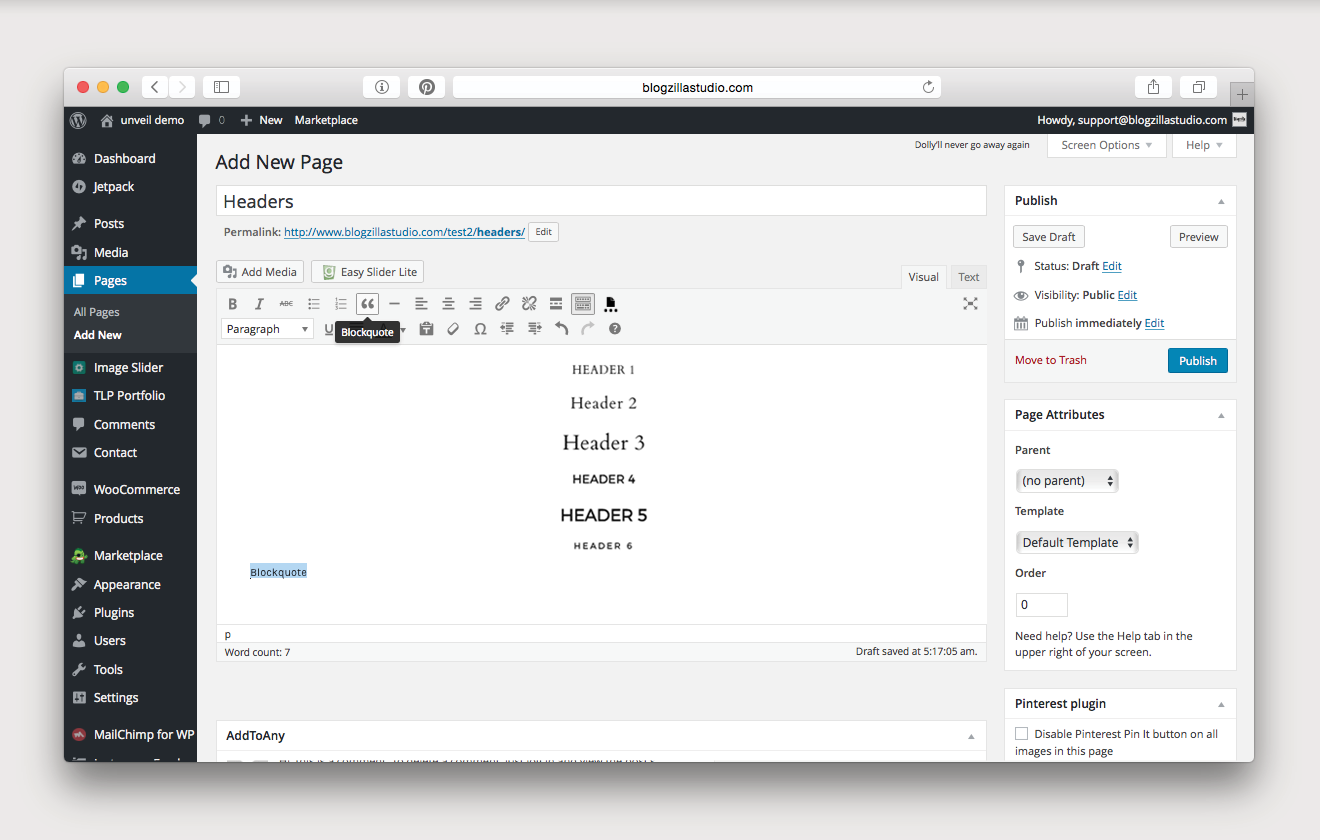
beautiful custom headers are included with the brooklyn theme. these can be easily selected from the dropdown menu labeled paragraph when editing posts to enhance the look of your pages. a blockquote option is also included.
note: you may have to select the toolbar toggle button to view the header options.
Category Page
the brooklyn theme has beautiful image galleries for the category pages. these exist automatically, but if you would like to add a dropdown filter to your category pages, you will have to take a few steps.
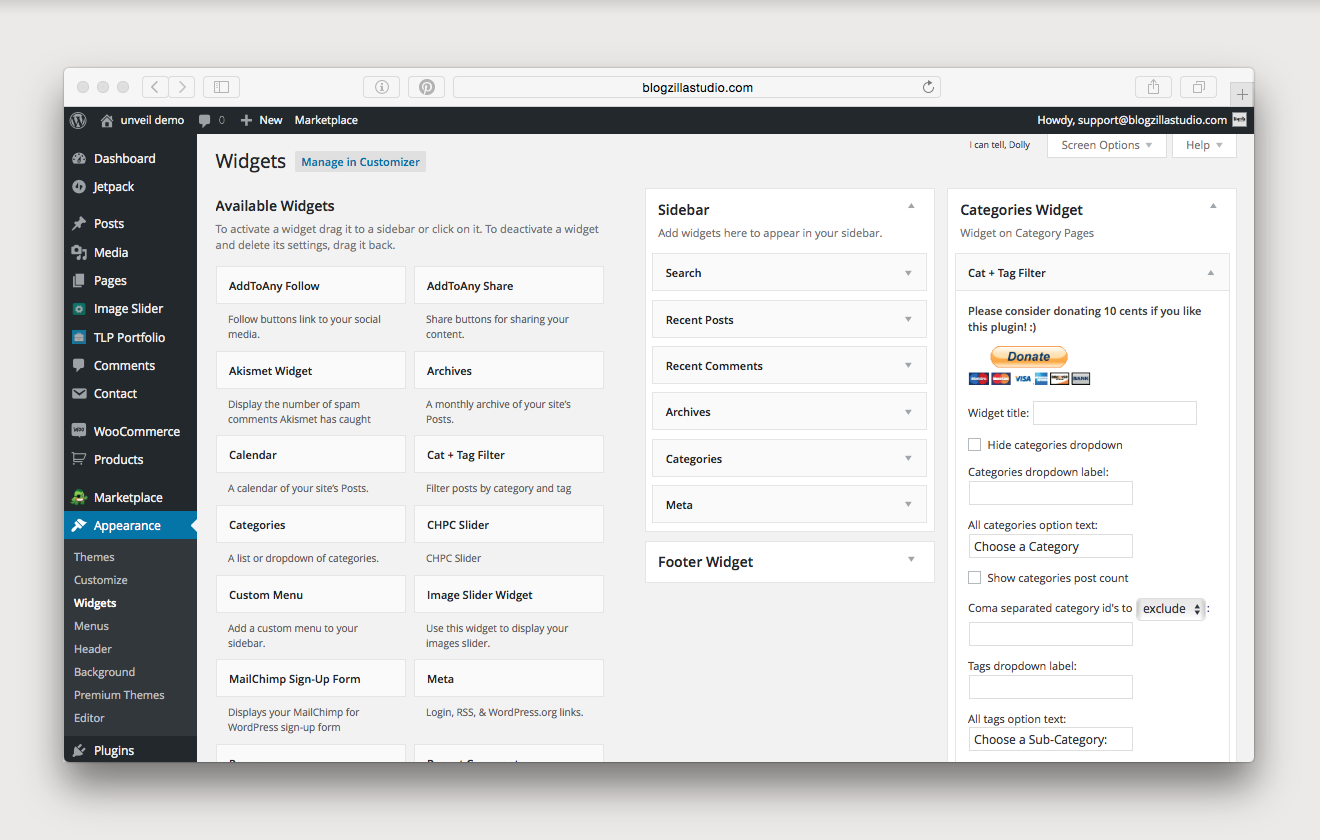
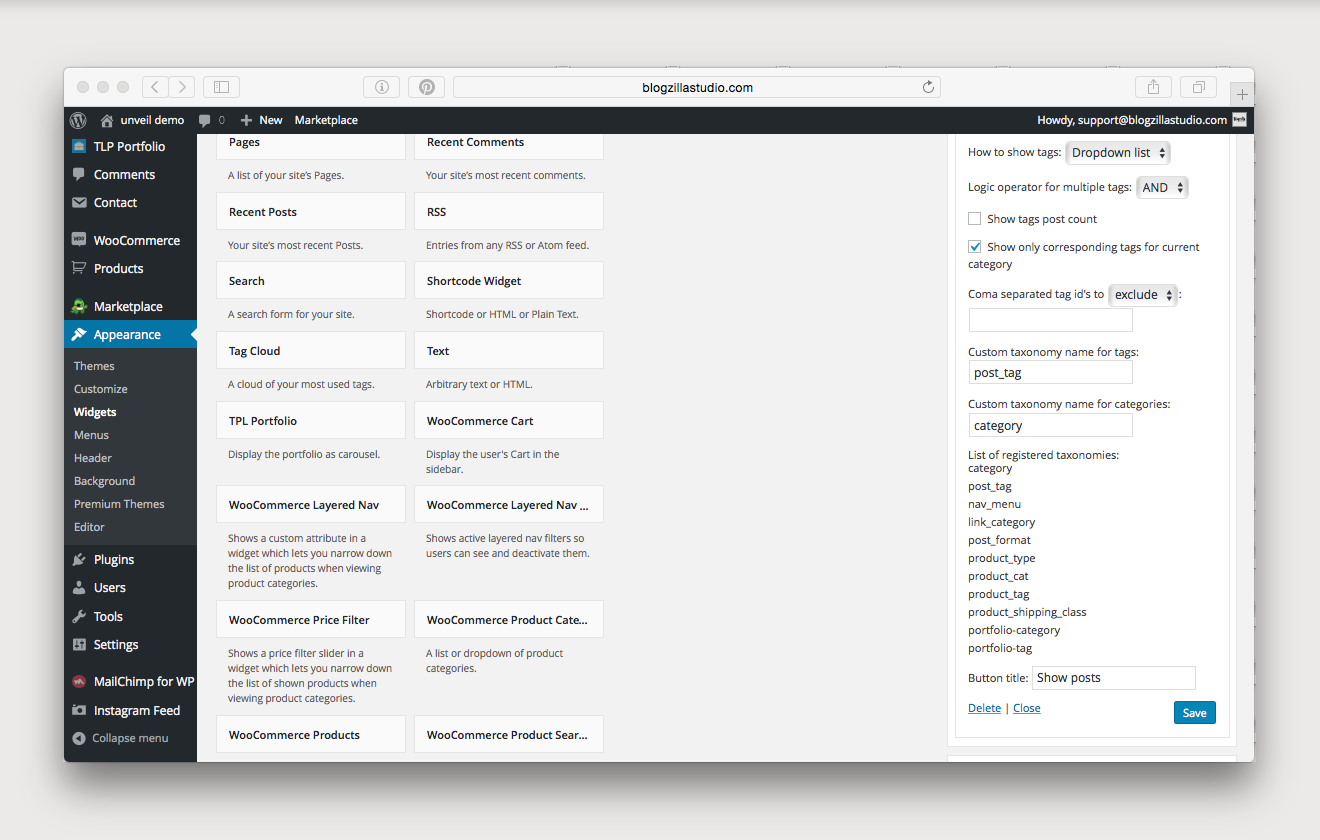
click on appearance and then select widgets. click on the categories widget. then, drag the cat + tag filter onto the widget. you can choose whichever settings you would like, but we recommend the following to filter by category and then subcategory:
widget title: leave blank
hide categories dropdown: deselect
categories dropdown label: leave blank
all categories option text: “choose a category” (or text of your choosing)
show categories post count: deselect
comma separated category id’s to exclude / include: leave blank
tags dropdown label: leave blank
all tags option text: “choose a sub-category” (or text of your choosing)
how to show tags: dropdown list
logic operator for multiple tags: and
show tags post count: deselect
show only corresponding tags for current category: select
comma separated tag id’s to exclude / include: leave blank
custom taxonomy name for tags: post_tag
custom taxonomy name for categories: category
button title: show posts
if you would like to limit the categories that are included in the dropdown you will need to enter the id numbers of the categories or tags you would like to include or exclude in the comma separated category id’s to exclude / include and/or comma separated tag id’s to exclude / include sections. for details on how to find your id numbers, check out this guide.
Contact Form
a beautifully minimal contact form design can be activated by installing one of the recommended plugins: contact form 7.
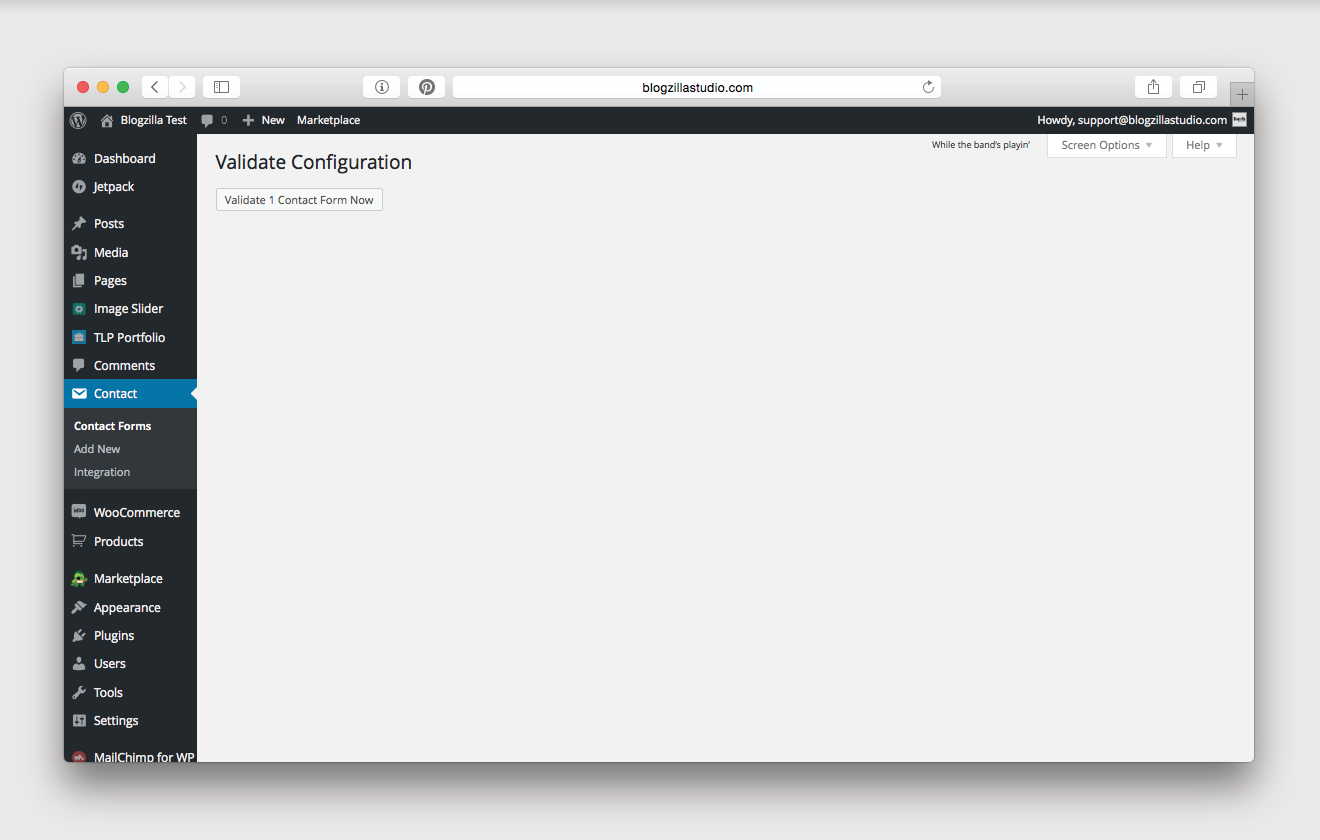
once installed, you may see a note indicating that you need to validate the contact form configuation. go ahead and click validate contact form now.
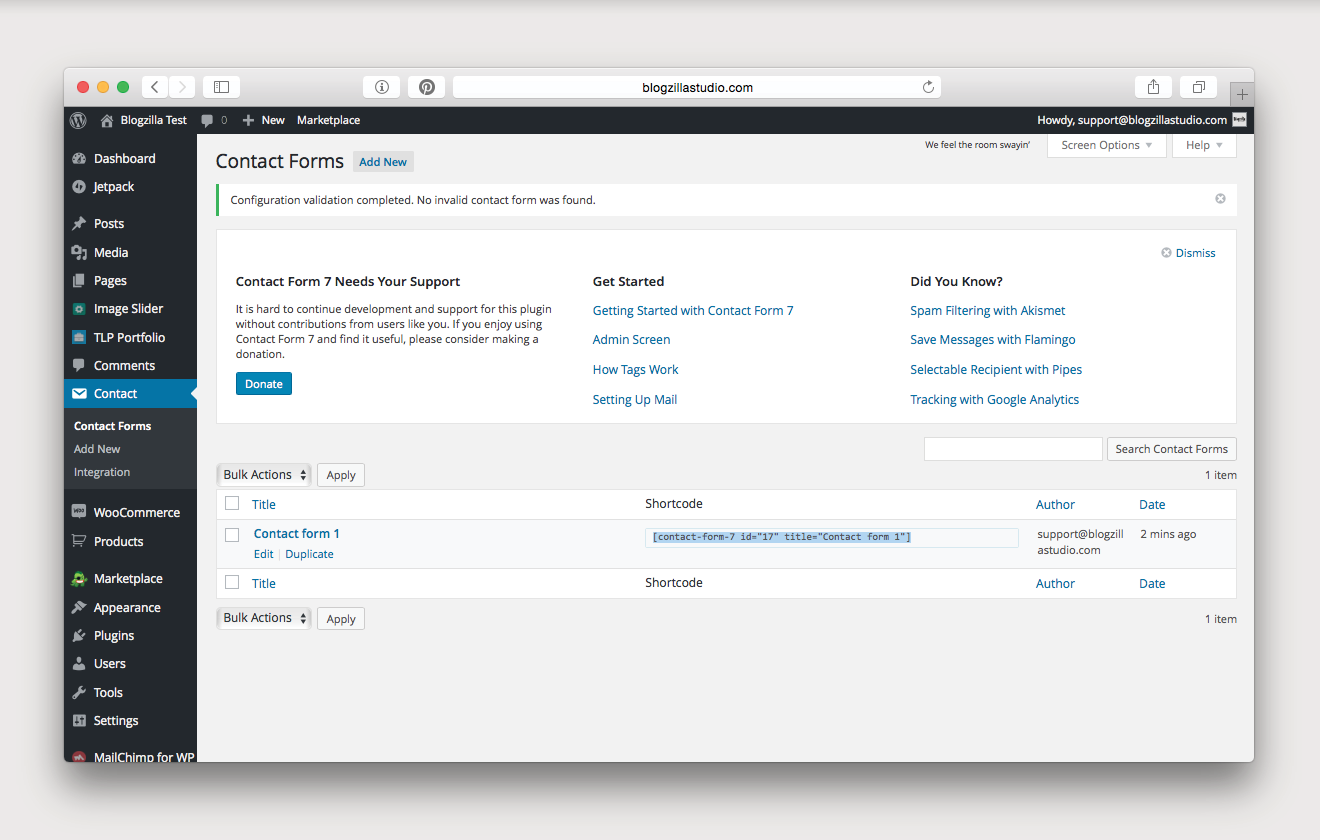
then, click on contact on your dashboard. from there, copy the shortcode for the default contact form.
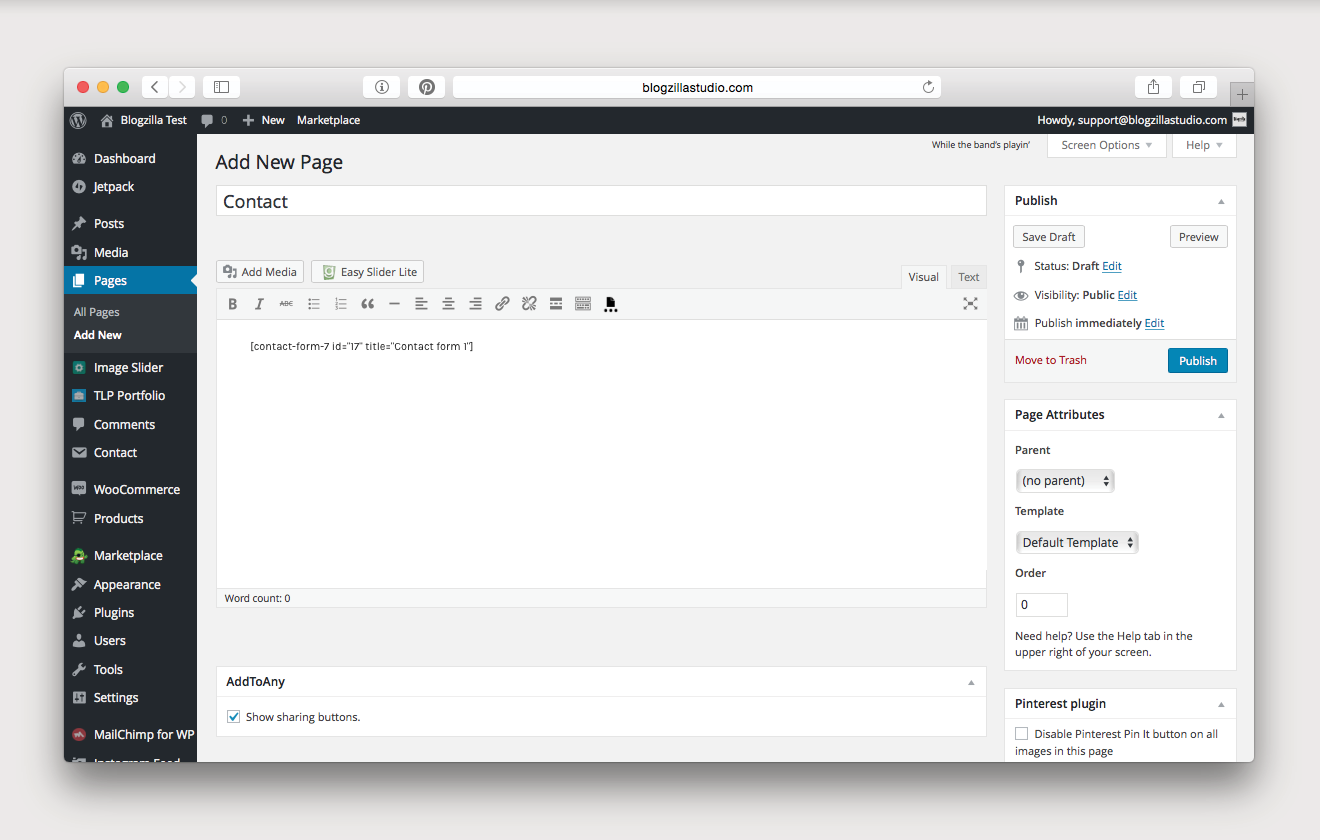
navigate to pages, and either add a new page or select your contact page. paste the shortcode onto your page.
note: you should verify the settings for your contact page by clicking on contact and then selecting contact form 1. select mail, and verify that your details are correct.
Portfolio
to create your portfolio, you will need to install one of the recommended plugins: tlp portfolio.
the first thing you will need to do is adjust the settings. click on tlp portfolio, and then click settings. the only area you need to modify is image size. it should be 350 x 350. remember that if you have already uploaded any images, you will need to run the regenerate thumbnails tool after the settings change.
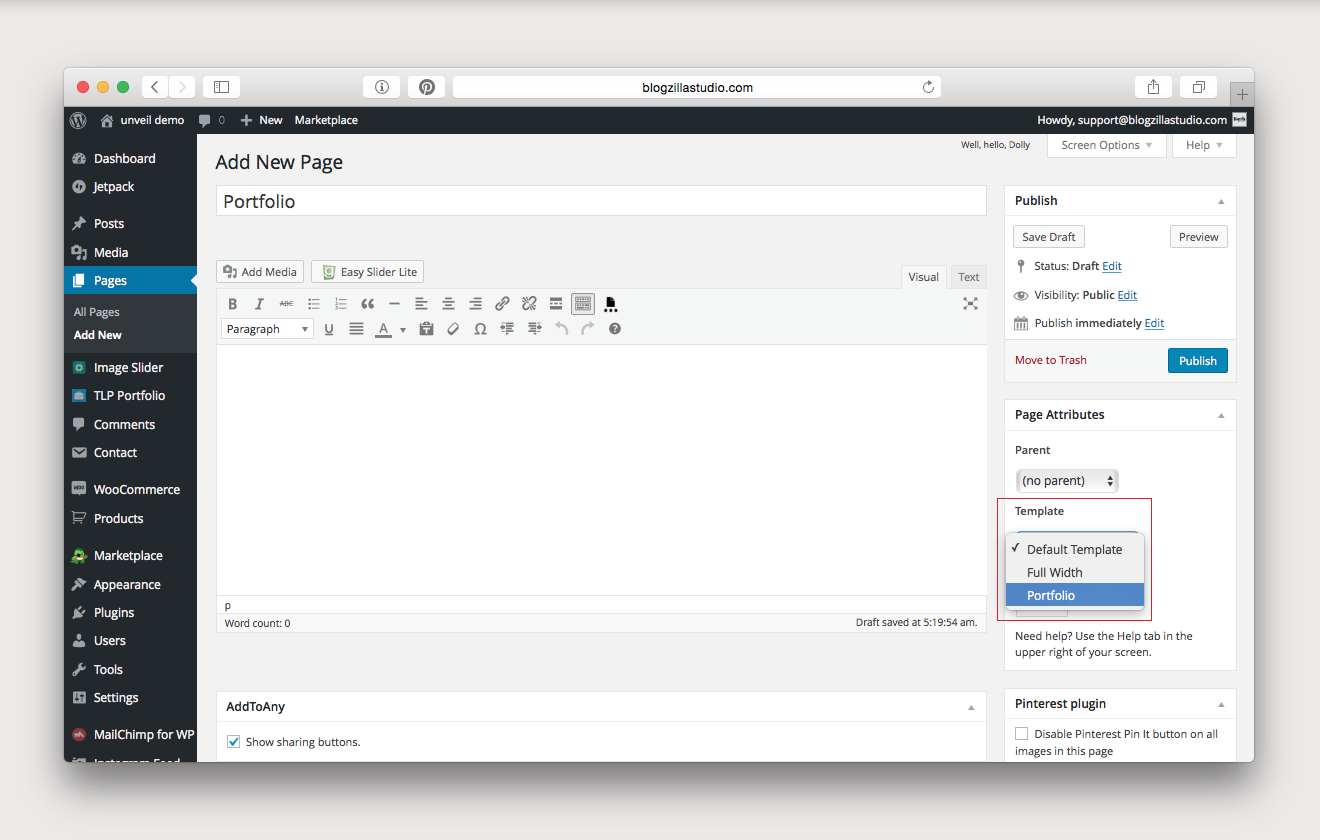
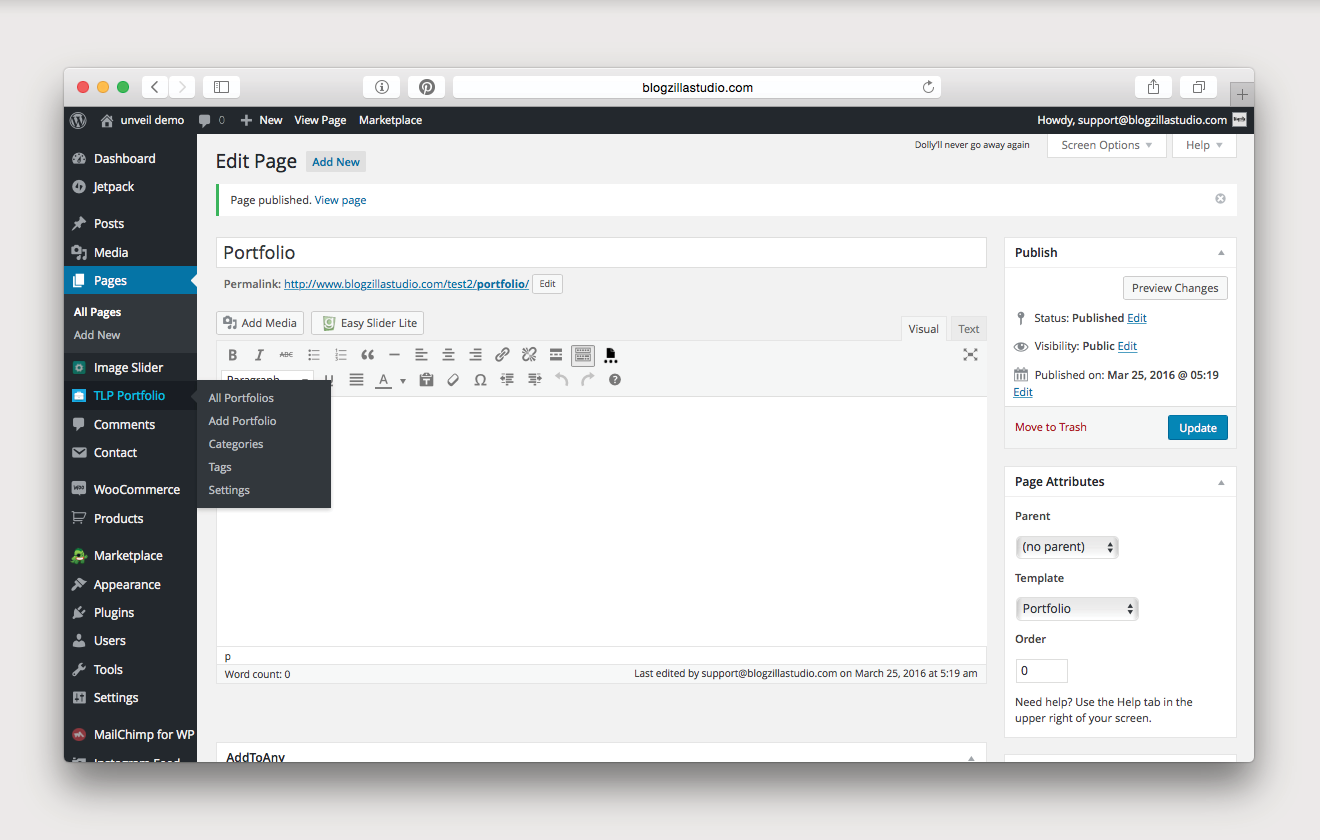
once installed, you first need to create your main portfolio page. navigate to pages, and then add new. name your page whatever you would like, and then select portfolio from the template dropdown.
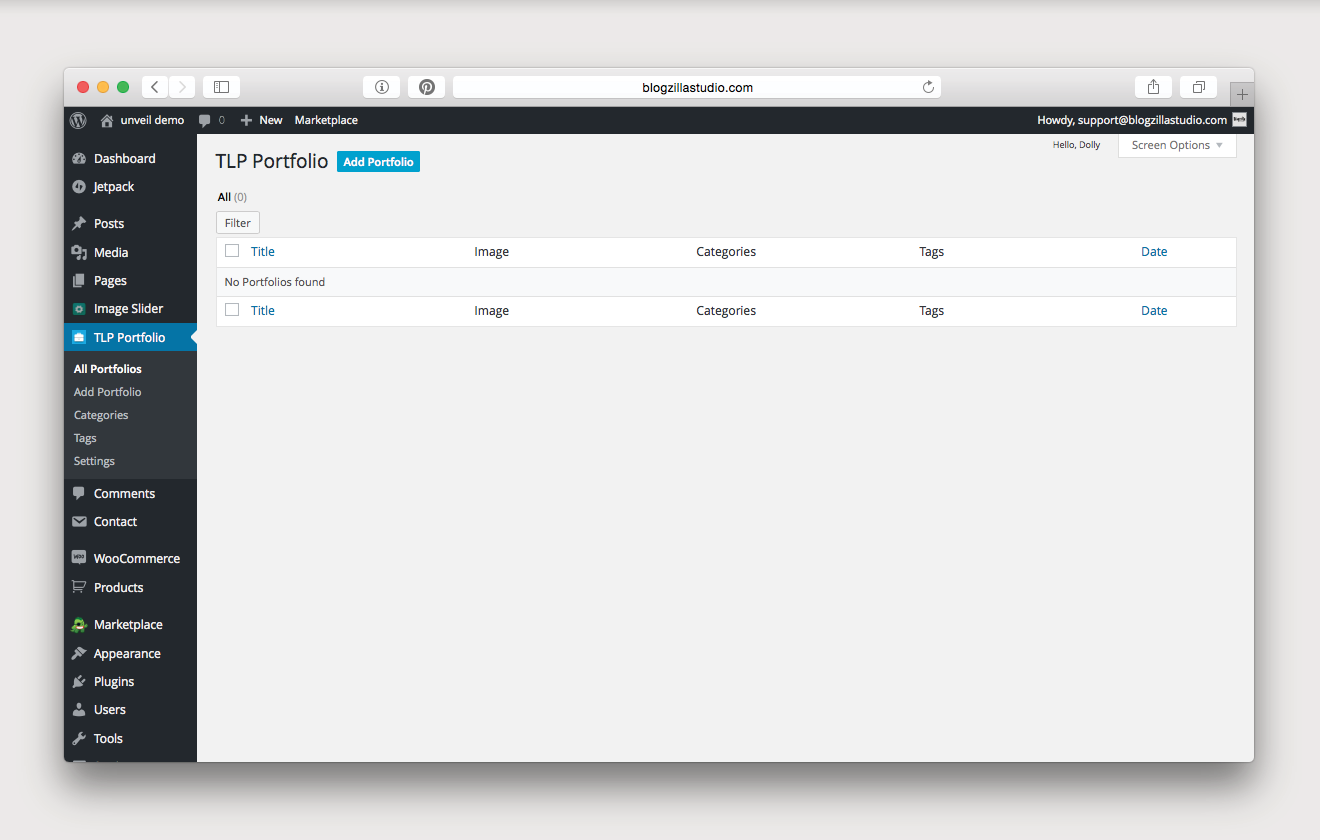
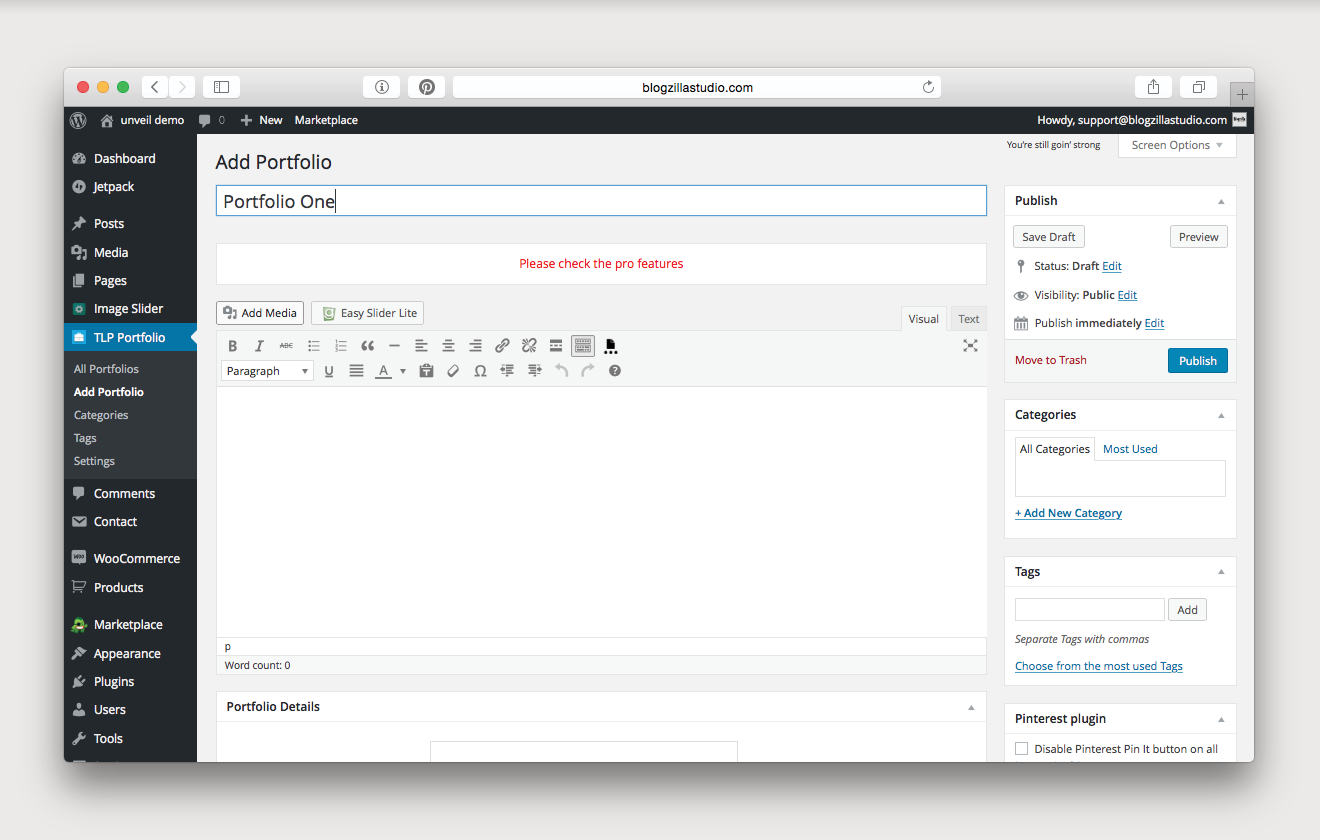
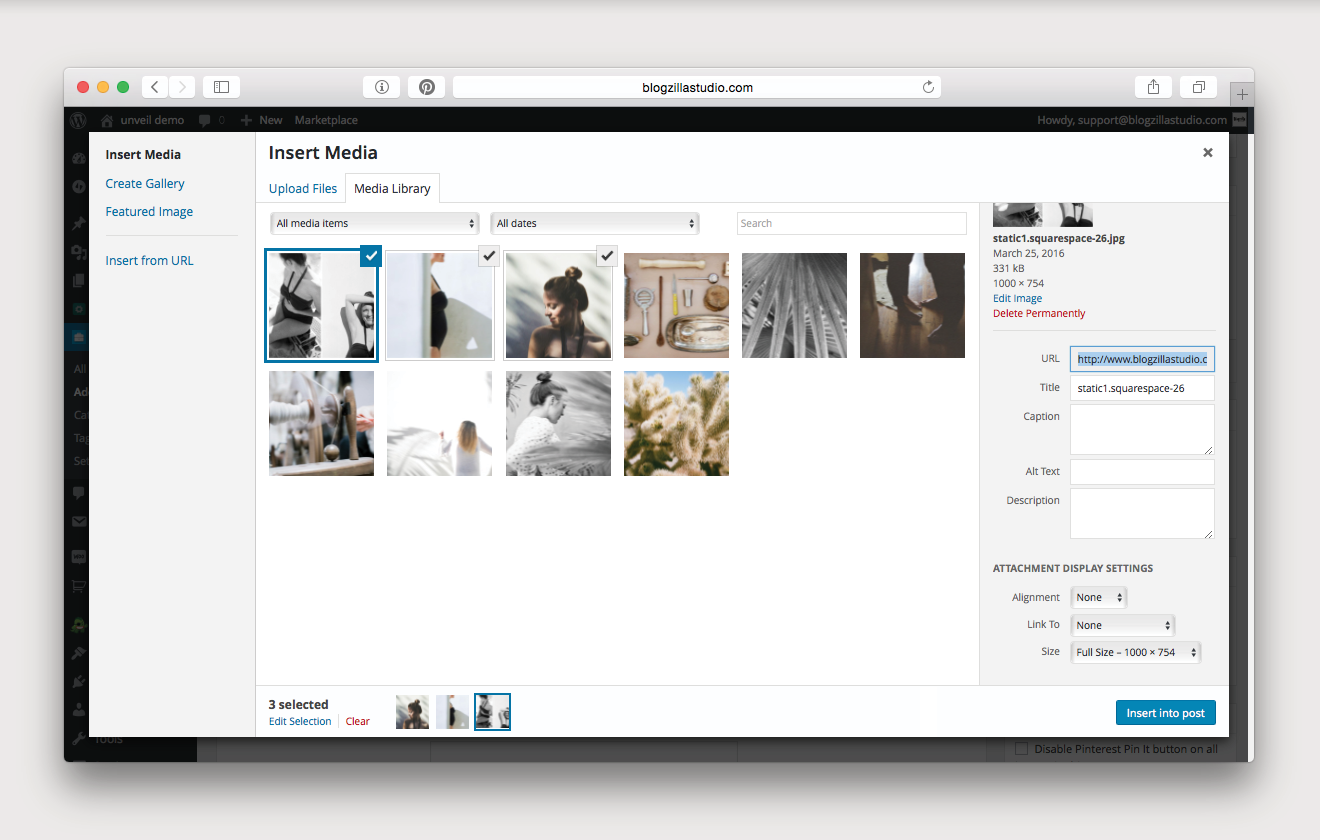
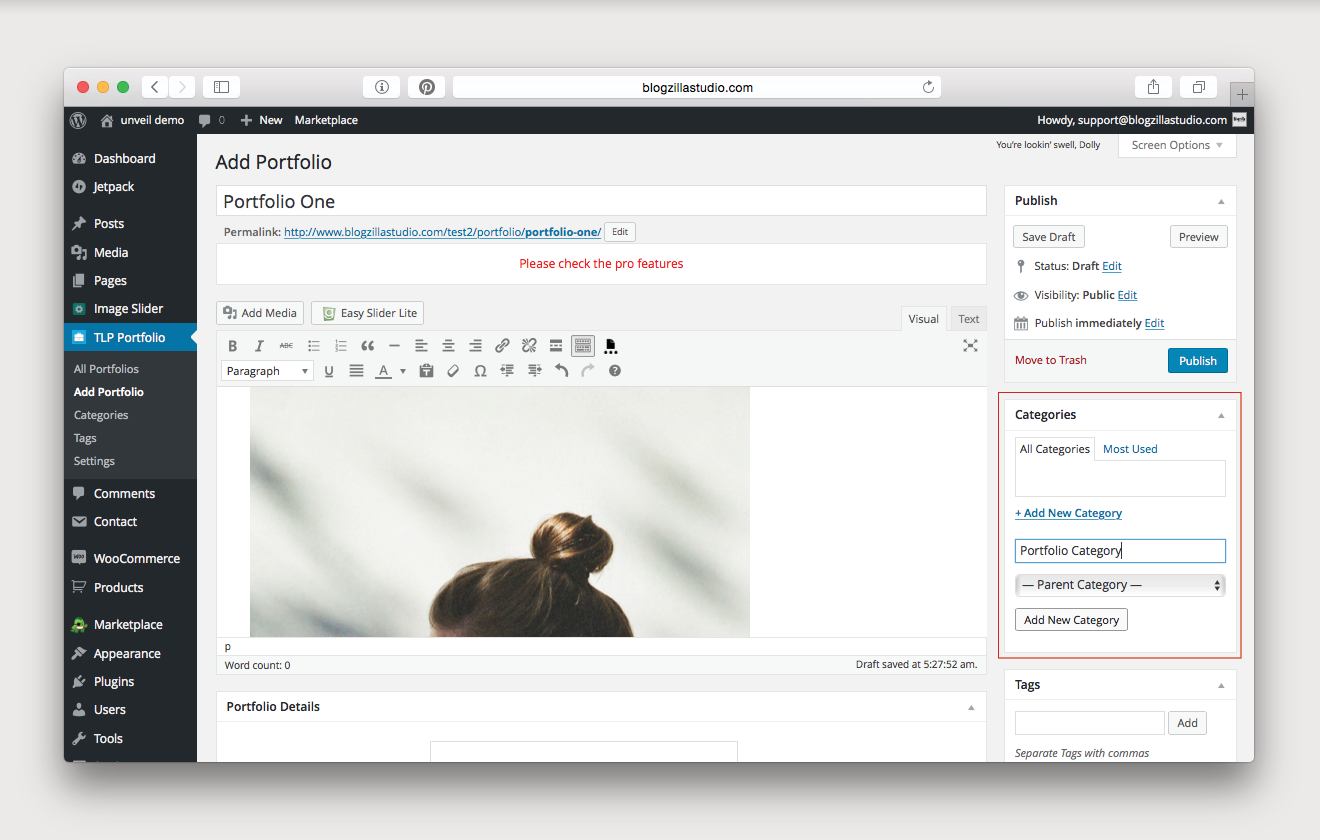
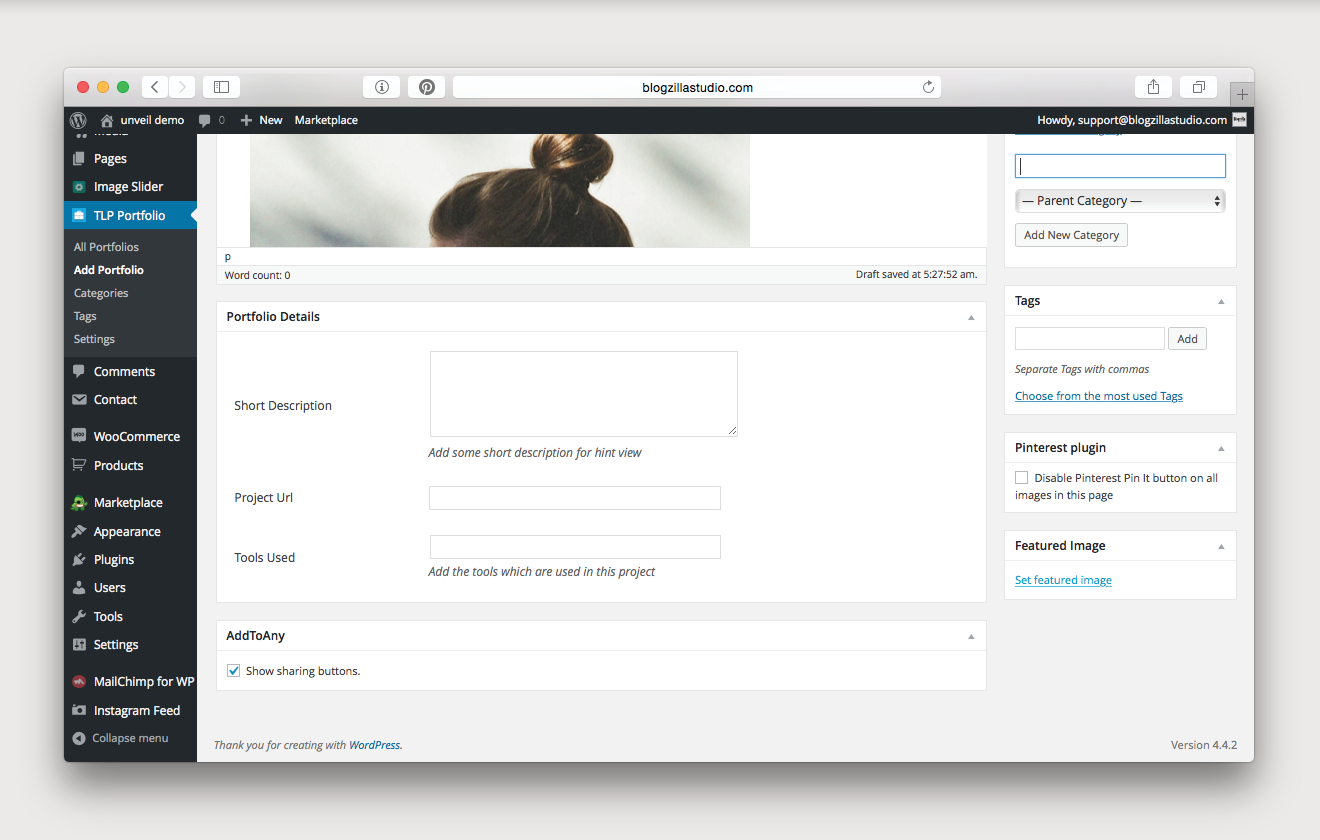
next you need to create your individual galleries. click on tlp portfolio. then, click add portfolio. add as many images as you’d like to the portfolio and then save it. you must add a featured image to your gallery. this is the image that will show up on your main category page. you should also categorize your gallery to take advantage of the full functionality of your portfolio.
continue creating galleries until you have added all of your images. and voila, you have a portfolio!
Footer
the brooklyn theme gives you the option of adding widgets to your footer. you can include whatever items you’d like! in the demo, we have included an instagram feed, a mailchimp form, and social media.
Pinterest Hover Button
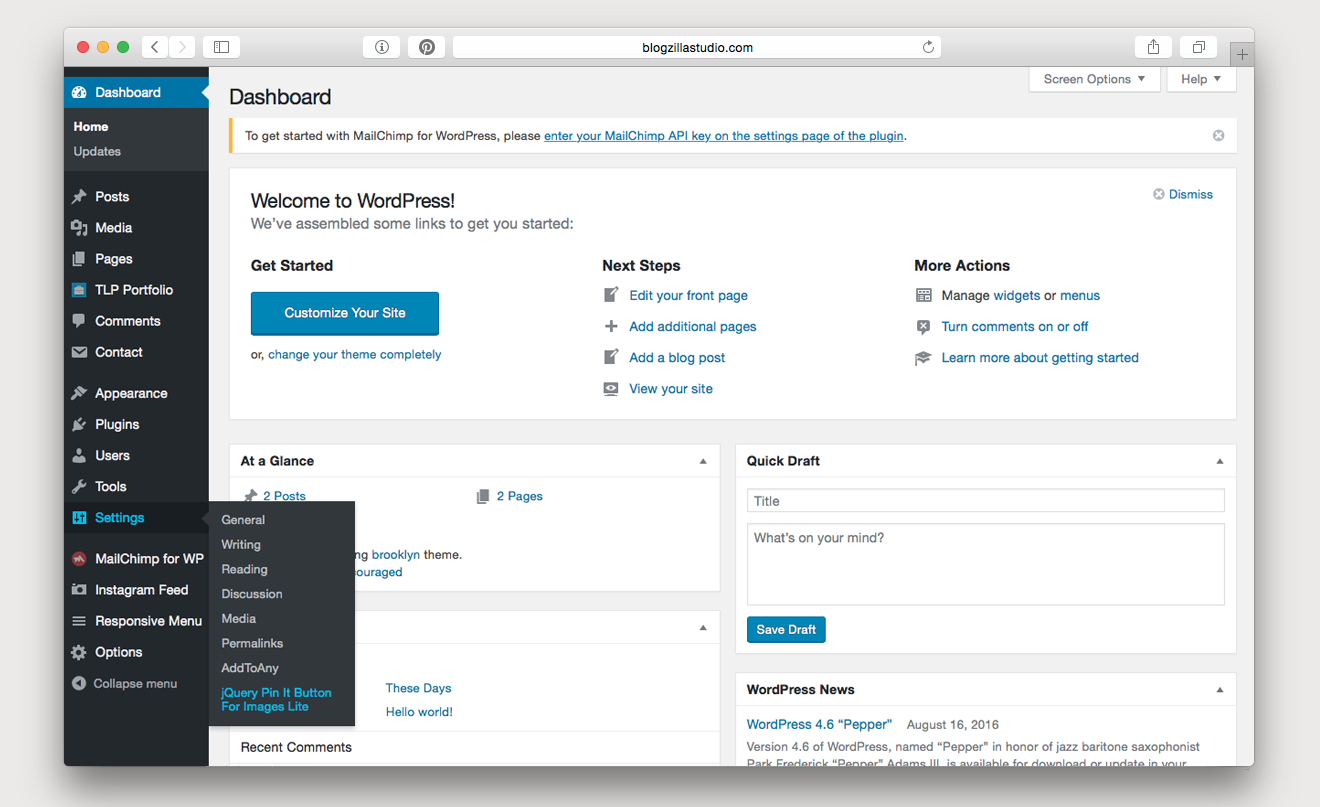
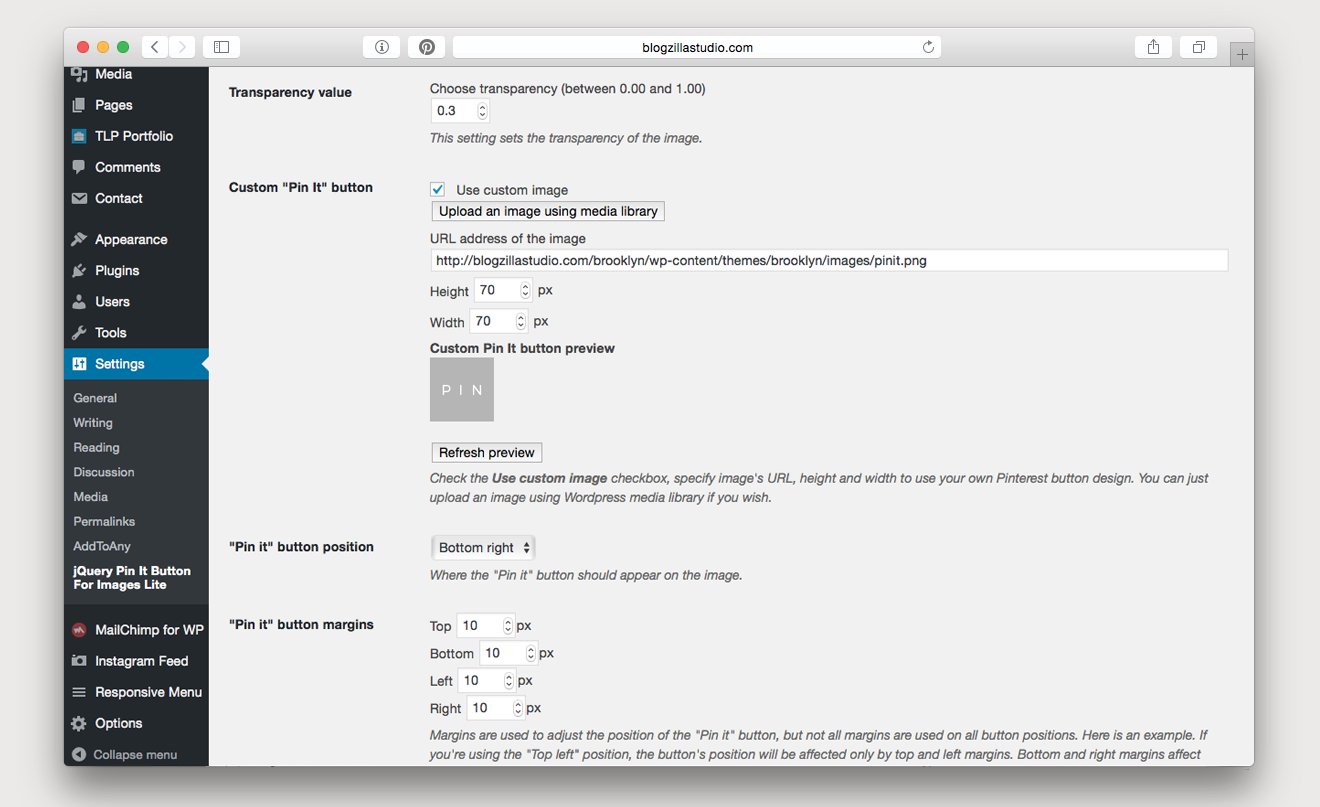
the brooklyn theme comes with a pinterest hover button that you can add and customize to your liking. first, you will need to install and activate the recommended plugin jquery pin it button for images. then, navigate to settings, and jquery pin it button for images lite. you can modify these settings however you like, but to have a pinterest button like the one featured on the brooklyn sample site, please choose the following settings under the visual tab (all other tabs should be left at default values):
show button: on hover
description source: page title
linked page: checked
pin linked images: unchecked
transparency value: 0.3
custom “pin it” button:
- check “use custom image“
- URL address: https://blogzillastudio.com/brooklyn/wp-content/themes/brooklyn/images/pinit.png
- height: 70px
- width: 70px
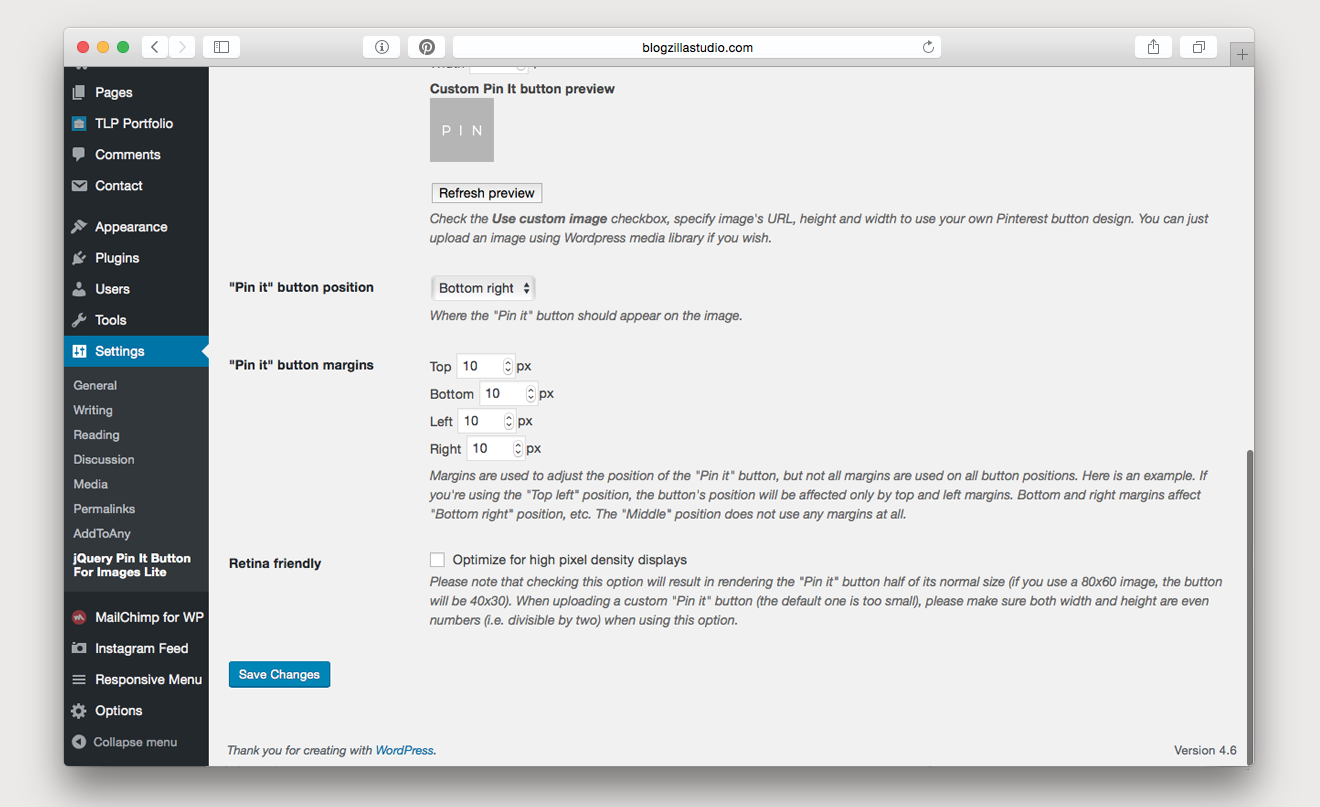
“pin it” button position: bottom right
“pin it” button margins: 10px for all
retina friendly: uncheck
Instagram Feed
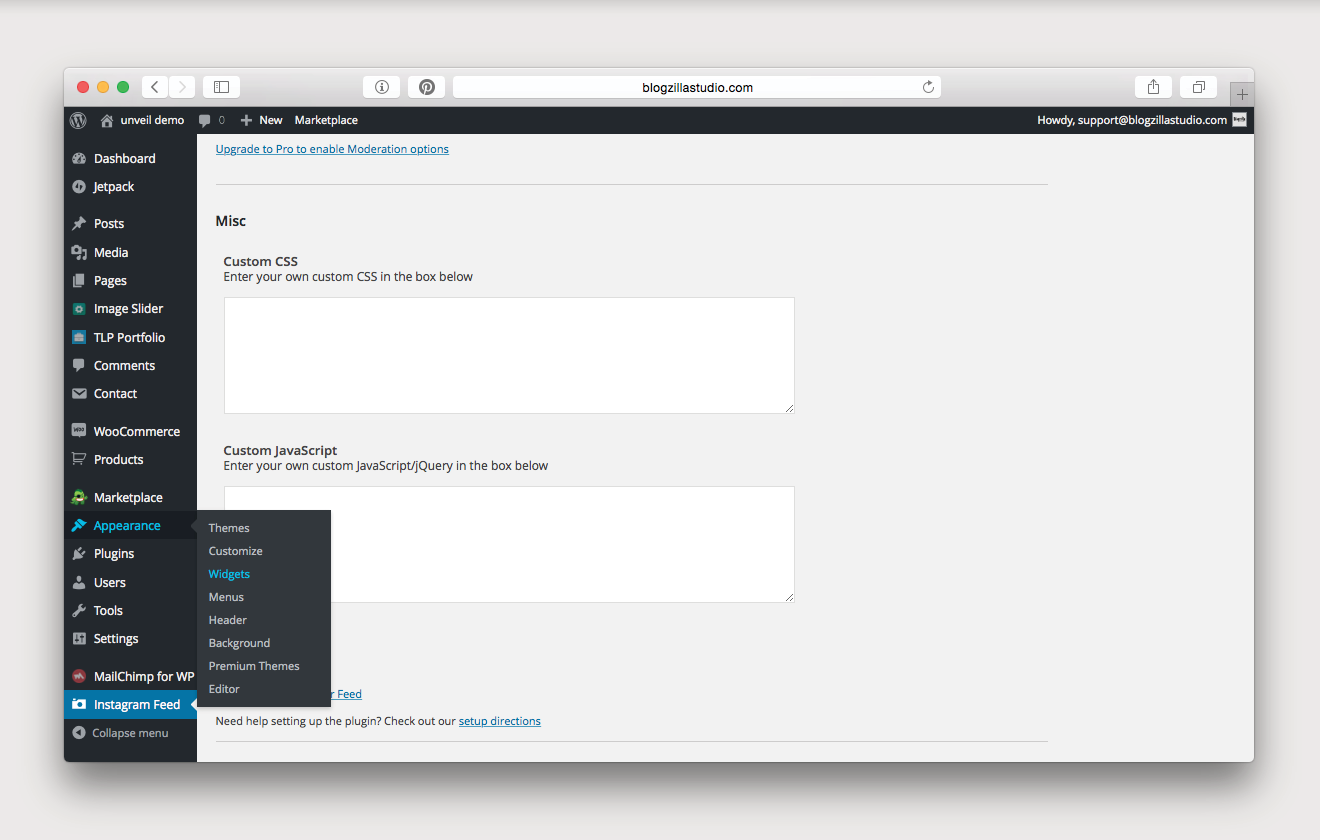
if you would like to feature your instagram feed on your footer, you must first download one of our recommended plugins: instagram feed.
once installed, you will need to connect it to your instagram account. click instagram feed, and then select log in and get my access token and user id. follow the instructions.
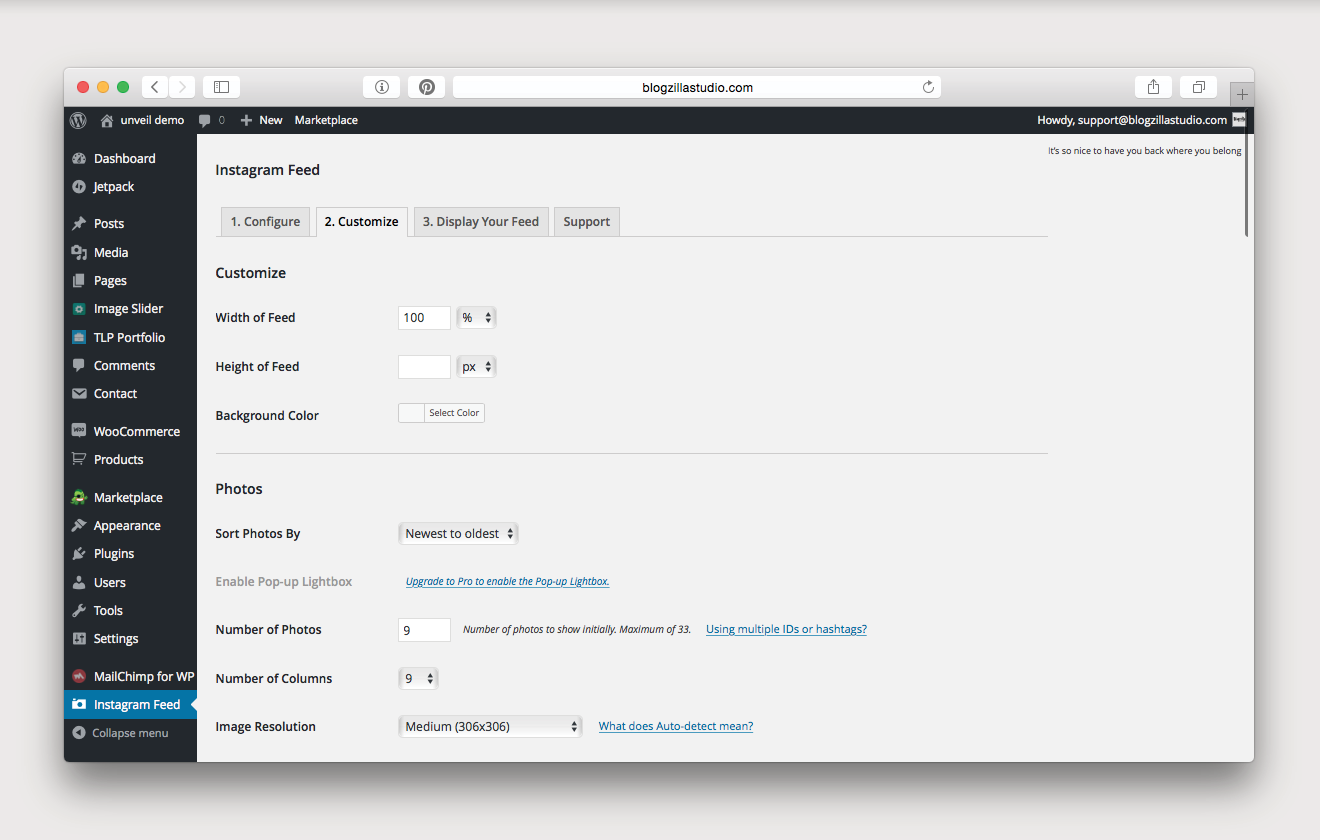
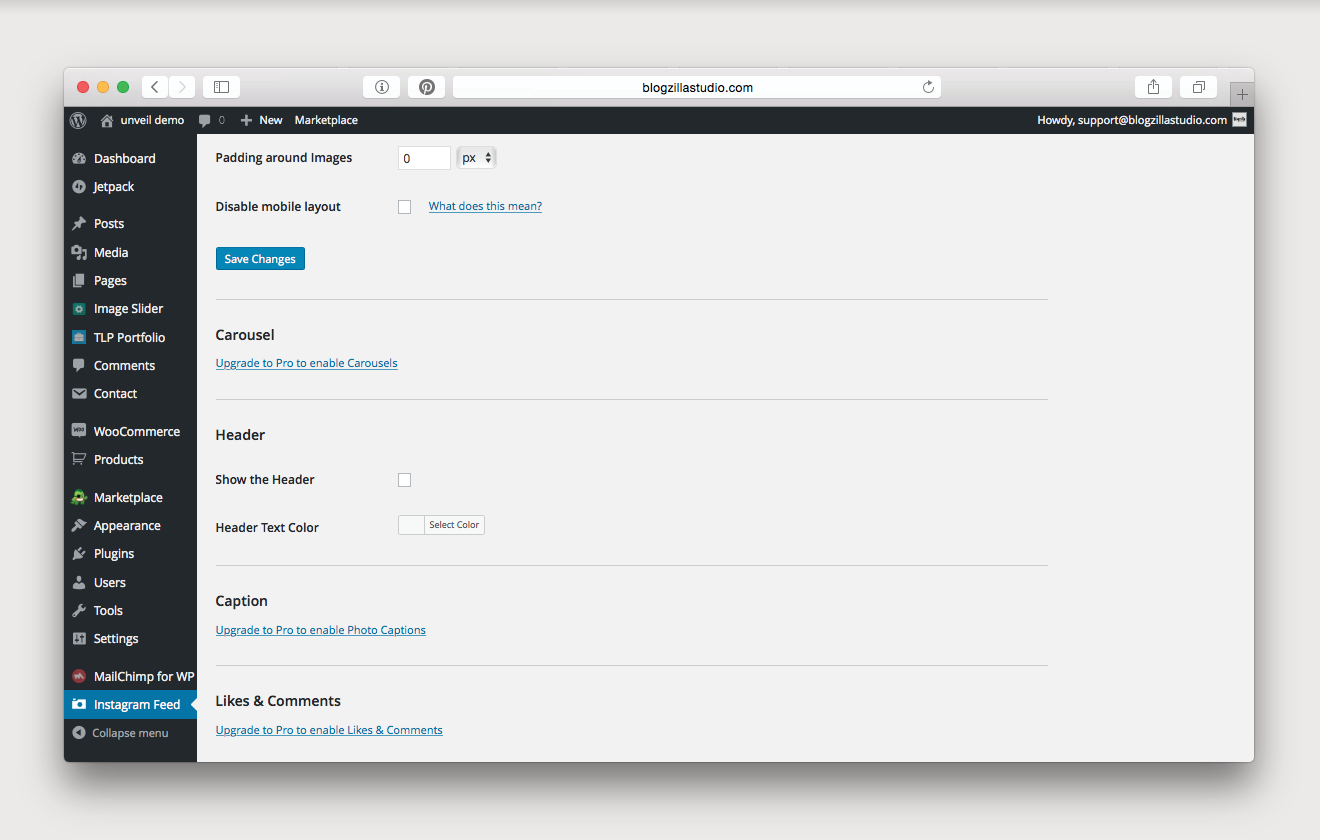
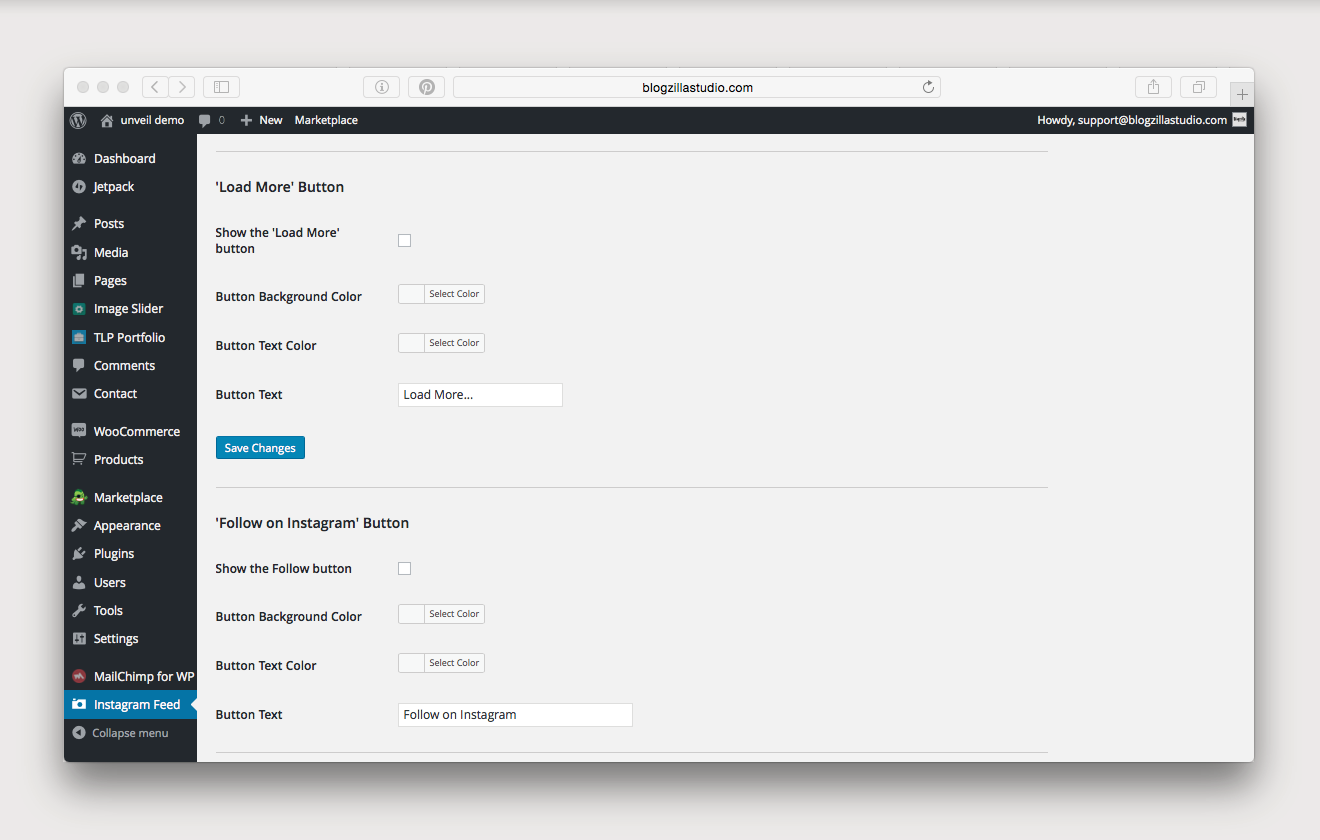
once you are connected to your account, click customize and set up the following settings:
width of feed: 100%
height of feed: leave blank
number of photos: 9
number of columns: 9
image resolution: 306 x 306
padding around images: 0px
show the header: deselect
show the load more button: deselect
show the follow button: deselect
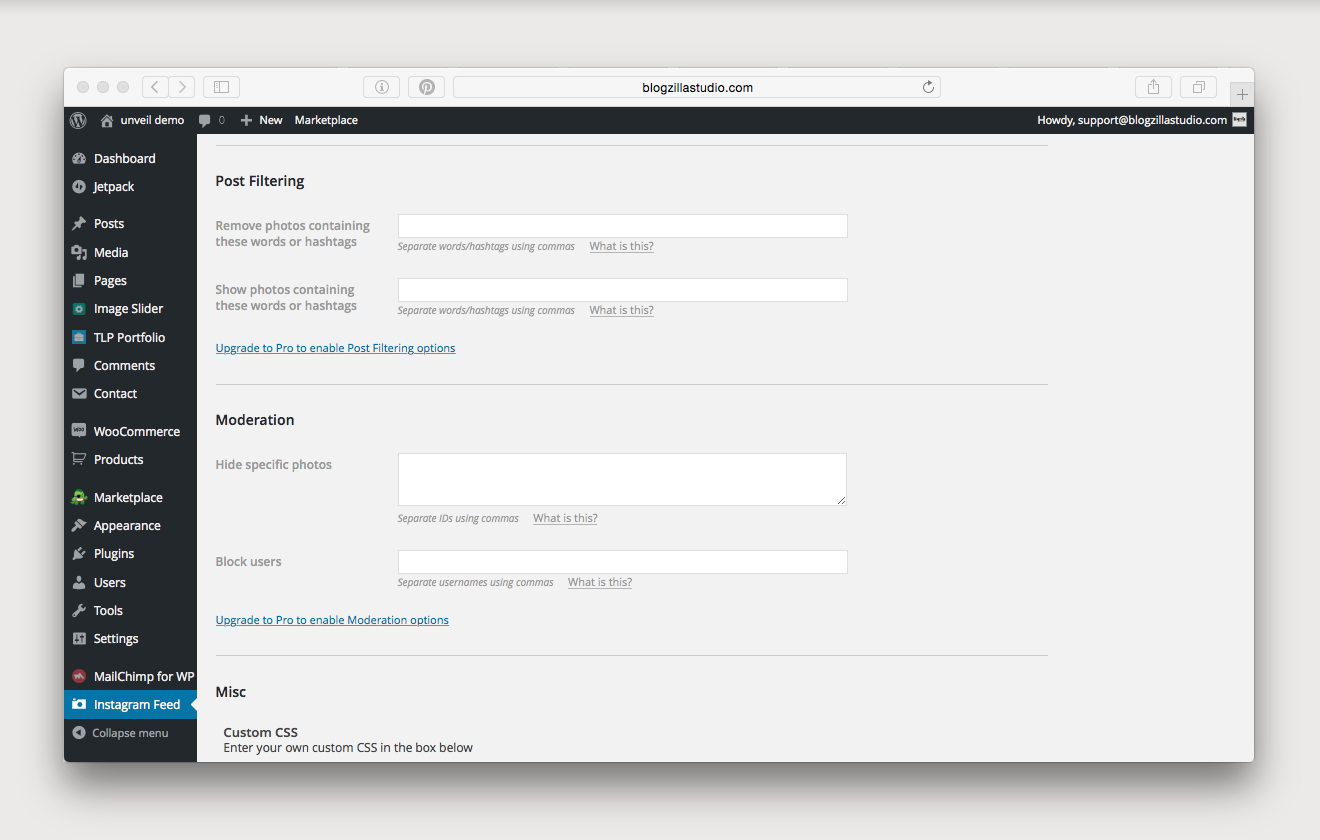
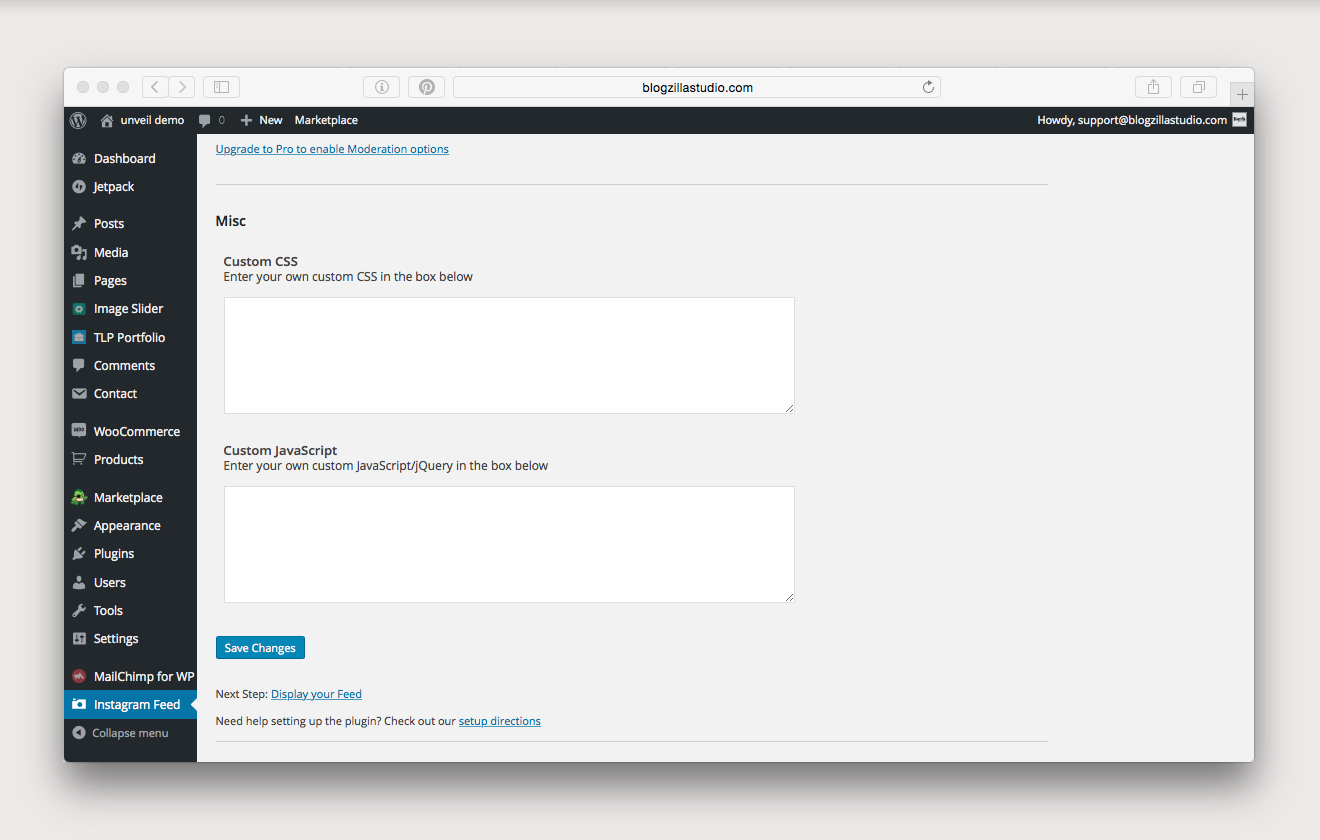
the rest can be left as is.
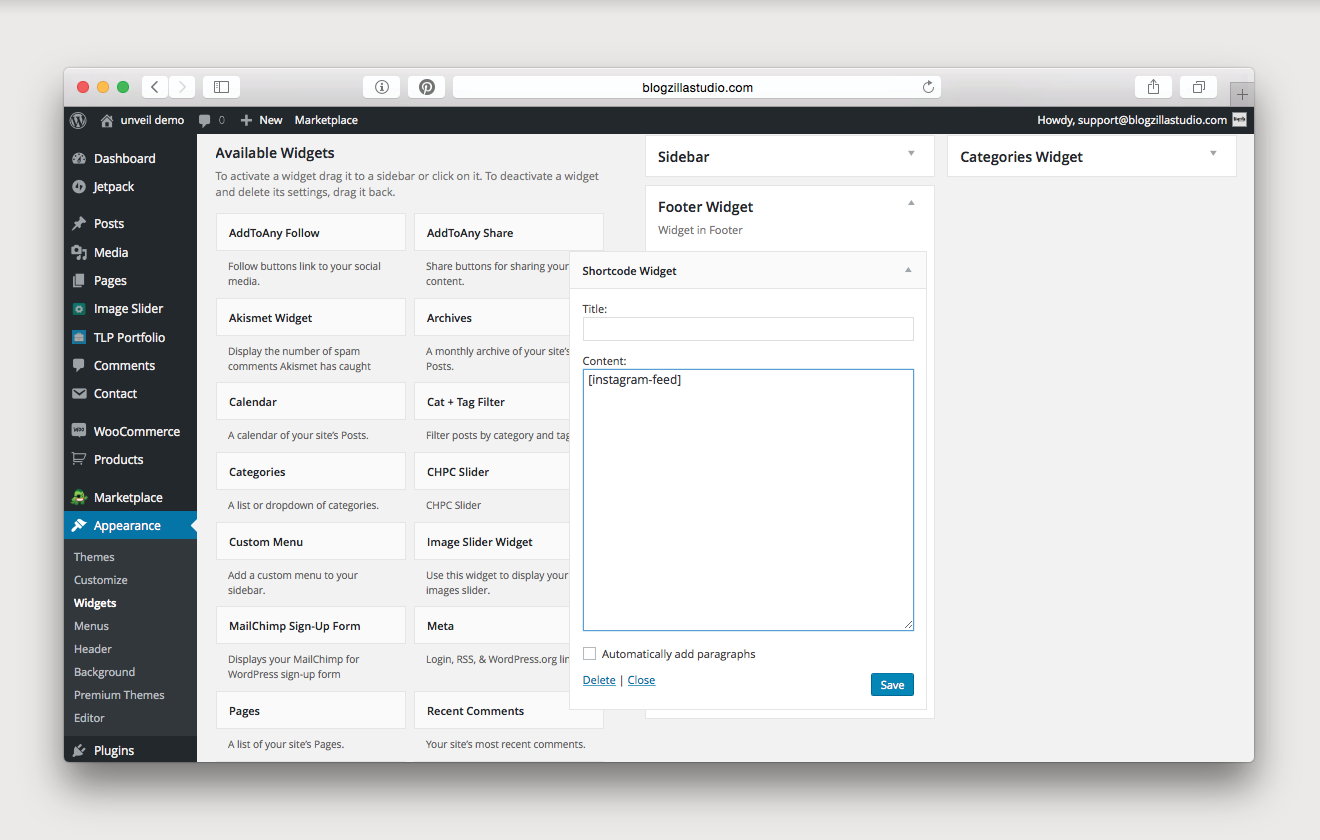
next, navigate to widgets. add a shortcode widget to the footer widget and add the following code:
[instagram-feed]


